Showing posts with label easy. Show all posts

Thursday, January 19, 2012

Reuse Last Year's Planners and Calendars!

What do you do with your old planners, schedule books, and calendars? I have one wall calendar, hanging by my desk, where I write down all of our plans and milestones. I save that one in a file box. It's kind of like a record of all of the things we did that year. I also have a planner that I use to keep track of blog posts and gardening (like when I planted the peas and when I picked the first tomato.) My husband has a day planner that he keeps all of his scheduled doctor's appointments in. And my oldest, of course, has a student planner that he is supposed to use to keep all of his assignments straight in - he doesn't use it very often... We also receive a few free promo planners in the mail that I usually give to Little Guy to write his "lists" of things to do in - just like Mommy, Daddy, and Brubber do.

At the end of the year, we find that we have these planners and calenders just sitting here. We don't want to throw them out, but what good are they? I'll tell you! You can use them as idea books.
As I was cleaning out my very messy corner of craft supplies, I found the stack of magazines and catalogs that I've been hoarding. Each one had at least one great idea that I wanted to use - a kids' craft, recipe, or DIY project. I really didn't have anywhere to put all of these magazines and, heck, I didn't even know which idea I was saving each book for just by looking at the cover. So, Little Guy and I went through each one and cut out all of the good ideas that we wanted to make someday.
Most of the time, I could just cut out a photo from the magazine or catalog and that would be enough. I don't really like following step-by-step instructions for things that are creative. Instructions make me feel as if I'm doing it wrong if I veer from the "rules" that have been set down. Plus, I tend to read the "Supplies Needed" list and, if I don't have one, I'll skip the project until I do have everything. By just having a photo of what I want to make, I can use my own imagination to figure out how to go about creating the item and which supplies we can use.

So, we spent a couple of afternoons just flipping through those magazines and catalogs, cutting out pictures of things that looked like fun. Now we had a pile of clippings. How was I going to keep them in some kind of order without losing them? As I pondered, hubby came through with his old planner and asked if he could throw it away (See how I have him asking about throwing things out? He's learned not to toss anything into the trash can before asking if I need it for something. Even banana peels are saved here - they add LOTS of potassium to the garden soil!) His asking me at that particular time was perfect - I could use the planner for the clippings!

I arranged the clippings into piles for each month - snowy/winter crafts for January, hearts and lovey crafts for February, etc. When he awoke, we got working on our books. His job was to put a tiny dot of glue onto each cut-out and place it on the planner page for the corresponding month. My job was to hand him the clippings, suggest a good place to glue the clipping (overlap can happen in an instant with an excited little guy!), and help turn the pages of the planner. Now we have our "Idea Book" to look at whenever we're feeling crafty. We can just open it up to the current month and choose from the pictures.


I also used planners for recipes and DIY projects. The recipe book was made from a planner that had an entire page for each day. There are many more pages in that book so I could clip the entire recipe (no, I can't just look at a picture of food and figure it out! LOL) and have room for more. Stew, soups, and other hearty, stick-to-your ribs recipes are glued into the winter months' pages. Quick, warm dinner ideas are in the November and December pages for those days when we're busy with holiday-related activities and there just isn't time for big, complicated dinners. And, of course, I have light, cool dishes in August; and I've got picnic-type recipes stuck to the June and July pages. Birthday cake ideas are now easy to find by turning to the months for everyone's birthdays.

My DIY book is separated by the seasons, rather than months. I simply took a marker and drew a border around each page for each season - blue for winter, green for spring, red for summer (hey, it's hot out!), and orange for fall. The times of year that each project would best be done is where I glued those clippings. So, I have a really neat indoor seed starter idea pasted on a green page. And there is a pretty wind chime made with dried leaves in the orange section. See what I mean?

I have more ideas for making other books:
  • I'm going to start looking for homeschooling ideas next, since Little Guy is getting to the right stage to start more learning activities. 
  • My oldest keep magazines for drawing ideas that he has seen in them - I think I could persuade him to cut the ideas out and recycle the magazines.
  • My husband takes a zillion different medications. He also collects old PDR's. I wonder if I could get him to cut the drug info and photos for each thing he takes and glue them into an old planner? It sure would take up less space than 6 old PDR's (have you seen how big they are?!). Plus, he'd have a little book to take to doctor's appointments, showing exactly what he takes. He could even pencil in the amounts and frequencies of each medication. I know that, if he ever keeled over, I'd have a list of meds to take to the ER with me for easy reference for the ER doctors.
I'd love to hear your ideas of books these used-up 
planners and calendars could be re-purposed into. 
What kind of clippings would YOU glue into an old planner???

Wednesday, January 18, 2012

Better Living with OATS! {4 Great #Recipes}

My family costs an arm and a leg when it comes to breakfast. No, I don't cook pancakes, bacon, sausage, and eggs every morning. I don't buy fancy pastries or anything like that, either. Breakfast around here consists of two choices: cold cereal or oatmeal.

I used to buy the "good" cereals. You know, the organic, whole-grain stuff? I stopped when the price went up to $4 for a small box. I moved on to the name brand healthy stuff in the regular cereal section. It still cost more, but I wanted cereal that was good for my family and with an ingredients list that didn't read like a chemistry book. Then, my oldest hit a growth spurt that hasn't slowed. In fact, it's gotten worse by the day. The kid was putting away a box of cereal and a gallon of milk a day! I resorted to the cereal that comes in bags and has names like "Fruity O's". It was the only way I could keep the kid full without starving the rest of us.

There had to be a better way to feed this kid. I mean, he's growing at an alarming rate. All of the food he puts into his body is being used to its fullest potential. I really didn't want the makeup of his body (for the rest of his life!) to be based on Fruity O's ingredients! I decided to go back to the fancy healthy cereals I was buying in the first place, only I wanted to make them myself. I knew that the proper ingredients for growing a man would be in the granola and it would fill him up much faster and for much longer and using a much smaller amount.

And then there was the oatmeal problem. Since he could feed himself with a spoon, Little Guy has been eating oatmeal for breakfast every day. At first, it was organic baby oatmeal. Then he moved up to Better Oats instant oatmeal. (The stuff is fantastic, by the way!) Now, I rely on instant oatmeal in the morning for him. I usually mix it with hot water for him, then set it on the counter to soak up the water and cool while I get that first pot of coffee brewing. By the time I pour my cup of coffee, his oatmeal is ready, and we quietly wake up at the table together - him with his oats and me with my cup of coffee.

Then my husband, who always had sworn off oats as "yucky" decided that he really liked Little Guy's Better Oats. He started eating two packages at once a couple of times a day for a snack. Do you have any idea how much those things cost?! And there are only 5 packets in a box! The last straw came when, for the third time in a week, I went to make Little Guy's breakfast and there weren't any packets left - just an empty box. ARGH!!! I started hiding Little Guy's breakfast in weird places so hubby wouldn't eat it all - at one point, I had four boxes of oatmeal in my underwear drawer. I was inspired by THIS POST to create my own instant oatmeal packets. This way, hubby can eat as much as he likes and I know that Little Guy's breakfast won't disappear!

So, here are some of the recipes I've come up with. At the very bottom of this post, I'm linking to the recipes that have inspired me or that helped me get the ingredient amounts and cooking processes figured out. I suggest that you check those link out because they may prove to be very helpful!

Instant Oatmeal Packets
  • 3c. whole rolled oats
  • instant baby oatmeal (if you like thicker oatmeal)
  • non-fat dried milk
  • flax seed
  • wheat germ
  • brown sugar
  • dried fruit, coconut, sunflower seeds, nuts, whatever you want
  1. Put the oats, 1 cup at a time, into the blender and process using the ice crush setting on pulse. If you don't have this, just turn the blender on and off. Pulse 5-7 times, until it looks as if the oats have all been cut at least once. Kind of hard to describe now that I'm trying! Empty the blender canister into a bowl after each session.
  2. Divide your oats into sandwich bags, 1/4 to 1/3 cup per bag. It just depends on how large a serving you or your kids will eat. Little Guy just moved up to 1/3 cup... must be growing again! Now, you don't have to use sandwich bags for this - small plastic containers or even glass jars would be great. I don't happen to have those. I reuse the plastic bags when I make more instant oatmeal, anyway. I just have my husband and son put the emptied bags into a re-purposed coffee can on the counter.
  3. Into each bag, measure: 1 Tbsp. baby oatmeal, 1 Tbsp. dried milk, 1 tsp. flax seeds, 1/2 Tbsp. wheat germ, 1 Tbsp. brown sugar. Add the goodies! I put about 2 Tbsp. dried fruit (freeze-dried fruit works well, too) and 1 tsp. sunflower seeds into Little Guy's because that's what he likes.
  4. Seal all of the baggies and then get the kids into the kitchen to help you. The ingredients in the bags need to be mixed up, particularly the brown sugar. If you don't mix that up, it'll end up becoming a rock of brown sugar that won't dissolve!
  5. To make oatmeal my way: Heat up 1/4 c. of water to boiling or near-boiling. Empty oatmeal packet into a bowl and pour hot water over it. Stir well and let sit for about 5 minutes (just long enough to get the coffee pot going!) Stir once more and add honey to taste.
  6. To make in the microwave: Cereal in bowl, 1/4 c. water mixed in, cook for 30 seconds to 1 minute. You may need to add some more water or a little milk because cooking it this way seems to result in a much thicker oatmeal.

Do you burn granola when you attempt to make it in the oven? Just a little too much heat or cooking time can ruin an entire batch of granola. The burnt flavor permeates every oat. And the ingredients in this stuff are too expensive to just toss when it burns. After my first experience of making (and burning) granola, I've been hesitant to try again. Until I learned you can make it in the crock pot. Now, using a crock pot to make granola doesn't mean you're exempt from burning! You still have to keep an eye on it and stir often. But, if you have different heat settings on your crock pot, you can relax a little.When I know I'll be busy and won't remember to stir, I turn the crock pot to "warm". When I'm in the kitchen cooking or cleaning and can be right on top of the granola, I set it to "high". And, when I'm on the computer or just hanging out with the kids, I put it on "low".

I have 1 7qt. crock pot. The amounts listed in the recipes fill it about 1/2 way. This gives me plenty of room for stirring without making a huge mess. If your crock pot is smaller, try cutting down on some of the ingredients. These recipes do not need to be followed exactly as written. If you don't like sunflower seeds, omit them. If you'd rather use coconut oil instead of butter, go for it. Just make sure the flavors of the things you add will meld together well. You don't want to use a strong-flavored olive oil, for instance. And don't add melty things (like chocolate chips) until after the granola is made and cooled. You'll just wind up with a huge mess if you add them before cooking!

Now, I made two batches of granola. My first batch failed the family taste test. First, I didn't add any salt. I didn't even think of adding it. When my husband and oldest said it was "missing something", it was the only thing I could think of. Salt brings out the flavor if the other ingredients, and you really don't need much of it for that boost. Second, it wasn't sweet enough for them. They tried adding sugar, honey, and brown sugar on top of the cereal, but it made it "taste funny". These guys are used to the colorful cereals in boxes on the store shelf, so I can see where it would be a problem for them. I used the first batch to make chewy granola bars (recipe below) and then changed some of the ingredients and amounts in the second batch (last recipe on this post), which they both love.

Crock Pot Granola #1 
(The not-so-sweet version)
  • 5 c. rolled oats (not instant or quick-cooking)
  • 2 Tbsp. flax seeds
  • 1/4 c. raw sunflower seeds, unsalted
  • 1/4 c. flaked coconut (I used sweetened, you don't have to)
  • 1/4 c. slivered almonds (get the ones that still have the brown husk - it's way healthier!)
  • 4 Tbsp. wheat germ
  • 1/4 c. EACH: finely chopped pecans and walnuts
  • 1/2 c. honey
  • 1/2 c. melted butter, unsalted
  1. Mix all of the dry ingredients in your crock pot.
  2. Melt butter and pour it and the honey over the granola mixture. Fold together with a large spoon until everything is coated well.
  3. Turn crock pot on LOW. You want to cover the crock pot to keep the heat in, but you also need to leave it vented so the moisture can escape. I just leave my wooden spoon in the crock pot. It sticks out enough to hold the lid off enough for venting. You could also use chopsticks or simply put the lid n askew to leave an opening. If you notice a lot of condensation inside the lid, you need to leave a larger opening. 
  4. Stir every 20 to 30 minutes. Make sure you are getting into the corners, sides, and bottom of the crock. Make sure to stir it thoroughly each time. The parts of the granola that are touching the crock will, obviously heat up faster and are more prone to burning. (If you have it set to high, stir every 5 or 10 minutes. Set to low? Stir 30 to 40 minutes.)
  5. Keep an eye on the color of your granola. It can take anywhere from 2 to 4 hours to cook, depending on your heat setting. You'll know it's done when it's a nice golden brown. Don't base doneness on how crisp the cereal is. Cooling time will make it crunchier.
  6. Pour granola onto a baking sheet (or two, depending on how quickly you want it to cool) and spread evenly. Let cool for 30 to 45 minutes. You want to make sure it's completely cool before putting it away.
  7. I keep my granola in gallon-sized food storage bags. Just like with the instant oatmeal, I reuse these bags over and over. You can use whatever you'd like to store your granola. Just make sure it's airtight. And, as I said above, make sure it's completely cool before packaging it. If it's still warm, it can still have moisture in it. Putting warm granola into an air-tight container will result in soggy granola and it will spoil quickly.
  8. To serve: Just pour into a bowl, add a little milk, and munch away! You can also heat it up a little in the microwave. I love eating slightly warmed granola. Add to yogurt, top muffins with it, whatever you like!

It took me a lot of searching to understand how to make a good chewy granola bar. There are millions of recipes for them, but I wanted a particular texture. I like the texture of the Quaker Chewy Granola Bars. Toothy, a little crunch, easy to pull apart, won't crumble into a bunch of little pieces that I have to vacuum up. There were a lot of chewy recipes that called for flour, eggs, baking soda... To cake-like for me. Then there were the ones that relied on corn syrup. I'm not going into the corn syrup debate here, just know that I like to keep away from the stuff. I finally found a handful of recipes that use sweetened condensed milk. I checked out the ingredients list on the can I had in the cupboard (for years!), and this is what it had to say: Milk, Sugar. That's it. I don't know what kind of sugar, I still have to look it up.Anyway, it passed my requirements - for now.

The recipe below was made using my Crock Pot Granola #1 recipe. If you don't want to go through all of that, you can just mix 4 cups of oats and 3 cups of dried fruits and other add-ins together for this. You're going to want to toast them until they're brown. You can just mix them together, put them on a baking sheet, and pop them into a 200 F oven (stirring very often) until they start to brown (about 15 minutes or so?)

Chewy Granola Bars
  • 7 c. Crock Pot Granola #1 (see the paragraph above if you don't have any)
  • 1/4 tsp. Kosher salt (optional, use less if you use table salt)
  • 1 can (oz.) sweetened condensed milk (make sure your can does NOT say: evaporated milk!!!)
  • 1 c. chocolate chips (Optional - I added them for the kids)
  1. Heat oven to 325 F. Line a jellyroll pan (baking sheet - 15"X10"X1") with parchment paper. You could also spray, butter, or oil the pan. However, I found that this can leave the bars somewhat greasy. Plus, using parchment allows you to lift the baked bars out of the pan and onto a flat surface for easier cutting.
  2. Mix all of the ingredients together very well. Fold and fold and fold until every bit is coated with the milk.
  3. Pour the mixture onto the pan and press it down firmly. This is important because if you don't have it all packed tightly, the bars will fall apart on you. Now, this part can be very sticky. I usually coat my hands in oil (avoid strong-flavored oils) to keep the stickiness down a little. I've also found that you can lay a sheet of waxed paper or parchment over the top of the granola and the use a rolling pin to press it all down. I just hate wasting the paper for that one job, you know?
  4. Bake for 15 to 20 minutes. Because my oven's heat is not evenly distributed, I rotate the pan halfway through cooking to even out the baking.
  5. Let cool for 5 to 10 minutes.
  6. Cut into bars. You must do this while it is still warm. You don't have to separate the bars just yet. But, if you don't cut them now, you will find it near impossible to cut them. I can get 24 bars that are approx. 2"X3.5" - the perfect size for my family's snacking needs.
  7. Let cool completely. Completely. This is going to take about 30-45 minutes, maybe more. As with the granola, you need to make sure these aren't holding any moisture before wrapping. 
  8. I wrap my bars individually using small pieces of plastic wrap. I do this because these bars are often grabbed by my oldest as he's on his way out the door. You can just put them into a food storage container, if you prefer. Just make sure the layers of bars are separated by waxed paper or something else because they will slowly meld together into a gigantic hunk of granola bar (trust me - I know this one!)

And, finally, here's my granola recipe that passed muster with my oldest and my husband. It is very sweet and crunchy. I've just copied and pasted the instructions from the Crock Pot Granola #1 recipe above, since the procedure is the same. Any changes I have made in the instructions below are in italics. I also added some pumpkin seeds to this one. I didn't have them when I made the first recipe. Oh, and I only had 4 cups of oats left, so that's what I used. I'd have put in five if I had them.

Crock Pot Granola #2 
(The sweet stuff)
  • 4 c. rolled oats (not instant or quick-cooking)
  • 1/4 tsp. Kosher salt (if you use table salt, use less!)
  • 1/2 c. slivered almonds
  • 1/2 c. raw sunflower seeds, unsalted
  • 1/2 c. pumpkin seeds, unsalted and shelled
  • 1/4 c. EACH: finely chopped pecans and walnuts
  • 2 Tb. flax seeds
  • 1/4 c. wheat germ
  • 1/2 c. flaked coconut
  • 1/2 c. dried cranberries
  • 3/4 c. honey
  • 1/2 c. melted butter
  • 1/4 c. dark brown sugar, packed
  1. Mix all of the dry ingredients in your crock pot.
  2. Melt butter and mix in the brown sugar. It won't completely dissolve the sugar, but it will make it easier to make sure that the sugar is evenly dispersed throughout the granola. Pour butter mixture and honey over granola mixture. Fold together with a large spoon until everything is coated well.
  3. Turn crock pot on LOW. You want to cover the crock pot to keep the heat in, but you also need to leave it vented so the moisture can escape. I just leave my wooden spoon in the crock pot. It sticks out enough to hold the lid off enough for venting. You could also use chopsticks or simply put the lid n askew to leave an opening. If you notice a lot of condensation inside the lid, you need to leave a larger opening. 
  4. Stir every 20 to 30 minutes. Make sure you are getting into the corners, sides, and bottom of the crock. Make sure to stir it thoroughly each time. The parts of the granola that are touching the crock will, obviously heat up faster and are more prone to burning. (If you have it set to high, stir every 5 or 10 minutes. Set to low? Stir 30 to 40 minutes.)
  5. Keep an eye on the color of your granola. It can take anywhere from 2 to 4 hours to cook, depending on your heat setting. You'll know it's done when it's a nice golden brown. Don't base doneness on how crisp the cereal is. Cooling time will make it crunchier.
  6. Pour granola onto a baking sheet (or two, depending on how quickly you want it to cool) and spread evenly. Let cool for 30 to 45 minutes. You want to make sure it's completely cool before putting it away.
  7. I keep my granola in gallon-sized food storage bags. Just like with the instant oatmeal, I reuse these bags over and over. You can use whatever you'd like to store your granola. Just make sure it's airtight. And, as I said above, make sure it's completely cool before packaging it. If it's still warm, it can still have moisture in it. Putting warm granola into an air-tight container will result in soggy granola and it will spoil quickly. The granola will be chunked together in this recipe after cooling. You can break it into whatever size pieces you prefer.
  8. To serve: Just pour into a bowl, add a little milk, and munch away! You can also heat it up a little in the microwave. I love eating slightly warmed granola. Add to yogurt, top muffins with it, whatever you like!
 Inspiration and how-to links:
Homemade Granola at Simplify, Life, Love
Granola at Crock Pot Recipe Exchange
Homemade Oatmeal Packets at The Frugal Girls
Homemade Chewy Granola Bars at Framed Cooks

Enjoy! 
I'd love to know what ingredients you like in your granola. Do you add anything to give it some UMPH, or to make it super healthy? Oh, and I would love any ideas you might have for wrapping the granola bars individually without making a heap of plastic wrap trash. It needs to be disposable because I'm not about to send my oldest out of the house with a $7 reusable snack bag that will inevitable get lost!

Thursday, January 12, 2012

Moss Terrariums {Crafty Science!}

I have been wanting to make a terrarium since I first saw them on Etsy, at the end of last summer. I vaguely planned to make them as Christmas gifts, then got caught up in back-to-school & Halloween. Suddenly the holidays were upon us and it was too late. I figured we'd do it as one of our spring projects. Until I was gazing out the window, checking out the squirrels and birds, when I saw this:
 See that lovely patch of green between the dying grass and the fence? It's moss! With the weather being so mild, and even warm on some days, the moss has been "living" it up. I kept my eye on it for a few days and then I just couldn't contain myself any longer. I dressed Little Guy for a nature walk and tossed a few plastic bags and spoons into a tote and we were off to collect things for our terrariums. In January. In Michigan. (Yes, I'm going to keep saying that. I am still amazed at the weather and will continue to be awed until there is 6" of snow on the ground and the temperatures have stayed below 30 F for at least a week!)
Once he finished running around like a nut, we got down to business. It was time to walk very slowly and see if we could spy any moss growing. Once we found a good patch, we collected some of it. Now, when you look for moss for this project, make sure of a few things:
1) Only take a little from each patch and leave the rest to regenerate.
2) Use a spoon or spatula to carefully lift it from the ground. It's pretty hardy stuff, but you want to make sure to lift the entire plant - including its root system.  
3) Don't forget to get some soil from the same area, preferably from directly under where the moss was growing. We found three different types of moss on our outing and each one had a very different type of soil beneath it: One had mostly rocky, sandy soil; one had a soil that was composed mostly of dead grass; a third had very rich soil that was mostly composed of what Little Guy refers to as "worm poops".
4) Take note of how moist the soil below the moss is. You are going to want to try to mimic that amount of moisture in your terrarium.  
5) Also be on the lookout for some nice-looking small pebbles and a few sticks or pieces of tree bark that have signs of moss or mushrooms (or, what Little Guy calls "fun guys") on them. We found a stick with some white "moldy" spots on it, a piece of bark from a tree stump with a mushroom, and bark from a dormant tree with green spots. We're excited to find out if anything sprouts from them!
Now, I want to tell you that you can use nearly anything to make your terrarium. I learned quite a bit from Storm The Castle. (This is THE coolest site for finding really neat things to do, by the way. Go bookmark it right now. I promise you'll use it. Repeatedly.) We used two different things for our terrariums: old honey jars and a plastic cake carrier that someone gave us a store-bought cake in for our terrarium containers. But, really, as long as it is see-through and has a lid or small opening, go for it: aquarium with a crack in it, glass vase, 2-liter pop bottle... Just remember that you're going to have to be able to get stuff into the container and arrange it! (Storm the Castle has a great tutorial on how to make really long tweezer-type thingies from a wire coat hanger so you can reach. I told you that site is great!)


Start by laying down the dirt you collected. Because the cake carrier is near-impossible to open without really jostling whatever is inside, I knew that we wouldn't be able to open it up to add water very often. So, I took a plastic lid that is about 1/4" deep and placed some cotton into it (the white rectangle on the left of Little Guy in the photo). I put this in the center of the cake "plate" before adding dirt. After we got the soil in place, I poked a small hole in the mound above the cotton-filled lid and poured some water into it, as well as all over the rest of the soil. My reasoning for the cotton was so it would hold a layer of moisture without saturating the soil. Don't know if it will matter in the end, or not. Just my theorizing!

(After I took the photo above, I noticed that pieces of dirt and rocks were falling into the area where the dome part of the cake carrier would fit into the bottom. So, I tore up a piece of paper towel into strips and poked them into that area to keep the debris out. You can see the paper towels in the photos below. Keep this in mind while you do the next part!)

So, where was I?! Oh, yeah: add your soil. Make sure to keep track of which soil is added where if you're using different mosses with different soil needs! Pile it up so you have a nice hill if your base is a flat piece like out cake dome has. If you're using a bottle-like container, try using a funnel to direct the different soils to different areas and attempt to get a mound going in there. This is important because, if you ever really look at the lay of the land that your moss is found on, you'll notice that it is usually on an inclined surface, even if it's only slight. Make sure to save some of the soil for later - you're going to need it to fill in spaces between the moss. Once you have your mound of soil, ever so slightly pack it down and moisten it. I just poured a little water onto the cake plate, I used a spray bottle of water for the honey jars.

Now it's time to add the moss! The pieces we had were rather large chunks, so I showed Little Guy how to gently pull them apart into small pieces. I had him decide where to place it. He loved being in charge of this part of the operation! It took forever for him to decide. He kept putting a piece down, turning it a little... moving it to the left, to the right... Sometimes he completely abandoned a piece in favor of a different one. It was really cool to watch him!

Once the moss was in place, I carefully added the reserved soils in between the pieces of moss. Then it was time for Little Guy to add the embellishments we collected. Now, I considered grabbing some tiny "guys" toys and a couple of tiny cars to include in the terrarium, but though better of it. Just before I went digging through the toys, I had a very disturbing vision: Little Guy attempting to recover his toys. Dirt everywhere. Terrarium ruined. Now, if your kids are cool with using toys inside, go for it. I think it would be pretty cool to create a scene with them. Just make sure that whatever you add to your terrarium will be able to withstand the high levels of moisture that it will encounter. Also consider whether it might give off any toxic fumes when wet or warm. The cute little plastic bunnies you add could end up killing all of the living things in there.

I think that I probably added too much moisture to our cake dome terrarium. Since opening and closing it just isn't an option, I have a back-up plan. If I notice that the dome is constantly coated in water droplets or the mosses or fungi start dying, I am going to poke small holes in the top of the plastic dome. This can be done very easily without marring the view: Just take a small nail or even a thick sewing needle and hold it with a pair of pliers over fire (a lighter or the burner of a gas stove.) Um... make sure your pliers are insulated or you're wearing an oven mitt! It doesn't have to get red hot, just hot enough to melt the plastic. Then, poke small holes through the dome, toward the top. This should allow enough moisture to escape without completely drying it out.

Our Finished Products:


This was such a fun and easy project to do. While we worked on it, we had some great conversations about ecosystems, habitats, what plants need to grow, what kind of rocks we were using, the water cycle... We also pondered the possibility of small insects, seeds, and spores being mixed into the soil we used. I'm anxious to see if any surprises grow in our terrariums.

I have another plastic domed container that has been sitting on top of my refrigerator since last spring. I've known it would be great for some use, but was waiting until I was inspired with an idea to use it. This thing is 18" in diameter! I want to do a similar project with that one. I'm not telling you what it is just yet, so watch for a post. It's going to be a little while, though. I need to have the space for the thing to have a home near a window, so I really need to do some purging of "stuff". One of these days, my husband and oldest will be gone all day. That's the day I call Salvation Army for a pick-up, get out the boxes, and get rid of all of this crap we don't really need! That day is coming soon and I can't wait for it. :)

One more thing: If you like this idea, but don't have the time or desire to make your own terrarium (or if you just don't have a moss supply available to you), you can get there ready-made. One Etsy shop I know of that sells these is 8Days Of Treasures. (You can check out the review I wrote of her shop for the Made in Michigan Blog Hop in October HERE.) Stephanie lives in Michigan and creates some pretty awesome terrariums! She also sells some unique glass containers that you could make your terrarium in, such as vinegar decanters, salt ans pepper shakers, and covered candy dishes.

If you make a terrarium and write about it, 
please leave me a link in the comments. 

If you have an idea of what could be added to a terrarium 
for a cool scene, share it! 

If you have pictures of your terrariums, 
I'd love for you to post them to my Facebook wall!

This post has been linked at:
Preschool Teacher Chestnut Grove Academy Classified: Mom Photobucket

Monday, January 2, 2012

Start the New Year with a WIN! - Tuesday's Giveaway Linkup {1/3}

Tuesday's Giveaway Linkup
Welcome to Tuesday's Giveaway Link Up with your hosts Aimee @ Classified: Mom & Karen @ Tots and Me & Alicia @ McCrenshaw's Newest Thoughts!

This link up will be posted Monday at 7 PM est. and run all week long! Make sure you stop in as often as you can to list your latest giveaways.

Here is how to use the Giveaway Link Up

1. Post your reviews and/or giveaways, as many as you have, be sure to add the end date (family friendly please)

2. Help spread the word about the giveaway link up by grabbing our button, Tweeting or posting on Facebook. (Not mandatory- but it helps get more exposure to your giveaways as well!)

3. Take a moment to enter any giveaway that strikes an interest to you!

If you would  like to follow the three hostesses, we will gladly follow you back! Simply leave us a message to do so.


Thank you for linking up with  Aimee @ Classified: Mom & Karen @ Tots and Me & Alicia @  McCrenshaw's Newest Thoughts! 

Thursday, December 22, 2011

Two-Ingredient Thin Mint Cookies {Last-Minute Homemade Gifts}

O... M... G...
These cookies are AMAZING!!! And, yes, there are only two ingredients. You can literally make a few dozen of these in less than 15 minutes and people will be raving about them! I wouldn't venture so far as to say that these are just like the ones that you can buy in March from little girls dressed in green and brown, but they are close enough (and WAY more affordable!) The flavor is there, but the texture is more delicate.

Now, I don't have a photo of them because, as it turns out, my husband and oldest found my stash and pigged out. No worries, though, you can see a photo HERE, on Vanessa of The Crafty Nest's Pinterest board, where I found this idea. I cannot find her original post on her blog, so I cannot link you directly.

So, here's what you're going to need:
  • A bag of Andes Mints (the original ones)
  • A box of Ritz crackers
That's it.

Now, you can find Andes Mint pieces in some stores. They cost a little more, but you don't have to unwrap a zillion of the mints and they melt faster since they're already broken into small bits. I bought one bag of each kind because I couldn't resist having some of the mint foils on hand for projects. (Hey, free green foil paper! I'm thinking St. Patrick's Day and springtime craft projects!) Also, I didn't try using an inexpensive store-brand cracker. I wanted these to taste just right and wasn't willing to risk it. I'm sure a cheaper box of crackers would work out just fine, though.

Here's what you do:

Over a double-boiler, melt the mints. I made sure to get them good and warm so the excess chocolate would run off easily. Just be careful that you don't over-do it and burn the chocolate - ick! You could probably use the microwave, but I don't care to melt large amounts of chocolate that way. It heats from the inside out and can sometimes get overheated and burn without even changing shape!

Make sure you pull out any broken and flaking crackers from the package (I crumble mine up and keep them in a jar for a quick topping for mac and cheese or other casseroles). Simply drop one cracker at a time into the melted mints, flip it over, then fish it out with a fork. With the coated cracker laying bottom side down, very gently tap the fork to let the excess chocolate drip off. Set the coated cracker on a baking sheet lined with waxed paper or parchment (I use parchment this time of year - less chance of sticking and you can reuse it many times for the same thing.)

You can leave the cookies as they are, or make them look pretty. Since I have my assistant chef helping me all of the time, it was decided that our cookies would be pretty. I gave him several small bowls with different cookie toppings in them: nonpareils, sprinkles (some of you call them jimmies?!), colored sugar, candy cane pieces, etc. As soon as I set a freshly-dipped cracker onto the baking sheet, his job was to decorate it with "just one little pinch" of whichever topping he chose, and sometimes a few of them!

When I finished with a tray, I put it into the refrigerator for about 5 minutes to let the chocolate set up. After I let them return to room temperature, I put 3 to 4 of the cookies, depending on how big Little Guy's pinches were, into a cupcake liner. We put three cupcake liners worth of cookies into a sandwich bag and tied it securely for giving to friends and family. You want to make sure that these are sealed pretty well or the minty flavor will sink into your other baked goods - not very yummy!

Now, I have to go melt some more mints. There are two guys in the doghouse right now who are going to be replacing the cookies they ate last night. See? These are so easy to make that I can actually have them do it on their own!

Wednesday, December 21, 2011

Fizzy Bath Bombs {Last-Minute Homemade Gift}

I originally found the recipe for these on About.com - the place to find articles about anything by anyone! This recipe for the Bath Bombs is based on the one posted by David Fisher, so I'd like to thank him for showing me just how easy these are to make. Really, I've been wanting to try them out for a while now, but they always seemed so complicated and as if they needed a ton of ingredients that were expensive and hard to find. Not true on either! 

Now, I scented my bath bombs with lavender essential oil and dried rosemary from my garden, but you can use any number of scent combinations. Check out this tutorial on mixing essential oils to get the right scent on Easy Aromatherapy Recipes. Just remember: If you use herbs instead of the oils, you'll need to use more. Also, remember that once the herbs rehydrate in the tub, their scent will be stronger! I chose Rosemary and Lavender because I just love how the two blend. Also, I had to buy the essential oil for this and I wanted something that I'd use often. And, once again, don't go all out and buy some expensive and fancy rosemary - get the cheap bulk stuff.

There is one ingredient on the list that I was worried about finding: Citric Acid powder. I took a shot in the dark and visited our local health food store, Health Matters in Monroe, MI, and found that Maurine had it AND it wasn't expensive. I only got a 4 oz. bottle, so I had to halve the recipe on About.com and, of course, I changed it up a little. Here's what I ended up with:

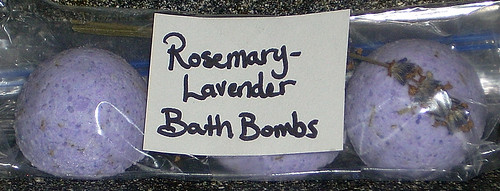
Rosemary-Lavender Bath Bombs

Ingredients
  • 1/2 c. Corn starch 
  • 1/2 c. Citric Acid (4 oz.)
  • 1 c. Baking Soda
  • 1/2 c. Epsom Salt
  • 1 tsp. Water
  • 1/2 tsp. Borax
  • 1/2 to 1 tsp Lavender Essential Oil 
  • 1 Tb. Dried Rosemary leaves, broken up into 1/4" or less pieces (I just pinched them in my hand to break them)
  • 1 Tb. olive oil
  • Colorant, if you want to use it (I used gel food coloring. If you have soap colorant you can use that, too)
Now, according to David Fisher, the most important part of the entire recipe is making sure that there is a 2:1 ratio of baking soda to citric acid. This is what makes the fizzies. All of the rest can be played with. The corn starch is there to make the bath water feel silky and it also helps hold the bombs together when they dry, but you can leave it out if you prefer. The Epsom salt can be exchanged in full or in part with sea salt. The oil is also up to you. I used olive oil because it's what I has on hand and I like it. Try grape seed, jojoba, anything you like!


Equipment
*Make sure that you either use all glass or metal equipment, or use plastics that you don't need for cooking. The essential oil will permeate the plastic and no amount of washing will help you!... Trust me - I found out the hard way!
  • Large glass or metal mixing bowl
  • Metal whisk
  • Measuring spoons and cups
  • Small squirt bottle (I picked up some ketchup and mustard bottles from the housewares section at the end of summer for $0.25. You could use anything that is small, squeezable, and has a top that allows you to control how much comes out.)
  • Spoons
  • Baking sheet lined with wax paper, foil, or paper towels
  • A mold for your bombs. I used the rounded half of a plastic Easter egg. Look around the house - lids, scoops, measuring cups, even a sturdy cardboard tube from the tin foil will work! You just want to make sure the mold is sturdy enough to withstand the pressure you're going to be putting on it by packing the mixture into it and that it is shaped to release the bombs easily.
How I Did It

I'm so sorry I didn't take pictures. Though, it would have been hard to do with my hands covered in bath bomb stuff! I made these on my own, without Little Guy's help, because I ended up making them at 2am. There are portions of this that he could have helped with, but it was rather powdery and I think I'm glad to have kept him out of this project - I wouldn't have wanted him, at his close level to the counter, to have breathed in all of that dust!

Make sure that you have all of your equipment at hand. This isn't a project where timing is everything, but it keeps things cleaner. I ended up trailing some of the mixture from one end of the kitchen to the other, collecting the things I needed as I went along.

  1. Mix the dry ingredients (*except the Borax) together with the whisk, or use a sifter: Cornstarch, Citric acid, Baking soda, Salt, and dried herbs. This is where I made the dusty powder bomb in my kitchen. Make sure you have food and clean dishes put away!
  2. In the squirt bottle, mix the wet ingredients and Borax: Water, essential oil, olive oil. Just put them all in and shake it up! This is where I added my food coloring, too. Remember to not over-do the coloring! The bombs will darken as they dry.
  3. Put your whisk in one hand and the squirt bottle in the other and get ready - this is where you have to make sure you went potty, the kids are going to be quiet for at least five minutes, and the answering machine is on. Just FIVE MINUTES! Squirt a tiny drop of the oil concoction into the middle of the dry stuff and wait a couple of seconds. See how it fizzes up? You don't want that to happen as you're mixing the wet and dry ingredients together, so make sure you keep stirring with that whisk. I don't know the scientific explanation as to why the stirring prevents the fizzing, it just does. So, as you drizzle the wet ingredients into the bowl, whisk like crazy. You may want to stop drizzling once in a while to make sure that it's all mixed in before adding more. 
  4. You want to check every once in a while to see if you have enough wet mixed in - depending on your ingredients, you may need less wet than you mixed up. Grab a small handful of the mixture and squeeze it hard. Open your hand and gently poke the mass. If it flakes up any, crumble it back into the bowl and keep adding the wet ingredients. If it doesn't - stop and go on to step 6. If you run out of wet stuff, go to step 5. (Check the picture that David Fisher was so kind to include in his instructions here.)
  5. If you need more wet, just put 1 TB of water into your squirt bottle. I added a little more food coloring here, too, because I wanted a darker color. Shake it up really well to get some of the leftover oils mixed in and keep squirting, mixing, and checking to see if you have enough wet in there. DO NOT USE TOO MUCH WET! I have no idea how to fix this!
  6. Now you're ready to mold your bath bombs! Get your mold and fill it up with the mixture. Press it in there as tightly as you possible can. This took everything I had to do - I have arthritis in my wrists and fingers. It's important to get it packed well, or they'll end up falling apart as they dry (if they do, just crumble them up, put it in a jar with a nice bow on top and call it Fizzy Bath Salts!) 
  7. If you're using a tube to mold them, set it directly on top of the lined baking sheet. Put some of the mixture into the tube, then use something to batter it down. I used a spice jar lid that fit perfectly inside the tube. kind of like a piston, and then used a long wooden spoon handle to pound it down. It worked great, but I didn't care for the giant pill-shaped bombs, so I scraped them and used the 1/2 egg mold. Once you have it packed well, just slowly lift the tube straight up. If it sticks, you can tap the sides of the tube and use the lid/spoon to press it out as you lift.
  8. Unmolding can be tough. You must have patience because you can't just plop them out unless your mold will allow it.I just repeatedly tapped and shook the mold against my hand until the bomb came out. There were times when I'd nearly given up - it was getting really late! - but then the bomb would pop into my hand. 
  9. Set the bombs on the baking sheet into your oven or other safe place to dry. Mine were dry in 12 hours, but I let them sit for about a day and a half just to make sure they were dry all the way through. When they were dry, they were rock hard and not at all fragile! 
  10.  I packed three bombs into each bag, added a sprig or two of dried lavender for pretties, and was done!
Now, after I made these, I thought of a few possibilities that I could have tried, had I had the time:
  • Split the dry mixture into two separate bowls, mix the wet ingredients into two separate bottles, and add different colors. When molding, create stripes or swirls of the two colors.
  • Wrap each bomb in plastic wrap and tie with a ribbon.
  • Put the bombs into wide-mouthed Mason jars with a pretty ribbon tied around the top.
  • Pack the bombs into a "spa gift basket" with herbal tea, raw honey, a pretty mug, handmade soap, a scrubby or pretty washcloth...  
I'm planning on making these more often! I tried one out (had to make sure they worked!) and I loved it. Do you have any scent combos that you think would be good? For me, for my husband and oldest, for little guy, for gifts?

Tuesday, December 20, 2011

Orange Spice Potpourri {Last-Minute Homemade Gift}

 I got the original idea from a post on Keeper of the Home. You should really check out this blog - she recently posted about different home remedies for winter ailments. I get tons of great ideas from her!

I cannot believe how great this stuff ended up smelling. I just added a few ingredients to it. It is so easy to make - Little Guy pretty much did it all himself! Just make sure that you have the whole family save their orange peels!

Orange Spice Potpourri

  • Cinnamon Sticks
  • Whole Allspice
  • Whole Cloves
  • Peels from Oranges
  • Bay Leaves
  • Pine cones or Wood shavings (from untreated wood!),
  • Orange or Citrus Essential Oil
Now, looking at the list of ingredients, I know what you're thinking: "Doesn't she have any idea how expensive those spices are???" Yes, I do. That's why I bought the dollar store out of them! As I mentioned in my Spiced Dough Ornaments post, if you're not eating it, it doesn't matter how good these things are. You want them for their scent only, so go the cheapest possible. You may even consider buying some of those Cinnamon-Scented Pine Cones to use - just pull them apart!

Next, I used Clementines. Little Guy can peel them by himself and the peels are very thin, they dry very quickly. I kept a bowl near the trash can and told everyone to put their peels into it. Little Guy's job, before bed, was to tear the peels into small pieces (about 1/2" X 1/2"). Then, we spread them onto a wax paper-lined cookie sheet and popped them into the oven. We have a pilot light that is on all of the time, so the little bit of heat generated by it helped dry the peels overnight. If you don't have a pilot light, try setting the sheet near a heating vent or anywhere that the air circulates.

You don't have to go collecting pine cones and wood shavings like we did. I just wanted to be able to bulk up my batch of potpourri so I could give out more and use less spices (they might have been bought at the dollar store, but the cost does add up, anyway!) We had a friend save his shavings for us. Since we had a lot of time before having to give the gifts, We mixed up a little food coloring into warm water and added the shavings. I let them sit for a couple of hours, then drained and spread onto a cookie sheet. I was worried about the orange scent being overpowered by the spices, so I shook a little bit of the essential oil onto the still wet shavings then put them into the oven to dry. They took about 24 hours, and I used my hand to turn them over a few times so they'd dry all over.It added a little extra color and extra scent to the mix.

Now, I didn't give any measurements because there really aren't any. I used about 8 cinnamon sticks. I had to get out a hammer and gently hit them so I could break them into 1/2" to 1" pieces. I used one jar of cloves (0.62 oz, I think), and the same amount of allspice. I think we had the peels from a dozen clementines (they shrink a ton when they dry!) and around 1 1/2 c. of wood shavings. I dumped it all into a bowl and Little Guy used a wooden spoon, then his hands, to mix it all together.

We wanted to have enough potpourri to give to ten people, so we put about 1/2 cup (eyeballed it) into a sandwich bag, then tied closed with a pretty ribbon. The potpourri smell good enough to just set in a bowl. When it stops being "smelly", just put a tablespoon or two into a mug filled about halfway with water and microwave for 45 to 60 seconds. Mmmm!

I linked this post at:
Classified: Mom

Pin It