Showing posts with label walks. Show all posts

Monday, January 16, 2012

Week 2 - January 8 - 14, 2012 {#Mamatography}

Well, I can't believe I've made it to the second week! I seem to always have good intentions when I start this type of thing. Unfortunately, when I miss a day or two, I seem to give up. I know there are other "take a picture a day for a year" memes out there, but I chose this one for a couple of reasons: 1) I love reading Diary of a First Child. 2) The guidelines of Mamatography are very laid back, making it feel less of an obligation and more of a fun experiment. The one thing that really hooked me was this from the Mamatography info post:
"If things happen and you can’t participate for a while, that’s fine – just start up again when you can."

Mamatography 2012
Yay For Clean Dishes!

Day 8 (1/8/12)

Yeah, I was lazy. The only thing I did that was productive all day. Well, I made dinner, too, but it shouldn't count. I just opened a jar of spaghetti sauce, then added a few herbs and the leftover meatloaf from the night before. Oh, and cooked some pasta.


I Wear My Sunglasses at Night
Day 9 (1/9/12)

I saw the moon and just had to take a picture! I love how the clouds give a smoky, mysterious feel to the photo. And the corona is so bright! It was easier to see the line between the moon and the corona circling it with the naked eye than through the lens on my camera. One of these days I'll learn how to take photos that look the same as how I see them.


Mustache Man!
 Day 10 (1/10/12)

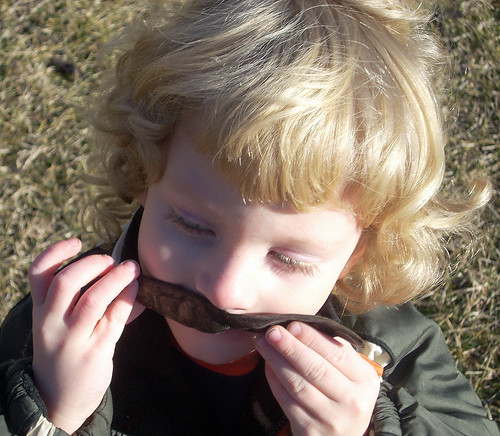
When my oldest was little, he called these beans. Well, actually, he still does (and so do I!) Little Guy, who seems to have a different way of looking at everything, has decided that they are not beans. They are most definitely mustaches, instead. Just after this picture was taken, my oldest came up and asked Little Guy what he was doing with the "bean". He got an earful and I don't think he'll be calling them anything but "mustaches" around Little Guy again!!


Zzzz...
Day 11 (1/11/12)

This hasn't happened... ever! He said, "Mama, please be quiet. I need a rest. I'm in a grumpy mood." Once I got over my shock, I began to wonder if he might be getting sick. Nope. Wouldn't it be cool if he was just learning to recognize his  need for sleep AND deciding to follow it?!


"Snot's On!"
Day 12 (1/12/12)

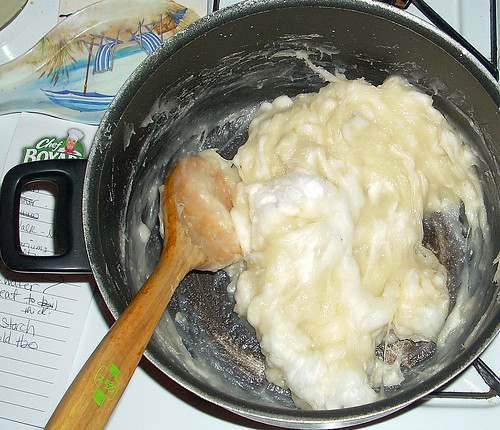
I've taken it upon myself to develop a recipe for a cotton play dough. I want something that is pliable like dough, but fuzzy like cotton balls. This was my first (failed) attempt. I wound up with a pot full of snotty cotton. ICK!

I added a bunch of flour until it was dough-ish, and let the kids have their fun with it.


Day 13 (1/13/12)

Yeah. Completely forgot to take the camera out all day.


Uh-Oh!

Day 14 (1/14/12)

We finally got some snow! This was Little Guy's first snowball fight. As you can see, the mittens are way too big for for him (the site I got them from said they fit ages 2-5. Those things are just a little too small for me to wear!) Anyway, my oldest showed him how to take his hands and push the snow together to pack it into a snowball-like formation. Pretty cool big brother, huh?


So, what did your week look like? If you'd like to join me on this endeavor, just click on the Mamatography button at the top of this post to learn more. I'll be linking this post at Diary of a First Child's Week 2 Mamatography Linky when it's posted on Wednesday (1/18), so if you'd like to see more photos you should head over!

Thursday, January 12, 2012

Moss Terrariums {Crafty Science!}

I have been wanting to make a terrarium since I first saw them on Etsy, at the end of last summer. I vaguely planned to make them as Christmas gifts, then got caught up in back-to-school & Halloween. Suddenly the holidays were upon us and it was too late. I figured we'd do it as one of our spring projects. Until I was gazing out the window, checking out the squirrels and birds, when I saw this:
 See that lovely patch of green between the dying grass and the fence? It's moss! With the weather being so mild, and even warm on some days, the moss has been "living" it up. I kept my eye on it for a few days and then I just couldn't contain myself any longer. I dressed Little Guy for a nature walk and tossed a few plastic bags and spoons into a tote and we were off to collect things for our terrariums. In January. In Michigan. (Yes, I'm going to keep saying that. I am still amazed at the weather and will continue to be awed until there is 6" of snow on the ground and the temperatures have stayed below 30 F for at least a week!)
Once he finished running around like a nut, we got down to business. It was time to walk very slowly and see if we could spy any moss growing. Once we found a good patch, we collected some of it. Now, when you look for moss for this project, make sure of a few things:
1) Only take a little from each patch and leave the rest to regenerate.
2) Use a spoon or spatula to carefully lift it from the ground. It's pretty hardy stuff, but you want to make sure to lift the entire plant - including its root system.  
3) Don't forget to get some soil from the same area, preferably from directly under where the moss was growing. We found three different types of moss on our outing and each one had a very different type of soil beneath it: One had mostly rocky, sandy soil; one had a soil that was composed mostly of dead grass; a third had very rich soil that was mostly composed of what Little Guy refers to as "worm poops".
4) Take note of how moist the soil below the moss is. You are going to want to try to mimic that amount of moisture in your terrarium.  
5) Also be on the lookout for some nice-looking small pebbles and a few sticks or pieces of tree bark that have signs of moss or mushrooms (or, what Little Guy calls "fun guys") on them. We found a stick with some white "moldy" spots on it, a piece of bark from a tree stump with a mushroom, and bark from a dormant tree with green spots. We're excited to find out if anything sprouts from them!
Now, I want to tell you that you can use nearly anything to make your terrarium. I learned quite a bit from Storm The Castle. (This is THE coolest site for finding really neat things to do, by the way. Go bookmark it right now. I promise you'll use it. Repeatedly.) We used two different things for our terrariums: old honey jars and a plastic cake carrier that someone gave us a store-bought cake in for our terrarium containers. But, really, as long as it is see-through and has a lid or small opening, go for it: aquarium with a crack in it, glass vase, 2-liter pop bottle... Just remember that you're going to have to be able to get stuff into the container and arrange it! (Storm the Castle has a great tutorial on how to make really long tweezer-type thingies from a wire coat hanger so you can reach. I told you that site is great!)


Start by laying down the dirt you collected. Because the cake carrier is near-impossible to open without really jostling whatever is inside, I knew that we wouldn't be able to open it up to add water very often. So, I took a plastic lid that is about 1/4" deep and placed some cotton into it (the white rectangle on the left of Little Guy in the photo). I put this in the center of the cake "plate" before adding dirt. After we got the soil in place, I poked a small hole in the mound above the cotton-filled lid and poured some water into it, as well as all over the rest of the soil. My reasoning for the cotton was so it would hold a layer of moisture without saturating the soil. Don't know if it will matter in the end, or not. Just my theorizing!

(After I took the photo above, I noticed that pieces of dirt and rocks were falling into the area where the dome part of the cake carrier would fit into the bottom. So, I tore up a piece of paper towel into strips and poked them into that area to keep the debris out. You can see the paper towels in the photos below. Keep this in mind while you do the next part!)

So, where was I?! Oh, yeah: add your soil. Make sure to keep track of which soil is added where if you're using different mosses with different soil needs! Pile it up so you have a nice hill if your base is a flat piece like out cake dome has. If you're using a bottle-like container, try using a funnel to direct the different soils to different areas and attempt to get a mound going in there. This is important because, if you ever really look at the lay of the land that your moss is found on, you'll notice that it is usually on an inclined surface, even if it's only slight. Make sure to save some of the soil for later - you're going to need it to fill in spaces between the moss. Once you have your mound of soil, ever so slightly pack it down and moisten it. I just poured a little water onto the cake plate, I used a spray bottle of water for the honey jars.

Now it's time to add the moss! The pieces we had were rather large chunks, so I showed Little Guy how to gently pull them apart into small pieces. I had him decide where to place it. He loved being in charge of this part of the operation! It took forever for him to decide. He kept putting a piece down, turning it a little... moving it to the left, to the right... Sometimes he completely abandoned a piece in favor of a different one. It was really cool to watch him!

Once the moss was in place, I carefully added the reserved soils in between the pieces of moss. Then it was time for Little Guy to add the embellishments we collected. Now, I considered grabbing some tiny "guys" toys and a couple of tiny cars to include in the terrarium, but though better of it. Just before I went digging through the toys, I had a very disturbing vision: Little Guy attempting to recover his toys. Dirt everywhere. Terrarium ruined. Now, if your kids are cool with using toys inside, go for it. I think it would be pretty cool to create a scene with them. Just make sure that whatever you add to your terrarium will be able to withstand the high levels of moisture that it will encounter. Also consider whether it might give off any toxic fumes when wet or warm. The cute little plastic bunnies you add could end up killing all of the living things in there.

I think that I probably added too much moisture to our cake dome terrarium. Since opening and closing it just isn't an option, I have a back-up plan. If I notice that the dome is constantly coated in water droplets or the mosses or fungi start dying, I am going to poke small holes in the top of the plastic dome. This can be done very easily without marring the view: Just take a small nail or even a thick sewing needle and hold it with a pair of pliers over fire (a lighter or the burner of a gas stove.) Um... make sure your pliers are insulated or you're wearing an oven mitt! It doesn't have to get red hot, just hot enough to melt the plastic. Then, poke small holes through the dome, toward the top. This should allow enough moisture to escape without completely drying it out.

Our Finished Products:


This was such a fun and easy project to do. While we worked on it, we had some great conversations about ecosystems, habitats, what plants need to grow, what kind of rocks we were using, the water cycle... We also pondered the possibility of small insects, seeds, and spores being mixed into the soil we used. I'm anxious to see if any surprises grow in our terrariums.

I have another plastic domed container that has been sitting on top of my refrigerator since last spring. I've known it would be great for some use, but was waiting until I was inspired with an idea to use it. This thing is 18" in diameter! I want to do a similar project with that one. I'm not telling you what it is just yet, so watch for a post. It's going to be a little while, though. I need to have the space for the thing to have a home near a window, so I really need to do some purging of "stuff". One of these days, my husband and oldest will be gone all day. That's the day I call Salvation Army for a pick-up, get out the boxes, and get rid of all of this crap we don't really need! That day is coming soon and I can't wait for it. :)

One more thing: If you like this idea, but don't have the time or desire to make your own terrarium (or if you just don't have a moss supply available to you), you can get there ready-made. One Etsy shop I know of that sells these is 8Days Of Treasures. (You can check out the review I wrote of her shop for the Made in Michigan Blog Hop in October HERE.) Stephanie lives in Michigan and creates some pretty awesome terrariums! She also sells some unique glass containers that you could make your terrarium in, such as vinegar decanters, salt ans pepper shakers, and covered candy dishes.

If you make a terrarium and write about it, 
please leave me a link in the comments. 

If you have an idea of what could be added to a terrarium 
for a cool scene, share it! 

If you have pictures of your terrariums, 
I'd love for you to post them to my Facebook wall!

This post has been linked at:
Preschool Teacher Chestnut Grove Academy Classified: Mom Photobucket

Wednesday, December 28, 2011

Here's to New Traditions! {Wordless Wednesday}

From my Facebook Page:
Monroe County Courthouse

Went to tell hubby we were leaving and snapped this. I had the camera on the wrong setting and this is what happened - kinda cool!

Me: "Get back here! It's dark and I can't see you!" I snapped the pic just so I could use the flash to locate him.

Our town's Christmas tree. :/ They lopped the top off a couple of years ago... I don't know why.

"Stick 'em up!"

Kids playing in the stage at Loranger Square. I love the metalwork of the lotus leaves & flower on this!
I stopped taking pictures after this. When we left on our little expedition, I had visions of photos with: faces in awe of the decorated homes, my guys all holding hands and enjoying the walk, the kids screwing around with each other. Nope.

The cookies and hot cocoa afterward were a hit, so at least we had that as a happy note to end on! 
I'm really hoping that we'll have more fun next year...

Thursday, December 15, 2011

In Up to My Eyeballs in Melted Chocolate and Candle Wax...

I had planned on writing two posts tonight before going to bed. Not gonna happen!

Since we don't have a car, it can be kind of hard to get things done in the winter time. Well, Michigan has some of the most contrary weather I've ever witnessed. Tomorrow (Thursday) is going to be 51 degrees and partly sunny. This will be the perfect opportunity for us to walk to the post office and get our three packages of gifts mailed out. Oh, and I have got to buy stamps for our cards! I MUST remember to buy the darn stamps! Our cards have been done for a week - the first time that I've ever gotten them done when I planned - and they're just sitting here... waiting for a 3 year old with a marker to get a hold of them!

Now, I had planned to mail out our packages next Monday, but I just can't let a beautiful day in the middle of December go by without taking full advantage! Little Guy needs to get out and run (his snow pants make him waddle - it's cute, but not that great for getting around quickly), I need to go to the grocery store, I have a few more items to pick up at the thrift store for projects that I am giving on Sunday, AND I just found out that I can get free range eggs at the health food store - so I have got to stop there, too. Anyway, the date change means that I need to have all of the gifts I plan on mailing made, wrapped, packed, and addressed... TONIGHT!

I planned on making one food item per night this week. Each afternoon all week, I was to work on the homemade gifts I plan to give. They're not terribly complicated, but they do take time. Well, since those gifts and food items are all supposed to go into the packages I want to mail out, I need to get it all done tonight. I know I won't... it's too much stress and these things need to be done right. I don't want to be giving crappy gifts just because I went too fast. I also don't want to hate making this stuff. I live for the holidays. I love making things to give. Regardless, I still want to try to get as much done as possible.

Please check back tomorrow evening, though. I have a wonderful story to tell you! Plus, I have a quick giveaway to post.
Here's a preview of the story I want to tell you. 
Can you guess what's got Little Guy so excited and 
allowed me to get a photo of my teen with a genuine smile on his face?

Sunday, November 13, 2011

Quick Update...

Where am I? 

Well, I had a lot of writing lined up for the last two days, but something amazing happened: The weather was nice! Yesterday and today, the temperatures hit the mid-60's. I was certain that the weather was just going to get colder, wetter, and windier for the rest of the month, so I had plans to hunker down inside, writing and baking, and doing some fun Thanksgiving projects with the kids. Instead, we've been hanging out outside.
Yesterday was spent exploring the river shore. Since many of the wildflowers and weeds dies off from the frosts we've had, we can now walk around near the river without being hampered by all of the flora. Little Guy was amazed with all of the different ways that plants regenerate. We found milkweed "floaties", burrs of all shapes and sizes, and "beans" with seeds inside. Since he is very good at plant-identification, he was able to understand which plant each type of seed comes from. For instance, the Queen Anne's Lace has little seeds that hang onto your pants for a ride to their new home. While we were checking out the seeds, we made sure to bring some home to make seed bombs for Christmas gifts to give to those who live locally (you don't want to go sending them across the country and introducing a new species to an area - it may become one of those things that takes over native species and kills them off!)

We also explored the woods behind our home. Just like nearly every other kid, Little Guy loved finding himself knee-deep in leaves! We created a very big pile of leaves and he got to play "hide & seek" in the pile. He just loves hiding and having us scratch our heads and ask each other where he went. My oldest even got in on the fun and taught Little Guy how to throw the leaves into the air and watch them float down all around him.

Today, we already headed for a nice walk to the store. It's very windy, moist, and warm out. Later, we'll be heading out to the garden to get it ready for winter and collect some herb seeds. I also need to cut all of my herbs back. I've already lost all of my basil thanks to procrastination. I need to get to the parsley (I use it for everything!), oregano, thyme, sage, and lavender before a hard frost settles in. Looks like today's the day! I also need to cut down the marigolds and grab the seeds for gifts and next year's garden. Then we need to collect leaves and cover the mint and strawberries. Last year, I took the time to add a 2"-3" layer of leaves under a few inches of soil throughout the garden. I don't know if it helped, or not, but it did attract a huge number of earthworms. If there's time, I'll do that again today.

I made pumpkin seeds and cooked my pumpkin last night. Today, I need to puree and freeze the pumpkin. I'm going to probably spend the evening baking some kind of sweet yummy thing using some of the pumpkin. There are so many amazing recipes out there - I just don't know which to pick... Maybe I'll take a poll of the family and see what they'd like.

Well, that's it! Hopefully, I'll be able to write my Topic 2 post for the Mindful Parenting Collaboration tonight. It's all in my head - I just need to get it straight and type it all out! I've also got a couple of other posts that I need to write before the ideas leave my head and I lose my motivation. Oh, and there will be a few more giveaways posting this week, too!

Oh, and last, but certainly not least, PLEASE take a minute to enter my current giveaways. They are all sponsored by Etsy shops and I'd love for you to show these wonderful artists some love.  All of these giveaways are open to the US and entries are easy to complete with Rafflecopter:


Wednesday, October 12, 2011

Too Big for a Stroller, BUT... {Review & #GIVEAWAY - Ends 10/30}

If you've read my blog often enough, you know that we don't have a car for many reasons. This leaves us a few alternatives: ride the bus, ask a friend for a ride, or walk. The bus is nice, but the schedule and routes aren't always convenient, plus it costs a dollar each way (when we all go, that means $6 just to get there and back - more than gas!) Once a month, we carpool to the grocery store with a friend to get our frozen, bulk, and heavy stuff, but asking for a ride every time we want to go somewhere becomes annoying to friends with cars! Plus, we don't have a car because we chose NOT to drive everywhere in the first place. So, we walk more often than not.

Last summer, we took our stroller everywhere with us - to the park, outdoor concerts, the store... Little Guy would run alongside it for a block or two at a time, then ask to sit in the stroller. The stroller was a pain, though. You couldn't push it through grass easily, taking it into stores was sometimes impossible, someone had to always be watching it so no one would take it when we were at our destination and taking a child into crowds with a stroller can be dangerous! People tend to hold cigarettes at the eye-level of a child who's sitting in a stroller. We had a couple of near-misses at the River Raisin Jazz Festival last year.

This summer, we pretty much ditched the stroller. I can't tell you how free it felt to leave it at home. Little Guy was able to walk farther distances (actually, he runs everywhere), but he still needed to be carried sometimes. We live a mile away from our favorite park, the post office, and downtown - the three places we go most often. That means 2 miles round-trip, plus whatever walking/running we do while we're there. I almost always end up carrying Little Guy the last 1/2 mile home, oh, along with whatever we happened to take with us and/or buy while we were out. I have arthritis in my hands, elbows, shoulders, and knees. Plus, I get nice little flare ups of sciatica from time to time. Carrying him usually results in some major pains for me later on!

So, what's the solution? Baby Nari's Hip Hugger! I cannot give enough praises to this wonderful product. It is basically a fanny pack with a little seat for little ones. If only I'd had this for the past two summers... Well, can't go back and change time - I have one now and love it! There is a nice-sized storage pocket where I can keep an extra pair pf pants and underwear, sunscreen, snacks, etc. The Hip Hugger also has storage pockets on the inside of the waist strap for keeping money, an ID, etc. safe. PLUS, there is a mesh pocket on the outside where we keep Little Guy's water (or whatever car he's decided absolutely must go bye-bye with us.)


The Hip Hugger isn't just a fancy fanny pack, though. The waist strap is very wide 5 inches and padded so it distributes the weight evenly. It has both Velcro and a safety strap to ensure it will stay on and stay snug (Baby Nari recommends that you keep the belt tight to stay comfortable.) And, it's easy to change the size of the belt buckle, so two parents can use the Hip Hugger without having to go through a huge mess of trouble changing the size (it fits waists up to 40 inches.) The seat has a little heart of non-skid material to keep a wiggly child from slipping and constantly needing readjustment.

There are two versions of the Hip Hugger: Infant and Toddler. We, of course, have the toddler one, which can hold a child up to 40 pounds! I has an angled seat which tilts the child closer to your body, making it easier to carry them. The baby version can be used as support for a tired arm when they are tiny. As soon as baby can sit on his or her own, you can use it in the same way as the toddler version. It can be used from 5 months old (15 lbs.)


Oh, and did I mention that they come in a ton of COLORS?!

I can't wait to use this in the winter. We were pretty much stuck at home last winter because strollers aren't made for snow and ice and Little Guy couldn't go very far - snow take a LOT of hard work to walk through! Carrying him with all of the bulky clothes between us was nearly impossible - he was constantly slipping, making him pretty much dead weight. We'll be able to go so many more places this year - no cabin fever for us!

Baby Nari Hip Huggers are available to buy HERE. With the code: BABYNARI you can get $20 off your order. Oh, and shipping is free for orders over $50!

So, would you like one? Maybe you know someone with a baby or toddler who could really use one? Fill out the Rafflecopter form and give it a shot!

Wednesday, October 5, 2011

Natural Art {Wordless Wesnesday}

Now, I'm not "into" spiders or anything, but I hold them in high esteem. It just amazes me to look at their webs and see all of the hard work and precision that goes into each one. Often, I'll see a web in a tree when we go for walks and I'll just stop and look at it. Of course, no one else can see it, so everyone treats me like I'm nuts, "What are you looking at?!" They should know better than to ask silly questions like that, I'm obviously looking at something interesting that they've passed up because they were too busy walking from Point A to Point B without bothering to take notice of the scenery on the way. Anyway, here's my Wordless (ha ha) Wednesday post - I thought October would be appropriate for it:
Mid-morning in my garden.

This is actually TWO Daddy Long Leg spiders, head-to-head. I don't know if they were being extra friendly or fighting to the death. Sorry for the fuzzy pic. It's just such a rare thing to observe that I had to share it!

There was an entire clearing in the woods with about ten of these giant weeds covered in webs just like this one. The photos of the collection didn't come out right - It's hard to take pictures of webs without the right light!

The spider is top, center. Waiting to trap the silly bug that attempts to land anywhere near him/her.

This one's waiting to jump out and catch his/her dinner, too.
We came upon this one at Sterling State Park, right on Lake Erie. I've never seen a spider like this before!


Wednesday, September 28, 2011

My Day Out with "Thomas"... Uh, Kinda {Wordless Wednesday}

Not really like those "Day Out with Thomas" posts I was seeing all summer. But, I think this was even better! We received this cool costume from Wholesale Halloween Costumes for the review I posted HERE.


BOTH feet have left the ground!


 Little Brown Bear's author, "Aunt Bett" (Elizabeth Upham McWebb), lived in our town. This is a statue of Little Brown Bear that sits in front of the library downtown. If you ever get the chance, check out your local library to see if her books are available - they're great stories for little ones! HERE is a list of her books.

 Downtown is starting to get "dressed up" for Autumn!
When I say, "Look at Mommy!" this is what I get.


This is "The Tea Store" (a.k.a. Health Matters) where we get all of our teas and vitamins. Oh, AND snacks when we're downtown!

 Nothing like heading to the library by our house to play with the really cool Thomas & Friends track while wearing your really cool Thomas costume!
And you just have to do some coloring, especially when the librarians just added fresh crayons to the box!
OK, know what he's doing here? Well, let me just say that when your kid is really interested in a leaf on a bush, pay close attention. As I was snapping the picture, I saw his hand go up to his mouth. It was a berry (?!) that he was after. I'm so glad I caught this before he popped it into his mouth!
So, that was my "Day Out with Thomas" - as I said, I'm sure it was better than any other one!

Thanks, once again, to Wholesale Halloween Costumes for sending us this really neat costume to review. I love the candy catcher pocket in front even better than before - Little Guy could carry his own sticks, leaves, rocks, and nuts (lots of black walnut trees around here) so I didn't have to!