
 |
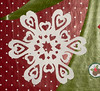
| Our "Christmas Tree" is slowly getting decorated! |
There are a few things that are important to know before you start making your snowflakes:
- Consider the thickness of your paper. I used construction and my hands have been angry with me ever since. If we do this again, I'll use newsprint or magazine pages!
- Have some very sharp scissors. I had to trim rough edges from my snowflakes. This took forever and made a huge mess.
- Cut the small bits first, then the bigger sections. This way, you have more paper to hold on to.
- If your kids want to help, but aren't really great at using scissors yet, do the cutting part on your own. Have the kids decorate the paper with crayons, paints, pr markers before you fold and cut and/or have them decorate the finished snowflakes with glitter.
- Try to line up the edges as you're folding as closely as possible to avoid lop-sided snowflakes. My Nutcracker one is completely missing a guy because of mis-folding. And make creases in the paper after each fold to keep it all together better.
 1) Start with a square of paper. If you only have rectangles, HERE is how to make squares.
2) Fold the square in half, corner-to-corner.
 3) Fold in half again.
  4) The tricky part! You need to fold the side that has two creases so that it looks like this:
 5) Then, fold the other side of the triangle over. The more lined up all of the edges are, the more perfect the snowflake will turn out.
 6) When I (finally) got the paper folded just right - construction paper is TOUGH! - I drew lines where the creases were and used that one as a template for folding the rest. It made life MUCH easier.
Time to Cut!
After I did a few of the book's patterns, I learned how the patterns were created. There were just a few rules to follow:
1) Make sure that there are plenty of places on both sides of the pattern that will keep the edges of the pattern intact.
2) Try as hard as you can NOT to make a pattern that has a space in the center that you must cut out. You'll see in the pattern that I created below that I made this mistake.
3) Try to keep the size of the shapes you're cutting large. Not only does it make cutting easier; it also makes sure that the cut will show if you happened to fold the paper a little off.
4) Use an iron set to the lowest heat to flatten out your snowflakes. I put a piece of construction paper over the snowflakes before ironing so I wouldn't accidentally catch an edge on the iron and tear the paper.

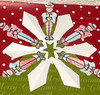
I made my own pattern!
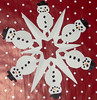
My oldest is a collector of Nutcrackers, so I was thrilled to find a pattern in the book. But there wasn't anything for Little Guy, so I decided to try making my own. I think it turned out pretty well:

I had to use an Xacto knife to repeatedly cut, cut, cut through the paper (including the curve of the wheels!) because my scissors just couldn't get in there without tearing the paper up.
In addition to making snowflakes, we also talked about snowflakes. I checked out another book that was filled with close-ups of snowflakes. We learned that there are different shapes for different types of weather (the colder it is when it snows, the more perfect the flakes are.) We counted the points, talked about hexagons, and talked about how snow if just frozen rain.
Have you made snowflakes yet? Did you manage to come up with your own unique pattern? Any tips and tricks you'd like to share. I imagine that we'll be making more snowflakes. It's a quick and easy project we can do with very little prep!
Pin It


3 comments:
Awesome snowflake craft. I like these!
Those are beautiful snowflakes! Not ready to do it with my two little ones, although they could color the paper, like you said...
If you would like to take a good deal from this article then you have to apply such techniques to your won
webpage.
Also visit my web page :: finance research papers
Post a Comment