Showing posts with label handmade. Show all posts

Thursday, January 19, 2012

Reuse Last Year's Planners and Calendars!

What do you do with your old planners, schedule books, and calendars? I have one wall calendar, hanging by my desk, where I write down all of our plans and milestones. I save that one in a file box. It's kind of like a record of all of the things we did that year. I also have a planner that I use to keep track of blog posts and gardening (like when I planted the peas and when I picked the first tomato.) My husband has a day planner that he keeps all of his scheduled doctor's appointments in. And my oldest, of course, has a student planner that he is supposed to use to keep all of his assignments straight in - he doesn't use it very often... We also receive a few free promo planners in the mail that I usually give to Little Guy to write his "lists" of things to do in - just like Mommy, Daddy, and Brubber do.

At the end of the year, we find that we have these planners and calenders just sitting here. We don't want to throw them out, but what good are they? I'll tell you! You can use them as idea books.
As I was cleaning out my very messy corner of craft supplies, I found the stack of magazines and catalogs that I've been hoarding. Each one had at least one great idea that I wanted to use - a kids' craft, recipe, or DIY project. I really didn't have anywhere to put all of these magazines and, heck, I didn't even know which idea I was saving each book for just by looking at the cover. So, Little Guy and I went through each one and cut out all of the good ideas that we wanted to make someday.
Most of the time, I could just cut out a photo from the magazine or catalog and that would be enough. I don't really like following step-by-step instructions for things that are creative. Instructions make me feel as if I'm doing it wrong if I veer from the "rules" that have been set down. Plus, I tend to read the "Supplies Needed" list and, if I don't have one, I'll skip the project until I do have everything. By just having a photo of what I want to make, I can use my own imagination to figure out how to go about creating the item and which supplies we can use.

So, we spent a couple of afternoons just flipping through those magazines and catalogs, cutting out pictures of things that looked like fun. Now we had a pile of clippings. How was I going to keep them in some kind of order without losing them? As I pondered, hubby came through with his old planner and asked if he could throw it away (See how I have him asking about throwing things out? He's learned not to toss anything into the trash can before asking if I need it for something. Even banana peels are saved here - they add LOTS of potassium to the garden soil!) His asking me at that particular time was perfect - I could use the planner for the clippings!

I arranged the clippings into piles for each month - snowy/winter crafts for January, hearts and lovey crafts for February, etc. When he awoke, we got working on our books. His job was to put a tiny dot of glue onto each cut-out and place it on the planner page for the corresponding month. My job was to hand him the clippings, suggest a good place to glue the clipping (overlap can happen in an instant with an excited little guy!), and help turn the pages of the planner. Now we have our "Idea Book" to look at whenever we're feeling crafty. We can just open it up to the current month and choose from the pictures.


I also used planners for recipes and DIY projects. The recipe book was made from a planner that had an entire page for each day. There are many more pages in that book so I could clip the entire recipe (no, I can't just look at a picture of food and figure it out! LOL) and have room for more. Stew, soups, and other hearty, stick-to-your ribs recipes are glued into the winter months' pages. Quick, warm dinner ideas are in the November and December pages for those days when we're busy with holiday-related activities and there just isn't time for big, complicated dinners. And, of course, I have light, cool dishes in August; and I've got picnic-type recipes stuck to the June and July pages. Birthday cake ideas are now easy to find by turning to the months for everyone's birthdays.

My DIY book is separated by the seasons, rather than months. I simply took a marker and drew a border around each page for each season - blue for winter, green for spring, red for summer (hey, it's hot out!), and orange for fall. The times of year that each project would best be done is where I glued those clippings. So, I have a really neat indoor seed starter idea pasted on a green page. And there is a pretty wind chime made with dried leaves in the orange section. See what I mean?

I have more ideas for making other books:
  • I'm going to start looking for homeschooling ideas next, since Little Guy is getting to the right stage to start more learning activities. 
  • My oldest keep magazines for drawing ideas that he has seen in them - I think I could persuade him to cut the ideas out and recycle the magazines.
  • My husband takes a zillion different medications. He also collects old PDR's. I wonder if I could get him to cut the drug info and photos for each thing he takes and glue them into an old planner? It sure would take up less space than 6 old PDR's (have you seen how big they are?!). Plus, he'd have a little book to take to doctor's appointments, showing exactly what he takes. He could even pencil in the amounts and frequencies of each medication. I know that, if he ever keeled over, I'd have a list of meds to take to the ER with me for easy reference for the ER doctors.
I'd love to hear your ideas of books these used-up 
planners and calendars could be re-purposed into. 
What kind of clippings would YOU glue into an old planner???

Wednesday, December 21, 2011

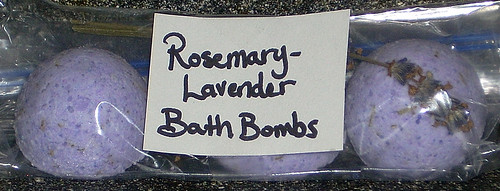
Fizzy Bath Bombs {Last-Minute Homemade Gift}

I originally found the recipe for these on About.com - the place to find articles about anything by anyone! This recipe for the Bath Bombs is based on the one posted by David Fisher, so I'd like to thank him for showing me just how easy these are to make. Really, I've been wanting to try them out for a while now, but they always seemed so complicated and as if they needed a ton of ingredients that were expensive and hard to find. Not true on either! 

Now, I scented my bath bombs with lavender essential oil and dried rosemary from my garden, but you can use any number of scent combinations. Check out this tutorial on mixing essential oils to get the right scent on Easy Aromatherapy Recipes. Just remember: If you use herbs instead of the oils, you'll need to use more. Also, remember that once the herbs rehydrate in the tub, their scent will be stronger! I chose Rosemary and Lavender because I just love how the two blend. Also, I had to buy the essential oil for this and I wanted something that I'd use often. And, once again, don't go all out and buy some expensive and fancy rosemary - get the cheap bulk stuff.

There is one ingredient on the list that I was worried about finding: Citric Acid powder. I took a shot in the dark and visited our local health food store, Health Matters in Monroe, MI, and found that Maurine had it AND it wasn't expensive. I only got a 4 oz. bottle, so I had to halve the recipe on About.com and, of course, I changed it up a little. Here's what I ended up with:

Rosemary-Lavender Bath Bombs

Ingredients
  • 1/2 c. Corn starch 
  • 1/2 c. Citric Acid (4 oz.)
  • 1 c. Baking Soda
  • 1/2 c. Epsom Salt
  • 1 tsp. Water
  • 1/2 tsp. Borax
  • 1/2 to 1 tsp Lavender Essential Oil 
  • 1 Tb. Dried Rosemary leaves, broken up into 1/4" or less pieces (I just pinched them in my hand to break them)
  • 1 Tb. olive oil
  • Colorant, if you want to use it (I used gel food coloring. If you have soap colorant you can use that, too)
Now, according to David Fisher, the most important part of the entire recipe is making sure that there is a 2:1 ratio of baking soda to citric acid. This is what makes the fizzies. All of the rest can be played with. The corn starch is there to make the bath water feel silky and it also helps hold the bombs together when they dry, but you can leave it out if you prefer. The Epsom salt can be exchanged in full or in part with sea salt. The oil is also up to you. I used olive oil because it's what I has on hand and I like it. Try grape seed, jojoba, anything you like!


Equipment
*Make sure that you either use all glass or metal equipment, or use plastics that you don't need for cooking. The essential oil will permeate the plastic and no amount of washing will help you!... Trust me - I found out the hard way!
  • Large glass or metal mixing bowl
  • Metal whisk
  • Measuring spoons and cups
  • Small squirt bottle (I picked up some ketchup and mustard bottles from the housewares section at the end of summer for $0.25. You could use anything that is small, squeezable, and has a top that allows you to control how much comes out.)
  • Spoons
  • Baking sheet lined with wax paper, foil, or paper towels
  • A mold for your bombs. I used the rounded half of a plastic Easter egg. Look around the house - lids, scoops, measuring cups, even a sturdy cardboard tube from the tin foil will work! You just want to make sure the mold is sturdy enough to withstand the pressure you're going to be putting on it by packing the mixture into it and that it is shaped to release the bombs easily.
How I Did It

I'm so sorry I didn't take pictures. Though, it would have been hard to do with my hands covered in bath bomb stuff! I made these on my own, without Little Guy's help, because I ended up making them at 2am. There are portions of this that he could have helped with, but it was rather powdery and I think I'm glad to have kept him out of this project - I wouldn't have wanted him, at his close level to the counter, to have breathed in all of that dust!

Make sure that you have all of your equipment at hand. This isn't a project where timing is everything, but it keeps things cleaner. I ended up trailing some of the mixture from one end of the kitchen to the other, collecting the things I needed as I went along.

  1. Mix the dry ingredients (*except the Borax) together with the whisk, or use a sifter: Cornstarch, Citric acid, Baking soda, Salt, and dried herbs. This is where I made the dusty powder bomb in my kitchen. Make sure you have food and clean dishes put away!
  2. In the squirt bottle, mix the wet ingredients and Borax: Water, essential oil, olive oil. Just put them all in and shake it up! This is where I added my food coloring, too. Remember to not over-do the coloring! The bombs will darken as they dry.
  3. Put your whisk in one hand and the squirt bottle in the other and get ready - this is where you have to make sure you went potty, the kids are going to be quiet for at least five minutes, and the answering machine is on. Just FIVE MINUTES! Squirt a tiny drop of the oil concoction into the middle of the dry stuff and wait a couple of seconds. See how it fizzes up? You don't want that to happen as you're mixing the wet and dry ingredients together, so make sure you keep stirring with that whisk. I don't know the scientific explanation as to why the stirring prevents the fizzing, it just does. So, as you drizzle the wet ingredients into the bowl, whisk like crazy. You may want to stop drizzling once in a while to make sure that it's all mixed in before adding more. 
  4. You want to check every once in a while to see if you have enough wet mixed in - depending on your ingredients, you may need less wet than you mixed up. Grab a small handful of the mixture and squeeze it hard. Open your hand and gently poke the mass. If it flakes up any, crumble it back into the bowl and keep adding the wet ingredients. If it doesn't - stop and go on to step 6. If you run out of wet stuff, go to step 5. (Check the picture that David Fisher was so kind to include in his instructions here.)
  5. If you need more wet, just put 1 TB of water into your squirt bottle. I added a little more food coloring here, too, because I wanted a darker color. Shake it up really well to get some of the leftover oils mixed in and keep squirting, mixing, and checking to see if you have enough wet in there. DO NOT USE TOO MUCH WET! I have no idea how to fix this!
  6. Now you're ready to mold your bath bombs! Get your mold and fill it up with the mixture. Press it in there as tightly as you possible can. This took everything I had to do - I have arthritis in my wrists and fingers. It's important to get it packed well, or they'll end up falling apart as they dry (if they do, just crumble them up, put it in a jar with a nice bow on top and call it Fizzy Bath Salts!) 
  7. If you're using a tube to mold them, set it directly on top of the lined baking sheet. Put some of the mixture into the tube, then use something to batter it down. I used a spice jar lid that fit perfectly inside the tube. kind of like a piston, and then used a long wooden spoon handle to pound it down. It worked great, but I didn't care for the giant pill-shaped bombs, so I scraped them and used the 1/2 egg mold. Once you have it packed well, just slowly lift the tube straight up. If it sticks, you can tap the sides of the tube and use the lid/spoon to press it out as you lift.
  8. Unmolding can be tough. You must have patience because you can't just plop them out unless your mold will allow it.I just repeatedly tapped and shook the mold against my hand until the bomb came out. There were times when I'd nearly given up - it was getting really late! - but then the bomb would pop into my hand. 
  9. Set the bombs on the baking sheet into your oven or other safe place to dry. Mine were dry in 12 hours, but I let them sit for about a day and a half just to make sure they were dry all the way through. When they were dry, they were rock hard and not at all fragile! 
  10.  I packed three bombs into each bag, added a sprig or two of dried lavender for pretties, and was done!
Now, after I made these, I thought of a few possibilities that I could have tried, had I had the time:
  • Split the dry mixture into two separate bowls, mix the wet ingredients into two separate bottles, and add different colors. When molding, create stripes or swirls of the two colors.
  • Wrap each bomb in plastic wrap and tie with a ribbon.
  • Put the bombs into wide-mouthed Mason jars with a pretty ribbon tied around the top.
  • Pack the bombs into a "spa gift basket" with herbal tea, raw honey, a pretty mug, handmade soap, a scrubby or pretty washcloth...  
I'm planning on making these more often! I tried one out (had to make sure they worked!) and I loved it. Do you have any scent combos that you think would be good? For me, for my husband and oldest, for little guy, for gifts?

Tuesday, December 20, 2011

Orange Spice Potpourri {Last-Minute Homemade Gift}

 I got the original idea from a post on Keeper of the Home. You should really check out this blog - she recently posted about different home remedies for winter ailments. I get tons of great ideas from her!

I cannot believe how great this stuff ended up smelling. I just added a few ingredients to it. It is so easy to make - Little Guy pretty much did it all himself! Just make sure that you have the whole family save their orange peels!

Orange Spice Potpourri

  • Cinnamon Sticks
  • Whole Allspice
  • Whole Cloves
  • Peels from Oranges
  • Bay Leaves
  • Pine cones or Wood shavings (from untreated wood!),
  • Orange or Citrus Essential Oil
Now, looking at the list of ingredients, I know what you're thinking: "Doesn't she have any idea how expensive those spices are???" Yes, I do. That's why I bought the dollar store out of them! As I mentioned in my Spiced Dough Ornaments post, if you're not eating it, it doesn't matter how good these things are. You want them for their scent only, so go the cheapest possible. You may even consider buying some of those Cinnamon-Scented Pine Cones to use - just pull them apart!

Next, I used Clementines. Little Guy can peel them by himself and the peels are very thin, they dry very quickly. I kept a bowl near the trash can and told everyone to put their peels into it. Little Guy's job, before bed, was to tear the peels into small pieces (about 1/2" X 1/2"). Then, we spread them onto a wax paper-lined cookie sheet and popped them into the oven. We have a pilot light that is on all of the time, so the little bit of heat generated by it helped dry the peels overnight. If you don't have a pilot light, try setting the sheet near a heating vent or anywhere that the air circulates.

You don't have to go collecting pine cones and wood shavings like we did. I just wanted to be able to bulk up my batch of potpourri so I could give out more and use less spices (they might have been bought at the dollar store, but the cost does add up, anyway!) We had a friend save his shavings for us. Since we had a lot of time before having to give the gifts, We mixed up a little food coloring into warm water and added the shavings. I let them sit for a couple of hours, then drained and spread onto a cookie sheet. I was worried about the orange scent being overpowered by the spices, so I shook a little bit of the essential oil onto the still wet shavings then put them into the oven to dry. They took about 24 hours, and I used my hand to turn them over a few times so they'd dry all over.It added a little extra color and extra scent to the mix.

Now, I didn't give any measurements because there really aren't any. I used about 8 cinnamon sticks. I had to get out a hammer and gently hit them so I could break them into 1/2" to 1" pieces. I used one jar of cloves (0.62 oz, I think), and the same amount of allspice. I think we had the peels from a dozen clementines (they shrink a ton when they dry!) and around 1 1/2 c. of wood shavings. I dumped it all into a bowl and Little Guy used a wooden spoon, then his hands, to mix it all together.

We wanted to have enough potpourri to give to ten people, so we put about 1/2 cup (eyeballed it) into a sandwich bag, then tied closed with a pretty ribbon. The potpourri smell good enough to just set in a bowl. When it stops being "smelly", just put a tablespoon or two into a mug filled about halfway with water and microwave for 45 to 60 seconds. Mmmm!

I linked this post at:
Classified: Mom

Pin It

Thursday, December 15, 2011

In Up to My Eyeballs in Melted Chocolate and Candle Wax...

I had planned on writing two posts tonight before going to bed. Not gonna happen!

Since we don't have a car, it can be kind of hard to get things done in the winter time. Well, Michigan has some of the most contrary weather I've ever witnessed. Tomorrow (Thursday) is going to be 51 degrees and partly sunny. This will be the perfect opportunity for us to walk to the post office and get our three packages of gifts mailed out. Oh, and I have got to buy stamps for our cards! I MUST remember to buy the darn stamps! Our cards have been done for a week - the first time that I've ever gotten them done when I planned - and they're just sitting here... waiting for a 3 year old with a marker to get a hold of them!

Now, I had planned to mail out our packages next Monday, but I just can't let a beautiful day in the middle of December go by without taking full advantage! Little Guy needs to get out and run (his snow pants make him waddle - it's cute, but not that great for getting around quickly), I need to go to the grocery store, I have a few more items to pick up at the thrift store for projects that I am giving on Sunday, AND I just found out that I can get free range eggs at the health food store - so I have got to stop there, too. Anyway, the date change means that I need to have all of the gifts I plan on mailing made, wrapped, packed, and addressed... TONIGHT!

I planned on making one food item per night this week. Each afternoon all week, I was to work on the homemade gifts I plan to give. They're not terribly complicated, but they do take time. Well, since those gifts and food items are all supposed to go into the packages I want to mail out, I need to get it all done tonight. I know I won't... it's too much stress and these things need to be done right. I don't want to be giving crappy gifts just because I went too fast. I also don't want to hate making this stuff. I live for the holidays. I love making things to give. Regardless, I still want to try to get as much done as possible.

Please check back tomorrow evening, though. I have a wonderful story to tell you! Plus, I have a quick giveaway to post.
Here's a preview of the story I want to tell you. 
Can you guess what's got Little Guy so excited and 
allowed me to get a photo of my teen with a genuine smile on his face?

Thursday, December 1, 2011

Easy DIY Advent Calendar with Stuff You Already Have {#Craft}

Every year, I make plans to make my own Advent Calendar... I always wind up picking one up at Walgreen's for $2 around December 5th. I also make a list of fun family activities that we can do together for the holiday season... and it ends up just sitting there because I don't plan ahead. Not this year!

I saw a really easy Advent calendar idea where you use muffin tins as the base. It's perfect - the little candy holders are already there! And, the next day, guess what hubby came home with... Yes, 6 aluminum mini muffin tins. It seems that someone he knew was going to just throw them out (I KNOW!) Knowing me, he figured if I couldn't use them, I'd recycle them. Two of them are now part of our Advent calendar, and I'll be able to use them again next year!

Another idea I saw was to make an Advent calendar that contained a surprise family activity for each of the 24 days leading to Christmas. If I put an activity on little pieces of paper for each day, I'd kind of have to do the stuff, right? You can't have the kids opening each section, read the paper, then say, "Eh... I don't feel like it!"

So, here's my little Advent calendar idea. It took me a total of one hour to make it, including the portions that the kids helped me with. I mostly used things I have around the house. I bought candy and some nice scrapbooking stickers that were on sale at 2/$2.

The mini muffin tins that I have hold one dozen muffins each, so I needed to figure out how to make them stick together. I don't keep glue that works on metal laying around the house, so I figured out a different way: bread ties. Yeah... I never throw them away. I even have other people save them for me! You can use those suckers for everything, even sticking two aluminum pans together! I had the kids help me peel the paper off of about 6 ties. Then, I used a pin to poke holes in both of the tins and threaded one end of each wire into the holes. I loosely twisted each wire before I flipped the tins over and tightened it all up.


*TIP: See the picture on the right up there? 
That paper clip saved me lots of trouble. 
I stuck it on there to remind me which cup
was Day 1. The tins got turned around so 
many times that I had to take all of the candy
out and read the activities so I knew which
one the calendar was supposed to start on.
Next, I had the kids help me. First, we had to agree on some activities. I found a wonderful list of over 30 ideas at Code Name: Mama that I borrowed from. Some of the things we chose will take effort, others are very easy: Make paper snowflakes, Take a family walk at night to look at the decorated houses, bake and decorate cookies (I have four days set aside for that!), family holiday movie night, write to Santa... The very next thing I did - and you shouldn't skip this step! - is to plan out what we;ll be doing on what day, then wrote it down in my planner. This is so important! You don't want to: 1) be surprised that today is the day you're supposed to go to the zoo, and 2) have something major planned for a bust night and something that takes 10 minutes planned for a day when you have lots of time to spare. I wrote all of the activities down on a piece of paper and we put them into the bottoms of the muffin cups.  The kids each got to pick out a bag of candy to fill each day's section with. So, they each took turns placing two of their candies into each cup.

While my oldest watched Little Guy, I got out the glue gun. I had to figure out how to cover each of the cups so they could be opened individually. I saw some great ideas on Pinterest that included cutting little circles from cardstock and covering each individually, making felt bags that contain the day's prize that had a glue dot holding them into the cups... I had two options with what I had on hand: wrapping paper or newsprint. They're both pretty easy to tear open. If I used one sticker for each day, when the kids puled on the sticker, the paper would rip and reveal the contents of the cup underneath. Although wrapping paper is a little more decorative, I went with newsprint. I've been carefully folding each piece of packing paper that I get and squirreling it away for projects just like this - not using it would have been insane, you know?


Now, I had to figure out how to make the paper stick to the aluminum well enough that the kids wouldn't end up ripping the entire sheet off on the first day. I came up with this nifty idea: I used a nail to poke holes in key areas of the tins. Then, I used the glue gun to glue the paper over each section - one at a time. I made sure to let the glue pool a little wherever I had poked holes. After I had the entire paper glued down, I carefully flipped the tins over and put extra dollops of glue over each hole. I also reinforced the bread ties by laying down a line of glue over the two edges of the tins they were holding together.


Then it was time for Little Guy's VERY IMPORTANT job. He had to put the stickers onto the Advent calendar! I had him leave Day 24 empty because I wanted to add a picture of Santa for Christmas Eve.

*TIP: If you have little ones helping, put dots where the center of each cup is.
Our last step was to fancy it up a little bit. I has all kids of ideas: the old tissue paper squares on the end of a pencil thing (too frustrating when it sticks to the pencil), glitter (and look like I ran into a pixie until February?!), paint (too easy for Little Guy to puncture the paper with the brush. AHA! We have tons of ribbon, so we simply glued a little in the spaces between the stickers.
The photo above is our almost-finished product (you can see some of the white glue's not even dry yet!) I plan on putting bows on each corner and then attaching a ribbon to hang the calendar on the wall. Where to put this posed a problem until I was downloading the pictures of our Christmas tree**.  When I saw the photo, I saw the perfect spot - just  left of the tree, up high. There's no way (short of using a long stick or throwing something heavy at it) for Little Guy to get that calendar down. He's is a candy freak and it doesn't agree with his disposition, so one piece a day is enough! He knows there's a whole lot of candy in those tins, so I have to be extra careful.
Don't you just love the thermostat? I think I'll put a big bow on top of it so it looks like an ornament. As we add our own ornaments to the tree, it should blend in... right?
**Now, we don't have a real or plastic tree for a variety of reasons. So, each year, I go out and look for the "perfect tree wrapping paper". In an hour or so, I cover the wall with wrapping paper , then cut out a tree shape from the tree paper. This year's was a quickie job - Little Guy was cranky and I was trying to hurry up and get it done so I could put him to bed. It's not even or anything, but that's how they come in real life, right? As we get closer to Christmas, we'll be making little crafts here and there and adding them to our tree as ornaments (we already have a beaded candy cane on there!)

This post has been added to the following crafty linkies:
 

The Crafty Nest
Classified: Mom

Saturday, November 26, 2011

Small Business Saturday is HERE!

Here it is, Small Business Saturday! I'm not really sure it's as big as many make it out to be, but give it time - new ideas always take a while to really take effect. So, for my part in this new movement, I'm doing two things: First, I'm urging you to hit the small, non-corporation businesses this year to shop for gifts and services. Next, I'd like to share with you some of the small online businesses I've had the pleasure of doing business with. I've checked for discounts and deals on each site - some had them, some didn't. Don't assume that there won't be any sales, etc. if I haven't listed them. I'm sure that many are probably waiting for Cyber Monday (and a few I came across had Black Friday-only deals.)

I can update this list, so if you know of a great small business please let me know. I'll need the name of the company, the URL, and a description of what they sell. And if they have any sales going on, let me know - what the sale is, when it ends, and if there's a discount code I'll need that, too! If your shop is listed and I haven't represented your discount properly (or completely missed one!) let me know ASAP. The fastest way to get my attention is via the Contact Me page.


Kids 


ElJay Plushie Hand-cut original appliqué cloth baby books, original soft fleece baby rattles and stuffed animals.

 Laugh Rabbit Jr.  Hand-sewn children’s items. From pillowcases to tooth fairy pillows to baby blankets and toys.

 Olive and Ollie  Modern quilts, chenille bibs, handmade appliqué tees, chenille blankets, lounge sets and pants, dresses, custom birthday shirts, custom birthday lounge sets.


 Beanie Designs  Handmade baby and children’s hats Always free shipping to US. Facebook fans get 10% off (look for code in the “About” section on FB sidebar)


 Freckles Crafts  Freckles Craft Kits offer convenient, safe, educational and fun craft projects for children ages three and older. Each craft kit contains everything you need to create a cute, fun, gift quality craft with your child and includes simple detailed instructions. With a wide range of materials to make paper crafts, wood crafts, and beaded crafts, Freckles Craft Kits can offer something for everyone's interest and ability. Free shipping on orders over $25 with code SANTA


Memorable Children’s Books and Gifts  You can receive a discount of 10-15% on the items listed on the page that I have linked to. Additionally, you will get a free place mat of your choice with every order! Sale ends 11/26. Also, look for Cyber Monday deals!


 Gummy Lump  Melissa & Doug, ALEX, and many other toys at great discounts! 40% ALL Toys sale!!! Everything in store marked down until Tuesday.

Frozen Creek Woodworks Quality handcrafted wood toys, home decor, and bookmarks made with reclaimed, repurposed and other woods that might otherwise be discarded. Prices reflect mark-downs for holidays.


Home 


4th Street Candle Co.  Handmade dye-free soy candles  (The scents are wonderful and last!)


8daysOfTreasures  Moss Terrariums, Nature Photography, Wall Decor, Vintage items, Jewelry Through Dec. 6, the code: BLACKFRIDAY will get 25% off  at checkout.


Amore Vivo  Unique Gifts, Speciality Florals, Peacock Feather Wreaths, Wine Ark, Cork Wall Art, Upcycled Cork Decor, Heart Wreaths, Summer Wreaths, Fall Autumn Wreaths, Handmade Heart Wreaths, Silk Everlasting Rose Arrangements, Home Decor, Italian and Wine Art and Wine Gifts for the Wine Lover,Wine Bottle Toppers and More! Looking to send Flowers? Make them last all year with realistic silk arrangements, I can ship right to your recipients door! *Also - Fresh Michigan Evergreen Centerpieces available for the holidays!*

Camp Honeybelle  Mid-century mod design, campy 1950's housewives, kitschy kitchens, atomic decor, retro school supplies, old books, vintage clothing. If someone on your list likes vintage, you've got to check out this shop!

The Peaceful Housewife  Safe, natural handmade cleaning products, bar soaps, and candles. 35% off all Peaceful Housewife products (all prices reflect discount – no code needed!)


For Her


MelJoy Creations  Hand-woven beaded jewelry at very affordable prices. You can request custom orders, but you may be pushing it if you wait too long! You can get a huge 25% discount with the code: SBS25 Today only!


 Party in My Pants  Mama cloth! If you’ve never tried cloth, you can request a free sample – just pay shipping! I held onto my free sample for months before I finally had the guts to try it out. I'm in love! (If anyone wants to send me a Christmas gift, this is it! LOL)


Cynical Redhead Creations  Handmade jewelry and accessories. For sales, coupon codes, etc. become a FB fan http://www.facebook.com/CynicalRedheadCreations


 Khara Ledonne  Amazingly small paintings inside lockets – unique! She will do custom orders, so make sure to get in touch ASAP if you have something special in mind.


Paper Goods/Cards


 Scrapin’ Sara’s Gifts  Great handmade greeting cards, gift tags, and gifts. Sara ALWAYS includes free surprises with every order, which amazes me since her prices are already so low! Get 20% off through the month of December with the code: THANKYOU


Budugalee Cards  Vintage handmade cards. You won’t find anything like these anywhere else! Cards are made with vintage photographs that have been altered – with colors, sparkles, even random objects. You’ll find cards from hilarious to serious. And, if you can’t find it – just ask! Custom orders are a specialty!


Now that's I've got my list together, I just know that I'm missing some shops. It's now 3:42am and I'm done thinking for the day (night? morning?) PLEASE don't hesitate to let me know about any sales, discounts, or great affordable small businesses that I should be sharing here! I will try my best to update this list (or maybe even write another post or two) throughout the day on...

SMALL BUSINESS SATURDAY!

Tuesday, October 11, 2011

Money? What Money?! {#CarNatPar}

Welcome to the October Carnival of Natural Parenting: Money Matters
This post was written for inclusion in the monthly Carnival of Natural Parenting hosted by Code Name: Mama and Hobo Mama. This month our participants have shared how finances affect their parenting choices. Please read to the end to find a list of links to the other carnival participants.
***
***


Photo by Aaron Patterson
I’ve learned that being “poor” is the easiest way to go green. Really, it is. Now, I’ve always leaned toward living naturally. Heck, I was the only person in my high school to celebrate Earth Day – and by “celebrate” I mean that I walked around the town I lived in and picked up trash for a couple of hours. I really didn’t know much else about it. I was raised in an upper middle-class family. We consumed and wasted a lot of stuff. Even when I was in my twenties and worked as a waitress, I didn’t really think about my lifestyle. I lived in Los Angeles, had The Oldest there, and was on a very tight budget. I guess it wasn’t tight enough – if I wanted something, I bought it. I didn’t think twice about the environment or the effects it had on my child. Then…
In early 2008, just weeks after hubby and I were married, I learned that we were expecting Little Guy. I was working third shift as a baker at a coffee shop. Just a month after finding out I was pregnant, hubby had an accident that totaled our minivan (thankfully, no one was hurt.) The next day, I found out that I couldn’t keep working at a job that had me on my feet & lifting heavy things for 8 – 10 hours a day. I had started bleeding and an ultrasound revealed that I had placenta previa. OK, no big deal. We talked it over and decided not to replace the van. Since I didn’t need to get to work at hours that the buses didn’t run anymore, we really had no need for a vehicle. It would save us a ton on gas money, insurance, and repairs (I swear, that thing cost us exactly $500 every time anything went wrong.) Hubby worked days and the buses ran right on schedule for him. So, #1 way to “afford” living more naturally:
NO CAR!

I decided to get back to school while I wasn’t working, so I started an online program that would have resulted in earning a Bachelor’s degree. I applied for financial aid and obtained a Pell Grant and a couple of student loans. Twice a year, I received a stipend check that helped pay for our utilities and rent (a.k.a. “room and board”), leaving some extra money out of hubby’s checks to pay for baby things, maternity clothes, little extras for The Oldest, etc. It was great – we were actually doing better with me home and not having a car than when I was working and driving!
We were even looking for a larger apartment. Our place was a one-bedroom, 625 sq. ft. apartment that we called “The House that Herb Built” (Herb being our landlord.) The angles of the walls, floors, and ceilings are wonky – you can never hang a picture and make it look straight because all of the angles are so crazy. The insulation (if there is any) in the walls is so thin that a gust of wind can be felt through the entire place. My Oldest had the bedroom and we were sleeping on a twin mattress in the living room. What were we going to do when Baby came?
Then, hubby was injured at work. It wasn’t a workman’s comp. type of situation, he had some medical problems that caused the accident and, as a result, was unable to work any longer. He filed for SSI in July of 2008. It was a good thing that I was at home because he needed care and someone to be around all of the time. Some of his medications had him walking around outside our apartment at 3am not knowing where he was. For a while there, I had one of those alarms on the door that beep loudly whenever it was opened so I knew if he had gotten lost on the five-foot walk from the living room to the bathroom and made his way outside. Without his income, we just couldn’t afford to move. We learned to make our small apartment work.
It can be hard, especially in the winter, with all of us in this little apartment. When cabin fever strikes, we do two things: purge our belongings and watch a TV show or DVD about how others live around the world. We receive all kinds of hand-me-down stuff from people. Rather than donating to the Salvation Army, people bring their useless junk to us instead. Then there’s hubby, who can’t go past a dumpster without peeking inside. Therefore, the place fills up rather quickly and a good purge helps. I read Momma Jorje’s Monday Minimalist posts to help get myself in the mood for this! And, because you just don’t know how good you have it until you see how other people live, I try to find some kind of show that features a family of 10 living in a hut the size of Oldest’s bedroom. We’ll all sit on the twin bed in the living room, passing around popcorn, and remind ourselves that we have it really, really good! There you have the #2 way to “afford” living more naturally:  
LIVE IN THE SMALLEST SPACE POSSIBLE.

Money started to get really tight with only my stipends to live on – they totaled only $8,000 a year. Our rent took nearly half of that, and utilities took the rest. We had to apply for food stamps – no choice. I also started going to WIC for milk, cereal, juice, etc. WIC even had a great program called Project Fresh that allotted me $50 a month to spend at the farmer’s market! We stopped eating out altogether – it was just way too expensive. We used to order pizza twice a month. I decided to make it from scratch, instead. It cost roughly $4 to make the same amount of pizza that we paid $25 to have someone deliver. (When I think about spending a whopping FIFTY DOLLARS on pizza – just two meals – every month, I want to kick myself!) I also started to make my own bread, froze as much farmer’s market produce as I could fit into the freezer, and stopped buying pop and junk food. Tortilla chips and shredded cheese, for instance, replaced chips. This was healthier AND the fact that we actually had to make nachos rather than grab a handful of chips when we were hungry made us all think twice about why we wanted to eat in the first place. Was it to fuel our bodies, or “just because”? I had also been reading a book called Animal, Vegetable, Miracle by Barbara Kingsolver. She and her family agreed to eat only locally-grown food (I think it was within 50 miles of their home?) for one year. As she describes how the family met their challenge, some disturbing facts about fuel consumption, pesticides, and many other food-related eco-unfriendly truths are revealed. Yeah, our eating habits definitely changed and the #3 way to “afford” living more naturally was born:  
KNOW WHERE YOUR FOOD COMES FROM AND WHAT IT’S MADE FROM.

Little Guy was born and I learned that there’s a huge difference between “want” and “need”. We did not need the things that you always see on those lists from baby registries: bottles, swing, wipes warmer, monitor, crib, changing table… I had breasts (well, actually, I still have them!) that held his food at the right temperature and didn’t cost anything, I held him all of the time, we made our own wipes on an as-needed basis so the water was always warm, um – don’t need a monitor if you’re in the vicinity of baby all of the time, we co-sleep, a blanket on the floor or bed works perfectly as a changing table. I can go on and on about how all of those “must have” items are a waste of money, space, and resources. The only thing that we really had to worry about was laundry and diapers. I never had the full amount needed to invest in cloth and, just three years ago, the availability of affordable cloth diapers was limited (or I just didn’t know where to look.) Clothing, toys, etc. were easy to come by – we either received hand-me-downs or I hit up the local thrift stores. When he started eating food, I just made my own from farmer’s market finds. Rather than buying all kinds of little freezer bowls and special baby food making equipment, I just used the blender and asked on Freecycle.com for some baby food jars. Hence, #4 of how to “afford” living more naturally:
LEARN THE DIFFERENCE BETWEEN “NEED” AND “WANT”.

Since this is getting very long, I’m going to make this the last one (yay!)* One thing I worry about is my Oldest son. He is growing up with friends whose families are still stuck in consumer mode. Even though we live closer to the low-socioeconomic side of town, his friends still get new shoes & clothing, video games, junk food, etc. And here’s my kid, trying to be cool in last year’s styles from the thrift store, trying to keep up on the newest video games so he can talk about them without actually having ever seen them, and eating an apple for a snack rather than a bag of Cheeto's. He doesn’t complain, but I know it’s hard. Now that he’s in high school, it’s even harder. Other kids judge. And, while it’s all well and good to keep telling him that they’re just being stupid teens and one day they’ll realize that the style of shirt you’re wearing doesn’t define who you are – it doesn’t make today any easier for him.
So, without a lot of money and attempting to live green, I started to enter blog giveaways and take surveys that offer Amazon.com gift cards and PayPal payments. I use these to get gifts and “cool” stuff for the kids, especially my Oldest. Last week, he gave me his Christmas list. Yeah, I know… BEFORE October even started! You know why? “Because I know that if you win something, it can take a while for it to get here.” He made up a very modest list of things he’d like because he knows that I can attempt to enter giveaways or check out Amazon for sales of these items. Some of the things I win or buy aren’t 100% green, but I have to remember what I felt like when I was his age. I want him to feel good about himself and have the self-esteem that I didn’t. This year, he will be wearing his very first non-homemade costume for Halloween thanks to a giveaway I won (kinda cool since it'll be his last year trick-or-treating!) I know that he understands my lifestyle choices and he knows why I made the decisions I have made. He and I have had numerous conversations about why such-and-such is bad (for him, for people, for the earth…) and I see him making eco-friendly decisions more and more. However, it’s important to note that I made these choices for me. I cannot deprive him of the things he wants or make him feel bad for wanting them just because of my opinions. The final thing to remember if you want to “afford” to live more naturally is:
FIND WAYS TO LET YOUR KIDS BE PART OF THE CROWD.

So, how do you live more naturally and still make ends meet? We’ve gone without and learned how to live comfortably, but there’s always room for improvement!
Any suggestions?

*I have a lot more to say on this subject, but I wanted to keep it at a readable length. :)
***

***

Carnival of Natural Parenting -- Hobo Mama and Code Name: Mama Visit Code Name: Mama and Hobo Mama to find out how you can participate in the next Carnival of Natural Parenting!

Please take time to read the submissions by the other carnival participants:

(This list will be live and updated by afternoon October 11 with all the carnival links.)

  • Money Matter$ — Jenny at I'm a full-time mummy shares her experiences on several ways to save money as a parent.
  • A different kind of life... — Mrs Green from Little Green Blog shares her utopian life and how it differs from her current one!
  • Show Me The Money! — Arpita of Up, Down & Natural shares her experience of planning for parenting costs while also balancing the financial aspect of infertility treatments.
  • Material v Spiritual Wealth - Living a Very Frugal Life with Kids — Amy at Peace 4 Parents shares her family's realizations about the differences between material and spiritual wealth.
  • If I Had a Money Tree — Sheila at A Gift Universe lists the things she would buy for her children if money were no object.
  • Financial Sacrifices, Budgets, and the Single Income Family — Jennifer at Hybrid Rasta Mama looks at the importance of living within your means, the basics of crafting a budget, and the "real cost" of working outside of the home.
  • Overcoming My Fear of All Things Financial — Christine at African Babies Don't Cry shares how she is currently overcoming her fear of money and trying to rectify her ignorance of all things financial.
  • Confessions of a Cheapskate — Adrienne at Mommying My Way admits that her cheapskate tendencies that were present pre-motherhood only compounded post-baby.
  • Money MattersWitch Mom hates money; here's why.
  • Money? What Money?! — Alicia C. at McCrenshaw's Newest Thoughts describes how decisions she's made have resulted in little income, yet a green lifestyle for her and her family.
  • What matters. — Laura at Our Messy Messy Life might worry about spending too much money on the grocery budget, but she will not sacrifice quality to save a dollar.
  • Making Ends Meet — Abbie at Farmer's Daughter shares about being a working mom and natural parent.
  • Poor People, Wealthy Ways — Sylvia at MaMammalia discusses how existing on very little money allows her to set an example of how to live conscientiously and with love.
  • The Green Stuff — Amyables at Toddler In Tow shares how natural parenting has bettered her budget - and her perspective on creating and mothering.
  • Jemma's Money — Take a sneak peek at That Mama Gretchen's monthly budget and how Jemma fits into it.
  • 5 Tips for How to Save Time and Money by Eating Healthier — Family meal prep can be expensive and time-consuming without a plan! Dionna at Code Name: Mama shares five easy tips for how to make your cooking life (and budget) easier.
  • Belonging in the Countryside — Lack of money led Phoebe at Little Tinker Tales towards natural parenting, but it also hinders her from realizing her dream.
  • Total Disclosure and Total Reform — Claire at The Adventures of Lactating Girl gets down to the nitty gritty of her money problems with hopes that you all can help her get her budget under control.
  • Save Money by Using What You Have — Gaby at Tmuffin is only good with money because she's lazy, has trouble throwing things away, and is indecisive. Here are some money-saving tips that helped her manage to quit her job and save enough money to become a WAHM.
  • Two Hippos & Ten Euros: A Lesson in BudgetingMudpieMama shares all about how her boys managed a tight budget at a recent zoo outing.
  • ABBA said it — Laura from A Pug in the Kitchen ponders where her family has come from, where they are now and her hopes for her children's financial future.
  • Money vs. TimeMomma Jorje writes about cutting back on junk, bills, and then ultimately on income as well ~ to gain something of greater value: Time.
  • An Unexpected Cost of Parenting — Moorea at MamaLady shares how medical crises changed how she feels about planning for parenthood.
  • 5 Ways This Stay at Home Mom Saves Money — Charise at I Thought I Knew Mama shares 5 self-imposed guidelines that help her spend as little money as possible.
  • Frugal Parenting — Lisa at My World Edenwild shares 8 ways she saves money and enriches her family's lives at the same time.
  • Conscious Cash Conscious — Zoie at TouchstoneZ shares her 5 money-conscious considerations that balance her family’s joy with their eco-friendly ideals.
  • Money, Sex and Having it All — Patti at Jazzy Mama explains how she's willing to give up one thing to get another. (And just for fun, she pretends to give advice on how to build capital in the bedroom.)
  • Money could buy me ... a clone? — With no local family to help out, Jessica Claire at Crunchy-Chewy Mama wants childcare so she can take care of her health.
  • Spending IntentionallyCatholicMommy loves to budget! Join her to learn what to buy, what not to buy, and, most importantly, where to buy.
  • New lessons from an allowance — Lauren at Hobo Mama welcomes a follow-up guest post from Sam about the latest lessons their four-year-old's learned from having his own spending money.
  • How to Homeschool without Spending a Fortune — Deb Chitwood at Living Montessori Now shares tips and links to many resources for saving money while homeschooling from preschool through high school.
  • It's Not a Baby Crisis. It's Not Even a Professional Crisis. — Why paid maternity leave, you may ask? Rachael at The Variegated Life has some answers.
  • "Making" Money — Do you like to do-it-yourself? Amy at Anktangle uses her crafty skills to save her family money and live a little greener.
  • Money On My Mind — Luschka at Diary of a First Child has been thinking about money and her relationship with it, specifically how it impacts on her parenting, her parenting choices, and ultimately her lifestyle.
  • Spending, Saving, and Finding a Balance — Melissa at The New Mommy Files discusses the various choices she and her family have made that affect their finances, and finds it all to be worth it in the end.
  • Accounting for Taste — Cassie at There's a Pickle in My Life shares their budget and talks about how they decided food is the most important item to budget for.
  • Money Matters... But Not Too Much — Mamapoekie at Authentic Parenting shares how her family approaches money without putting too much of a focus onto it.
  • Parenting While Owning a Home Business — In a guest post at Natural Parents Network, Lauren at Hobo Mama lays out the pros and cons of balancing parenting with working from home.
  • Crunchy Living is SO Expensive...Or Is It? — Kelly at Becoming Crunchy talks about her biggest objection to natural living - and her surprise at what she learned.
  • Mo' Money, Mo' Problems — Sarah at Parenting God's Children shares how a financial accountability partner changed her family's finances.
  • The Importance of Food Planning — Amanda at Let's Take the Metro discusses how food budgeting and planning has helped her, even if she doesn't always do it.
  • Kids & Money: Starting an Allowance for Preschoolers — Kristin at Intrepid Murmurings discusses her family's approach and experiences with starting an allowance for preschoolers.

Sunday, October 9, 2011

I’m So Excited! {Made in #Michigan #Giveaway Hop PREVIEW}


About a month ago, I posted about joining the Made in Michigan Giveaway Blog Hop with quite a bit of apprehension. How was I going to get someone to sponsor a prize worth $25 or more?! I’m not very good at cold pitches - the majority of the reviews and giveaways have been facilitated by the sponsors contacting me or by me being the “sponsor”. Heck, when I waited tables, I was the only waitress that would tell you that the grilled cheese ($3.99) tasted much better than the sirloin tips ($14.99)! But, I really wanted to join in on this, my very first, giveaway hop.

Why? Because I live here and our economy sucks right now. Teenagers can’t get jobs – even babysitting – because there are so many adults out of work that they’re willing to take any type of work as long as it guarantees a little money. I honestly cannot remember the last time someone under the age of 25 bagged my groceries! And don’t let those unemployment numbers fool you. The percentage is only going down because people cannot receive unemployment compensation anymore, not because they’re working.
Small businesses are struggling in particular. They’re overhead costs more because they can’t buy in the gigantic quantities that larger companies can. I have the utmost respect for people who have decided to do what they enjoy and struggle to get by because of it. So, I headed over to Etsy to see what kind of wonderful handmade products come form Michigan. I asked a few Michigan-based shops if they’d like to take part in the hop and, to my surprise, they said “yes”! (My first cold-pitch letter was bad. I had details in there that didn’t pertain to the sponsors… it was just plain confusing. And these people didn’t just write me off as a nut case!)
I’d like to introduce you to the wonderful sponsors today. The week before the giveaway (which will take place Oct. 28 – Nov. 2), I will write review posts for the shops that sent an item for me to try out. These posts will have very easy extra entries on them, so don’t miss them! (Click on pics to see the shops!)
 ~~~~~~~~~~~~~~~~~~~~~~~~~~~~~~~~~~~~~~~~~~~~

 ~~~~~~~~~~~~~~~~~~~~~~~~~~~~~~~~~~~~~~~~~~~~~~~

 ~~~~~~~~~~~~~~~~~~~~~~~~~~~~~~~~~~~~~~~~~~~~

 ~~~~~~~~~~~~~~~~~~~~~~~~~~~~~~~~~~~~~~~~
~~~~~~~~~~~~~~~~~~~~~~~~~~~~~~~~~~~~~~~~~~~~~

(Psst... FREE shipping to Michigan addresses!)
~~~~~~~~~~~~~~~~~~~~~~~~~~~~~~~~~~~~~~~~~~~~~~~


~~~~~~~~~~~~~~~~~~~~~~~~~~~~~~~~~~~~~~~~~~~~~~~~
~~~~~~~~~~~~~~~~~~~~~~~~~~~~~~~~~~~~~~~~~~~~~~~

~~~~~~~~~~~~~~~~~~~~~~~~~~~~~~~~~~~~~~~~~~~~
YEAH, CAN YOU BELIEVE IT?! And you'll have a chance to win something from all of these shops at the end of the month. Go check them out now, though. Many have fall sales going on and you can pick up some really nice, handmade items - remember the holidays are on their way and every one of these shops carries some great gift items!

A special "THANK YOU" to the sponsors. I am still in shock over the response I received for this giveaway. GO MICHIGAN!

If you are are a blogger or sponsor that would like to join The Made in Michigan Giveaway Blog Hop, it's not too late! Just let me know via that handy "Contact Me" button at the top of the page and I'll send you to the right person to get signed up!