Showing posts with label holiday. Show all posts

Thursday, December 22, 2011

Two-Ingredient Thin Mint Cookies {Last-Minute Homemade Gifts}

O... M... G...
These cookies are AMAZING!!! And, yes, there are only two ingredients. You can literally make a few dozen of these in less than 15 minutes and people will be raving about them! I wouldn't venture so far as to say that these are just like the ones that you can buy in March from little girls dressed in green and brown, but they are close enough (and WAY more affordable!) The flavor is there, but the texture is more delicate.

Now, I don't have a photo of them because, as it turns out, my husband and oldest found my stash and pigged out. No worries, though, you can see a photo HERE, on Vanessa of The Crafty Nest's Pinterest board, where I found this idea. I cannot find her original post on her blog, so I cannot link you directly.

So, here's what you're going to need:
  • A bag of Andes Mints (the original ones)
  • A box of Ritz crackers
That's it.

Now, you can find Andes Mint pieces in some stores. They cost a little more, but you don't have to unwrap a zillion of the mints and they melt faster since they're already broken into small bits. I bought one bag of each kind because I couldn't resist having some of the mint foils on hand for projects. (Hey, free green foil paper! I'm thinking St. Patrick's Day and springtime craft projects!) Also, I didn't try using an inexpensive store-brand cracker. I wanted these to taste just right and wasn't willing to risk it. I'm sure a cheaper box of crackers would work out just fine, though.

Here's what you do:

Over a double-boiler, melt the mints. I made sure to get them good and warm so the excess chocolate would run off easily. Just be careful that you don't over-do it and burn the chocolate - ick! You could probably use the microwave, but I don't care to melt large amounts of chocolate that way. It heats from the inside out and can sometimes get overheated and burn without even changing shape!

Make sure you pull out any broken and flaking crackers from the package (I crumble mine up and keep them in a jar for a quick topping for mac and cheese or other casseroles). Simply drop one cracker at a time into the melted mints, flip it over, then fish it out with a fork. With the coated cracker laying bottom side down, very gently tap the fork to let the excess chocolate drip off. Set the coated cracker on a baking sheet lined with waxed paper or parchment (I use parchment this time of year - less chance of sticking and you can reuse it many times for the same thing.)

You can leave the cookies as they are, or make them look pretty. Since I have my assistant chef helping me all of the time, it was decided that our cookies would be pretty. I gave him several small bowls with different cookie toppings in them: nonpareils, sprinkles (some of you call them jimmies?!), colored sugar, candy cane pieces, etc. As soon as I set a freshly-dipped cracker onto the baking sheet, his job was to decorate it with "just one little pinch" of whichever topping he chose, and sometimes a few of them!

When I finished with a tray, I put it into the refrigerator for about 5 minutes to let the chocolate set up. After I let them return to room temperature, I put 3 to 4 of the cookies, depending on how big Little Guy's pinches were, into a cupcake liner. We put three cupcake liners worth of cookies into a sandwich bag and tied it securely for giving to friends and family. You want to make sure that these are sealed pretty well or the minty flavor will sink into your other baked goods - not very yummy!

Now, I have to go melt some more mints. There are two guys in the doghouse right now who are going to be replacing the cookies they ate last night. See? These are so easy to make that I can actually have them do it on their own!

Wednesday, December 21, 2011

Fizzy Bath Bombs {Last-Minute Homemade Gift}

I originally found the recipe for these on About.com - the place to find articles about anything by anyone! This recipe for the Bath Bombs is based on the one posted by David Fisher, so I'd like to thank him for showing me just how easy these are to make. Really, I've been wanting to try them out for a while now, but they always seemed so complicated and as if they needed a ton of ingredients that were expensive and hard to find. Not true on either! 

Now, I scented my bath bombs with lavender essential oil and dried rosemary from my garden, but you can use any number of scent combinations. Check out this tutorial on mixing essential oils to get the right scent on Easy Aromatherapy Recipes. Just remember: If you use herbs instead of the oils, you'll need to use more. Also, remember that once the herbs rehydrate in the tub, their scent will be stronger! I chose Rosemary and Lavender because I just love how the two blend. Also, I had to buy the essential oil for this and I wanted something that I'd use often. And, once again, don't go all out and buy some expensive and fancy rosemary - get the cheap bulk stuff.

There is one ingredient on the list that I was worried about finding: Citric Acid powder. I took a shot in the dark and visited our local health food store, Health Matters in Monroe, MI, and found that Maurine had it AND it wasn't expensive. I only got a 4 oz. bottle, so I had to halve the recipe on About.com and, of course, I changed it up a little. Here's what I ended up with:

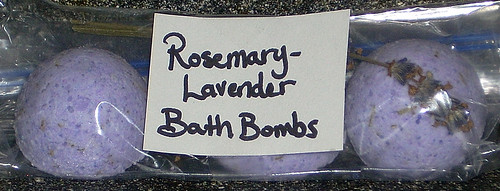
Rosemary-Lavender Bath Bombs

Ingredients
  • 1/2 c. Corn starch 
  • 1/2 c. Citric Acid (4 oz.)
  • 1 c. Baking Soda
  • 1/2 c. Epsom Salt
  • 1 tsp. Water
  • 1/2 tsp. Borax
  • 1/2 to 1 tsp Lavender Essential Oil 
  • 1 Tb. Dried Rosemary leaves, broken up into 1/4" or less pieces (I just pinched them in my hand to break them)
  • 1 Tb. olive oil
  • Colorant, if you want to use it (I used gel food coloring. If you have soap colorant you can use that, too)
Now, according to David Fisher, the most important part of the entire recipe is making sure that there is a 2:1 ratio of baking soda to citric acid. This is what makes the fizzies. All of the rest can be played with. The corn starch is there to make the bath water feel silky and it also helps hold the bombs together when they dry, but you can leave it out if you prefer. The Epsom salt can be exchanged in full or in part with sea salt. The oil is also up to you. I used olive oil because it's what I has on hand and I like it. Try grape seed, jojoba, anything you like!


Equipment
*Make sure that you either use all glass or metal equipment, or use plastics that you don't need for cooking. The essential oil will permeate the plastic and no amount of washing will help you!... Trust me - I found out the hard way!
  • Large glass or metal mixing bowl
  • Metal whisk
  • Measuring spoons and cups
  • Small squirt bottle (I picked up some ketchup and mustard bottles from the housewares section at the end of summer for $0.25. You could use anything that is small, squeezable, and has a top that allows you to control how much comes out.)
  • Spoons
  • Baking sheet lined with wax paper, foil, or paper towels
  • A mold for your bombs. I used the rounded half of a plastic Easter egg. Look around the house - lids, scoops, measuring cups, even a sturdy cardboard tube from the tin foil will work! You just want to make sure the mold is sturdy enough to withstand the pressure you're going to be putting on it by packing the mixture into it and that it is shaped to release the bombs easily.
How I Did It

I'm so sorry I didn't take pictures. Though, it would have been hard to do with my hands covered in bath bomb stuff! I made these on my own, without Little Guy's help, because I ended up making them at 2am. There are portions of this that he could have helped with, but it was rather powdery and I think I'm glad to have kept him out of this project - I wouldn't have wanted him, at his close level to the counter, to have breathed in all of that dust!

Make sure that you have all of your equipment at hand. This isn't a project where timing is everything, but it keeps things cleaner. I ended up trailing some of the mixture from one end of the kitchen to the other, collecting the things I needed as I went along.

  1. Mix the dry ingredients (*except the Borax) together with the whisk, or use a sifter: Cornstarch, Citric acid, Baking soda, Salt, and dried herbs. This is where I made the dusty powder bomb in my kitchen. Make sure you have food and clean dishes put away!
  2. In the squirt bottle, mix the wet ingredients and Borax: Water, essential oil, olive oil. Just put them all in and shake it up! This is where I added my food coloring, too. Remember to not over-do the coloring! The bombs will darken as they dry.
  3. Put your whisk in one hand and the squirt bottle in the other and get ready - this is where you have to make sure you went potty, the kids are going to be quiet for at least five minutes, and the answering machine is on. Just FIVE MINUTES! Squirt a tiny drop of the oil concoction into the middle of the dry stuff and wait a couple of seconds. See how it fizzes up? You don't want that to happen as you're mixing the wet and dry ingredients together, so make sure you keep stirring with that whisk. I don't know the scientific explanation as to why the stirring prevents the fizzing, it just does. So, as you drizzle the wet ingredients into the bowl, whisk like crazy. You may want to stop drizzling once in a while to make sure that it's all mixed in before adding more. 
  4. You want to check every once in a while to see if you have enough wet mixed in - depending on your ingredients, you may need less wet than you mixed up. Grab a small handful of the mixture and squeeze it hard. Open your hand and gently poke the mass. If it flakes up any, crumble it back into the bowl and keep adding the wet ingredients. If it doesn't - stop and go on to step 6. If you run out of wet stuff, go to step 5. (Check the picture that David Fisher was so kind to include in his instructions here.)
  5. If you need more wet, just put 1 TB of water into your squirt bottle. I added a little more food coloring here, too, because I wanted a darker color. Shake it up really well to get some of the leftover oils mixed in and keep squirting, mixing, and checking to see if you have enough wet in there. DO NOT USE TOO MUCH WET! I have no idea how to fix this!
  6. Now you're ready to mold your bath bombs! Get your mold and fill it up with the mixture. Press it in there as tightly as you possible can. This took everything I had to do - I have arthritis in my wrists and fingers. It's important to get it packed well, or they'll end up falling apart as they dry (if they do, just crumble them up, put it in a jar with a nice bow on top and call it Fizzy Bath Salts!) 
  7. If you're using a tube to mold them, set it directly on top of the lined baking sheet. Put some of the mixture into the tube, then use something to batter it down. I used a spice jar lid that fit perfectly inside the tube. kind of like a piston, and then used a long wooden spoon handle to pound it down. It worked great, but I didn't care for the giant pill-shaped bombs, so I scraped them and used the 1/2 egg mold. Once you have it packed well, just slowly lift the tube straight up. If it sticks, you can tap the sides of the tube and use the lid/spoon to press it out as you lift.
  8. Unmolding can be tough. You must have patience because you can't just plop them out unless your mold will allow it.I just repeatedly tapped and shook the mold against my hand until the bomb came out. There were times when I'd nearly given up - it was getting really late! - but then the bomb would pop into my hand. 
  9. Set the bombs on the baking sheet into your oven or other safe place to dry. Mine were dry in 12 hours, but I let them sit for about a day and a half just to make sure they were dry all the way through. When they were dry, they were rock hard and not at all fragile! 
  10.  I packed three bombs into each bag, added a sprig or two of dried lavender for pretties, and was done!
Now, after I made these, I thought of a few possibilities that I could have tried, had I had the time:
  • Split the dry mixture into two separate bowls, mix the wet ingredients into two separate bottles, and add different colors. When molding, create stripes or swirls of the two colors.
  • Wrap each bomb in plastic wrap and tie with a ribbon.
  • Put the bombs into wide-mouthed Mason jars with a pretty ribbon tied around the top.
  • Pack the bombs into a "spa gift basket" with herbal tea, raw honey, a pretty mug, handmade soap, a scrubby or pretty washcloth...  
I'm planning on making these more often! I tried one out (had to make sure they worked!) and I loved it. Do you have any scent combos that you think would be good? For me, for my husband and oldest, for little guy, for gifts?

Tuesday, December 20, 2011

Orange Spice Potpourri {Last-Minute Homemade Gift}

 I got the original idea from a post on Keeper of the Home. You should really check out this blog - she recently posted about different home remedies for winter ailments. I get tons of great ideas from her!

I cannot believe how great this stuff ended up smelling. I just added a few ingredients to it. It is so easy to make - Little Guy pretty much did it all himself! Just make sure that you have the whole family save their orange peels!

Orange Spice Potpourri

  • Cinnamon Sticks
  • Whole Allspice
  • Whole Cloves
  • Peels from Oranges
  • Bay Leaves
  • Pine cones or Wood shavings (from untreated wood!),
  • Orange or Citrus Essential Oil
Now, looking at the list of ingredients, I know what you're thinking: "Doesn't she have any idea how expensive those spices are???" Yes, I do. That's why I bought the dollar store out of them! As I mentioned in my Spiced Dough Ornaments post, if you're not eating it, it doesn't matter how good these things are. You want them for their scent only, so go the cheapest possible. You may even consider buying some of those Cinnamon-Scented Pine Cones to use - just pull them apart!

Next, I used Clementines. Little Guy can peel them by himself and the peels are very thin, they dry very quickly. I kept a bowl near the trash can and told everyone to put their peels into it. Little Guy's job, before bed, was to tear the peels into small pieces (about 1/2" X 1/2"). Then, we spread them onto a wax paper-lined cookie sheet and popped them into the oven. We have a pilot light that is on all of the time, so the little bit of heat generated by it helped dry the peels overnight. If you don't have a pilot light, try setting the sheet near a heating vent or anywhere that the air circulates.

You don't have to go collecting pine cones and wood shavings like we did. I just wanted to be able to bulk up my batch of potpourri so I could give out more and use less spices (they might have been bought at the dollar store, but the cost does add up, anyway!) We had a friend save his shavings for us. Since we had a lot of time before having to give the gifts, We mixed up a little food coloring into warm water and added the shavings. I let them sit for a couple of hours, then drained and spread onto a cookie sheet. I was worried about the orange scent being overpowered by the spices, so I shook a little bit of the essential oil onto the still wet shavings then put them into the oven to dry. They took about 24 hours, and I used my hand to turn them over a few times so they'd dry all over.It added a little extra color and extra scent to the mix.

Now, I didn't give any measurements because there really aren't any. I used about 8 cinnamon sticks. I had to get out a hammer and gently hit them so I could break them into 1/2" to 1" pieces. I used one jar of cloves (0.62 oz, I think), and the same amount of allspice. I think we had the peels from a dozen clementines (they shrink a ton when they dry!) and around 1 1/2 c. of wood shavings. I dumped it all into a bowl and Little Guy used a wooden spoon, then his hands, to mix it all together.

We wanted to have enough potpourri to give to ten people, so we put about 1/2 cup (eyeballed it) into a sandwich bag, then tied closed with a pretty ribbon. The potpourri smell good enough to just set in a bowl. When it stops being "smelly", just put a tablespoon or two into a mug filled about halfway with water and microwave for 45 to 60 seconds. Mmmm!

I linked this post at:
Classified: Mom

Pin It

Wednesday, December 7, 2011

Spiced Dough for Ornaments {Craft}

On Sunday, I had planned to make salt dough ornaments with the kids as our Advent calendar activity. Well, on Saturday night, I checked out all of the different recipes, looking to see if there was anyone with an unusual twist or different kind of ingredients. I'm always looking for stuff like that. Anyway, I saw an old recipe that I tried a few times with my oldest and didn't much care for: Cinnamon Applesauce Dough. I mean, it was OK for playing with, but it didn't set up well for ornaments and the scent seemed to go away as it dried. So, I switched my search to a cinnamon dough that had those two qualities I've been missing.
I decorated these two rather quickly so I could take pictures and write this post. The kids and I will decorate the rest on Thursday - it's another one of our activities!

I came upon the best recipe yet! It was posted on a blog called Heartland MOPS. And, if you know me, you know I changed it a little bit. (One thing I want to tell you before I get started on the recipe: Do not buy your spices at the grocery store for this one. Head to the dollar store, Aldi, anywhere else. They don't need to be fresh, you're not eating them - just using their smell!)

Spiced Ornament Dough
  • 1 c. ground cinnamon
  • 1 Tb. ground cloves
  • 1 Tb. ground ginger
  • 1 Tb. ground nutmeg
  • 1 c. applesauce
  • 2 Tb. white glue (I used Elmer's Glue All)
  • 2 Tb. flour + more for rolling dough 
  1.  Measure out the dry ingredients and stir them together. Make sure you pour the cinnamon and stir slowly! There will be cinnamon dust floating around and you probably don't want to be breathing it in. I had Little Guy get down off the chair he was standing on and wait at the kitchen table until I had the wet ingredients added.
  2. So, yeah... the next part is to add  the applesauce and glue. Now, the glue probably isn't a necessity, but it does hold everything together nicely once the ornaments are dry.
  3. Once everything is mixed pretty well, have you kid put his or her hands into that bowl and knead the dough for a while. It's not as if it has to be perfectly kneaded, so just let them feel it, squish it, and smell it for 5-10 minutes. What they're doing is helping the gluten in the flour come out, making the dough a little elastic. If the dough seems too wet or sticky, add a little more flour. It really shouldn't be sticky. You should be able to shake your hands and have the majority of it fall off.
  4. Now it's time for fun! Roll the dough on a lightly-floured surface to 1/4" thick. I had some that was slightly thinner, but you need to be careful - the thinner the ornaments are, the more likely they will break! Also, watch that you don't use too much flour. You can see faint white areas on my ornaments from using too much.
  5. Cut the ornaments and set on parchment- or foil-lined baking sheets. You don't really have to worry about them being far apart because they're not going to rise, but make sure that they aren't touching.
  6. Bake at 200 degrees for an hour - your house is going to smell AMAZING. If they're still wet, carefully flip them over and bake for 30 minutes to an hour more - check every 10-15 minutes to make sure they don't burn! (Burnt cinnamon is nasty-smelling and will hang around the house for days. Yuck!) If you don't want to bake them, you can let them dry on their own for 3 to 4 days, turning once a day to dry evenly.
  7. Once dry, you can decorate your ornaments in any number of ways. I chose to use obviously inedible decorations so no one would think they were cookies. While the ornaments are made of food and non-toxic glue, they taste nasty - just ask Little Guy who decided that I was wrong when I told him it was yucky. He took a HUGE bite of dough when my back was turned. He really wanted to prove me wrong and tell me it was yummy (yep, he's three!) When I turned back around, I knew, by the look on his face, what he'd done. I waited to see what he'd do. After holding it in his mouth for 30 seconds, it got spit right out.
If you don't celebrate any ornament-related holidays, you can also make beads from this dough. That's what I did with the scraps that were leftover. You could make a nice car freshener by threading a few large beads onto a ribbon and hanging it from the rear view mirror. I tossed a couple of flattened disks of dried dough into the exhaust of our vacuum cleaner, so every time I run it, the room gets deodorized, too!

Thursday, December 1, 2011

Easy DIY Advent Calendar with Stuff You Already Have {#Craft}

Every year, I make plans to make my own Advent Calendar... I always wind up picking one up at Walgreen's for $2 around December 5th. I also make a list of fun family activities that we can do together for the holiday season... and it ends up just sitting there because I don't plan ahead. Not this year!

I saw a really easy Advent calendar idea where you use muffin tins as the base. It's perfect - the little candy holders are already there! And, the next day, guess what hubby came home with... Yes, 6 aluminum mini muffin tins. It seems that someone he knew was going to just throw them out (I KNOW!) Knowing me, he figured if I couldn't use them, I'd recycle them. Two of them are now part of our Advent calendar, and I'll be able to use them again next year!

Another idea I saw was to make an Advent calendar that contained a surprise family activity for each of the 24 days leading to Christmas. If I put an activity on little pieces of paper for each day, I'd kind of have to do the stuff, right? You can't have the kids opening each section, read the paper, then say, "Eh... I don't feel like it!"

So, here's my little Advent calendar idea. It took me a total of one hour to make it, including the portions that the kids helped me with. I mostly used things I have around the house. I bought candy and some nice scrapbooking stickers that were on sale at 2/$2.

The mini muffin tins that I have hold one dozen muffins each, so I needed to figure out how to make them stick together. I don't keep glue that works on metal laying around the house, so I figured out a different way: bread ties. Yeah... I never throw them away. I even have other people save them for me! You can use those suckers for everything, even sticking two aluminum pans together! I had the kids help me peel the paper off of about 6 ties. Then, I used a pin to poke holes in both of the tins and threaded one end of each wire into the holes. I loosely twisted each wire before I flipped the tins over and tightened it all up.


*TIP: See the picture on the right up there? 
That paper clip saved me lots of trouble. 
I stuck it on there to remind me which cup
was Day 1. The tins got turned around so 
many times that I had to take all of the candy
out and read the activities so I knew which
one the calendar was supposed to start on.
Next, I had the kids help me. First, we had to agree on some activities. I found a wonderful list of over 30 ideas at Code Name: Mama that I borrowed from. Some of the things we chose will take effort, others are very easy: Make paper snowflakes, Take a family walk at night to look at the decorated houses, bake and decorate cookies (I have four days set aside for that!), family holiday movie night, write to Santa... The very next thing I did - and you shouldn't skip this step! - is to plan out what we;ll be doing on what day, then wrote it down in my planner. This is so important! You don't want to: 1) be surprised that today is the day you're supposed to go to the zoo, and 2) have something major planned for a bust night and something that takes 10 minutes planned for a day when you have lots of time to spare. I wrote all of the activities down on a piece of paper and we put them into the bottoms of the muffin cups.  The kids each got to pick out a bag of candy to fill each day's section with. So, they each took turns placing two of their candies into each cup.

While my oldest watched Little Guy, I got out the glue gun. I had to figure out how to cover each of the cups so they could be opened individually. I saw some great ideas on Pinterest that included cutting little circles from cardstock and covering each individually, making felt bags that contain the day's prize that had a glue dot holding them into the cups... I had two options with what I had on hand: wrapping paper or newsprint. They're both pretty easy to tear open. If I used one sticker for each day, when the kids puled on the sticker, the paper would rip and reveal the contents of the cup underneath. Although wrapping paper is a little more decorative, I went with newsprint. I've been carefully folding each piece of packing paper that I get and squirreling it away for projects just like this - not using it would have been insane, you know?


Now, I had to figure out how to make the paper stick to the aluminum well enough that the kids wouldn't end up ripping the entire sheet off on the first day. I came up with this nifty idea: I used a nail to poke holes in key areas of the tins. Then, I used the glue gun to glue the paper over each section - one at a time. I made sure to let the glue pool a little wherever I had poked holes. After I had the entire paper glued down, I carefully flipped the tins over and put extra dollops of glue over each hole. I also reinforced the bread ties by laying down a line of glue over the two edges of the tins they were holding together.


Then it was time for Little Guy's VERY IMPORTANT job. He had to put the stickers onto the Advent calendar! I had him leave Day 24 empty because I wanted to add a picture of Santa for Christmas Eve.

*TIP: If you have little ones helping, put dots where the center of each cup is.
Our last step was to fancy it up a little bit. I has all kids of ideas: the old tissue paper squares on the end of a pencil thing (too frustrating when it sticks to the pencil), glitter (and look like I ran into a pixie until February?!), paint (too easy for Little Guy to puncture the paper with the brush. AHA! We have tons of ribbon, so we simply glued a little in the spaces between the stickers.
The photo above is our almost-finished product (you can see some of the white glue's not even dry yet!) I plan on putting bows on each corner and then attaching a ribbon to hang the calendar on the wall. Where to put this posed a problem until I was downloading the pictures of our Christmas tree**.  When I saw the photo, I saw the perfect spot - just  left of the tree, up high. There's no way (short of using a long stick or throwing something heavy at it) for Little Guy to get that calendar down. He's is a candy freak and it doesn't agree with his disposition, so one piece a day is enough! He knows there's a whole lot of candy in those tins, so I have to be extra careful.
Don't you just love the thermostat? I think I'll put a big bow on top of it so it looks like an ornament. As we add our own ornaments to the tree, it should blend in... right?
**Now, we don't have a real or plastic tree for a variety of reasons. So, each year, I go out and look for the "perfect tree wrapping paper". In an hour or so, I cover the wall with wrapping paper , then cut out a tree shape from the tree paper. This year's was a quickie job - Little Guy was cranky and I was trying to hurry up and get it done so I could put him to bed. It's not even or anything, but that's how they come in real life, right? As we get closer to Christmas, we'll be making little crafts here and there and adding them to our tree as ornaments (we already have a beaded candy cane on there!)

This post has been added to the following crafty linkies:
 

The Crafty Nest
Classified: Mom

Thursday, November 24, 2011

Turkey in the Crock Pot {And a Couple More Thanksgiving Recipes}

Just like with my Thanksgiving craft post, I'm late on this one, too. But I wanted to try it all out before posting the recipes, so I have a good excuse. Plus, these are all things that can be made anytime, not just Turkey Day! In fact, I will be making turkey in the slow cooker from now on - it's so moist and I really don't care if it has a golden brown skin (we never eat that part anyway, and I think the cat doesn't care what color it is, either!) So, here's what out Thanksgiving Menu looked like (the ones with stars have recipes below):
  • Crock Pot Turkey*
  • Roasted Acorn & Butternut Squash
  • Green Bean Casserole (It's my oldest's favorite)
  • Fresh Cranberry Sauce* (three ingredients!)
  • Mushroom & Sage Dressing
  • Red Mashed Potatoes w/ Garlic & Rosemary
  • Sweet Dinner Rolls*
  • REAL Pumpkin Pie* w/ Real Whipped Cream
 Crock Pot Turkey
OK, I found this recipe via The Crock Pot Recipe Exchange. It came from A Busy Mom's Slow Cooker Adventures. These are both my go-to sites for crock pot recipes that aren't the same old thing. I changed the recipe quite a bit so it included the things I think are essential to a Thanksgiving turkey. 
7lb. Turkey Breast (bone-in, skin on)
2 carrots
2 stalks celery
1 apple
1 onion
1 tsp. Kosher salt
1/2 tsp. garlic powder (NOT salt!)
1/2 tsp. rubbed sage
1/2 tsp. thyme
3 fresh rosemary stalks (is that what they're called?)

  1. Cut up the carrots, celery, apple, and onion into big chunks. I just rinsed them off and chopped. They're there for flavor, not to eat (they go into the woods tonight for all of the little animals!)
  2. Line the bottom of the slow cooker with the veggies and apple. Put the rest into the breast cavity, along with the rosemary. 
  3. Set the turkey into the crock pot. I bought some slow cooker bags for this one. I knew I'd be doing dishes all day long and did not want to be scrubbing the crock at midnight! 
  4. Mix up the salt and herbs. Rub them onto the breast's skin. *OPTIONAL - cut up 3-4 Tbsp. butter and set on top of the breast.
  5. Cook on low for 8-10 hours.
Now, I just want to tell you about our turkey this year. Due to the long cooking time, I put everything into the crock pot the night before, then stuck it into the fridge. Hubby was supposed to set his alarm for 7am so he could wake up, put the crock pot into the cooker, plug it in, and set it to low. I expected to sleep in and wake up to the smell of turkey cooking. He forgot to turn it on!!! So, our dinner didn't get finished up until after 7pm. (I couldn't get mad - I can't tell you how many times I've done this!)

The turkey was amazing!! I am a dark meat person but, with this way of cooking it, I didn't even miss it. It was moist, flavorful, and YUMMY!


Fresh Cranberry Sauce
This is from my very, very favorite cooking star, Alton Brown. I could watch Good Eats all day, every day. I have learned so much about the science behind cooking just by watching (not trying to write everything down or memorize it all.) I've found that the knowledge just kind of embeds itself into my brain. I'll be cooking something and just know what spices to use. I also know why it's important to spend the time to cream the butter & sugars for cookies and how to make the flakiest pie crust ever. If you ever have a chance to watch one of his shows, you'll be hooked - I promise! As with the turkey recipe, I changed it just a little. Alton's recipe calls for both OJ and cranberry juice (Click on "Alton Brown, above, for the real recipe). I forgot the cranberry juice when I was shopping, so I doubled the OJ. I've never had real cranberry sauce, and my mouth was in heaven when I tasted this. The extra OJ, I think, gave it the perfect flavor.

(Oh, and this makes the perfect "sick food", too. With all of the Vitamin C, honey, and antioxidants, it really helps get over that cold fast. Plus, the tartness cuts through the mucous. Little Guy came down with a cold and has been more than happy to eat a few bites throughout the day!)
1 lb. fresh cranberries
1/2 c. fresh orange juice (I used reconstituted frozen)
1 c. honey
  1.  Mix juice and honey in a tall saucepan. You want a tall one because the cranberries will pop and they tend to spray. Also, this can boil over if you're not careful. Cleaning up cranberry/honey goop from the stove is NOT easy! Heat the juice and honey until it boils. Lower heat and simmer for 5 minutes, stirring often.
  2. Rinse cranberries. Pick out the soft and wrinkled ones. Add to juice/honey mixture. Let cook over medium-low heat for 15 minutes or until all berries have popped and sauce thickens. Do NOT cook longer than 15 minutes or the pectin in the berries will break down and it won't gel up.
  3. Let sit for 5 minutes to cool.
  4. Find a 3-cup mold. Anything will do, as long as you can invert it and let the sauce slide out. I used one of my square food storage containers. Pour the sauce into the container and let cool for another 10-15 minutes. Cover and refrigerate for 6 hours. You can do this a day ahead of time, but make sure you eat it within 24 hours or the sauce will begin to get watery again.
  5. To loosen from the mold, hold the container in hot water for 15-30 seconds. Put a plate over the top of the mold and - flip! - you should have the perfect-looking cranberry sauce. If it's ugly, no big deal. The taste will make everyone forget how it looks!
  6. *** You can add cloves, cinnamon, ginger, orange peel, etc. to the recipe, if you want. Add these when you add the cranberries.
 Sweet Dinner Rolls
I love dinner rolls! I have had a hard time finding a recipe that is fast, uses few ingredients, and really has a lot of flavor - until now! These are amazing rolls. They are so easy to make that my husband (who can't cook anything unless the ingredients are cold cereal and milk) did it himself one day when I was sick. By Himself! I found this recipe on Foodie's Hope and didn't change a thing!
1 Tbsp active dry yeast (this is a little less than 2 packets of yeast)
4 Tbsp. sugar
1 c. + 2 Tbsp. warm milk
1 tsp Kosher salt
1 egg
2 Tbsp. unsalted butter
3 1/2 to 4 cups all-purpose unbleached white flour (you can replace up to 2c. with wheat flour)
1 egg, beaten with 1 Tbsp. honey for glazing rolls
  1. Mix the Yeast, 1 tsp Sugar (out of 4 tbsp sugar), 2 tbsp warm milk (about 105 F), let it froth for 5-10min. Use a cereal-size bowl, because when it froths, it grows! (The kids like watching the yeast "fart" - Yeah... they're guys!)
  2. Heat 1 cup of milk, the rest of the sugar, and the butter until butter melts in the milk. Set aside until it cools down just "warm to touch" temperature. I used my thermometer to make sure it was below 105 degrees F because I've killed yeast by adding milk that's too hot.
  3. Add 1 egg to the milk and beat well. Then add in the yeast and stir. It doesn't have to be beaten in or anything.
  4. Sift 3 1/2 cups all-purpose flour with salt. Make a well in the center, add milk mixture and stir. Knead it well until you get a soft dough, not sticky. Now, I hate cleaning flour off of the counter, so I just knead tit right in the bowl. You can do it either way - just make sure the gluten in the flour are working and the dough gets stretchy.
  5. Lightly oil a large bowl (I use olive oil, you can use anything you want.) Place dough in the bowl and turn it so it's coated in oil. Cover the dough with a clean towel or plastic wrap and let it rise until double, about 1 hour. You can also let it rise in the fridge overnight.
  6. Punch down the dough and lightly knead it in the bowl. Divide it in half, then divide those in half (you'll have 4 equal pieces.) Cut each of the four pieces into three even pieces - you'll have 12 total. Roll into balls and set onto a lightly greased baking sheet. Cover and let rise one hour.
  7. Preheat the oven at 400 F (this is the one thing I changed in the recipe. It said 425 F, but I found it made the bottoms burn.) Uncover the rolls, brush it with egg glaze for the best browned color (or with melted butter for super-soft rolls), then place the cookie sheet in the oven on the middle rack.
  8. Bake for 12-15 minutes, or until they are golden. If you tap on them, they will sound hollow. Do not over-bake, they are softer when they are a bit undercooked. Cool them on a wire rack.
REAL Pumpkin Pie
I bought pie pumpkins at the farmer's market for Halloween this year. I had the kids decorate them with facial features that we cut from magazines so we could eat the pumpkins later. I just can't see how laying out $7-15 for a pumpkin that ends up as waste is good for much.) Anyway, after Halloween, we cut up the pumpkins, roasted the seeds, and I cooked the flesh in the slow cooker. I pureed it in the blender and had to add cooking water because I couldn't get it to puree without it. I was worried that the pie wouldn't set up, but Jen, Life with My BOYS, shared this recipe from Group Recipes with me. It was originally for white pumpkin pie, but I don't think it really mattered what color the pumpkins were... Oh, and this recipe makes enough filling for TWO 10" pies. I made one pie, and froze the rest of the filling for later.
I only changed one thing - I made my own pumpkin pie spice. So, rather than including all of the different spices the recipe called for, I added up the total amount of spices and just used my pumpkin pie spice mixture for the entire amount. The pie set up perfectly and the spices were perfect (if you don't like a lot of spice, cut back by about 1 tsp or so.) Oh, and I used Alton Brown's Pie Crust recipe. It's the only one I use now - it's perfectly flaky and very easy to make. If you have a hard time with pie crust, watch this episode of Good Eats. He explains everything you'll ever need to know to make crusts of any kind, with any recipe, and have them turn out perfectly every time!
4 eggs
3 c. pumpkin puree
1 c. sugar
1 tsp. salt
4 1/2 tsp. pumpkin pie spice
14 oz. can sweetened condensed milk
6 oz. evaporated milk (it's 1/2 can - I gave the rest to the cat. He's now my very best friend.)
  1. Preheat oven to 425 F.
  2. Mix all of the ingredients together. I used a wire whisk because I've found that using a mixer causes bubbles to form and you end up with a pie that has a bunch of little holes on top.
  3. Pour pumpkin mixture into prepared 10" pie crust(s) - I have a 9" deep-dish pan, so that's what I used. I cannot stress this part enough: Line a baking sheet with foil and set the pie(s) on top. My pie boiled over and I'd have had a nasty mess if I hadn't used a baking sheet. The foil saved me from lots of soaking and scrubbing, too!
  4. Set pie(s) in the oven. After 15 minutes, TURN DOWN the thermostat to 350 F. Bake 50-60 more minutes, or until the center is set. Because my pie was deep-dish, it took about 70 minutes.
  5. Cool on wire rack. We eat our pumpkin pie warm, which is how I thought everyone ate it until I moved to L.A. and people looked at me as if I had two heads when I asked them if they wanted their pie warmed. So, if you want it cold, make sure it's cooled to room temperature before putting it into the fridge. If you don't, you'll end up with that gooey, watery stuff on top. Not a big deal, but not all that pretty, either.
Everything was wonderful! It's now Friday night, and we have only enough leftovers for one more meal - for one person. I do have extra turkey and a quart of turkey stock in the freezer. I think that, with the response from my family (and the fact that even my oldest was having leftovers, and then seconds!), I need to make this meal more often. Who says a turkey dinner is for Thanksgiving only?!

Wednesday, November 23, 2011

Holiday Parade - Yeas, We Already Had Ours! {Wordless Wednesday}

Last Saturday was the kick-off to the holiday season in our town. We attended a parade, Little Guy visited Santa for the first time, and we ran into a few familiar faces. We came home and warmed up with some hot apple cider, which I put into the crock pot before we left, and Smiley Cookies.

"It's THOMAS!!!"

Marchin' Mans
Here come Elmo & Cookie Monster!

Pretending to look like they're interested in the parade, but really wonder, "How much longer do we have to stand here before we can wander around?"


All he asked for was "Thomas"


"Bye, Mom!" He was not afraid of these guys AT ALL. In fact, I was kind of cramping his style with all of the picture-taking.


The picture above is from this year. The one on the right is last year's. Now, if you'll notice, both Buzz and Woody look as if they've been partaking in some of nature's more psychedelic gifts. Now, I thought that someone would have noticed this and done a little work on the costumes for this year. NOPE! So, I had my oldest stand next to Buzz and he gladly obliged with the goofy face for me.

"Hmm, I wonder how many cookies I can grab before anyone notices..."