Showing posts with label nature. Show all posts

Sunday, January 22, 2012

Week 3: January 15 - 21, 2010 {#Mamatography}

Mamatography 2012

It was so hard to choose photos for this week's Mamatography post. It seemed like I had the camera out all of the time. And we did so much! I had the kids help me choose which picture to include and this is what we decided on:
Day 15 (1/15/12)
"I push this button!"
Little Guy was just thrilled when "Brubber" invited him to play computer games on his laptop with him. Usually, we try to keep him away from our computers because he gets over-excited AND had that "I know what I'm doing and I'm going to do it myself" attitude going. The two of those, together, usually equal a computer that is completely frozen up within minutes and hours of trying to figure out how to fix it. But, my oldest patiently kept little guy in check and found a game that would allow him to use the mouse pad easily. He had the BEST time!


Day 16 (1/16/12)
Warm Winter's Catnap
Number 1 has been in heaven lately. He comes into the house after spending a few hours in the freezing cold, gets a bite to eat, then lays down somewhere for a nap - purring the entire time. I can't help but wonder if he ran into a stray who told him he should be grateful for a warm home and food in his belly. He's been showing his appreciation in many ways, too. He knows how much I like a kitty sitting on my lap, but he never really cared for it himself. Not recently! He's been bringing up "presents" to the door (and sometimes tries to sneak them into the house) in the form of field mice. My oldest usually is the recipient of these gifts, since he's often the first one to leave the house in the morning! And, he has even been hanging out with Little Guy, who has just recently made the differentiation between stuffed animal and real animal.

Day 17 (1/17/12)


Goofball
If you're my friend on Facebook, you already know about this picture. My oldest borrowed my camera for a school project he had to do (how cool is it that he can email his homework to his teachers?!) And, while he had the camera, he had to screw around a little, right? I found about 20 goofy pictures of him and his friend on my camera after he returned it to me. I jokingly told him that he should always delete photos after uploading, or they could make their way into the wrong hands. Then I mentioned putting one of the pictures on Facebook and tagging him in it. The kid actually DARED me to do it. Well, being the mom that I am, that's exactly what I did. I started feeling bad a few minutes later, so I removed the tag (the picture is still there.) I just don't know if one of his classmates might get a hold of his goofy picture and turn it into some kind of nasty joke. So, it's on my wall and he can tag himself in it if he wants. And I'll be having prints made of these photos because they are just too fun to forget about!

Day 18 (1/18/12)
You Could Have Put Your Eye Out!
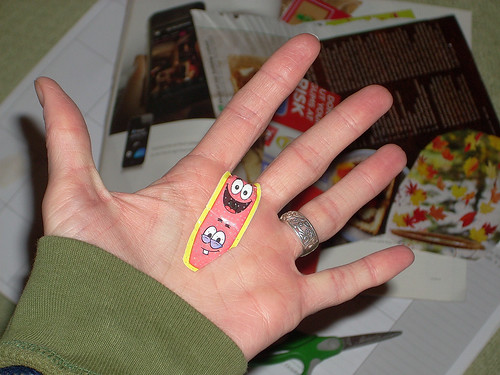
You know how you're always warning kids to be careful with scissors? Yeah... While Little Guy and I were making our Craft Idea Book, I put the scissors down for a split second. That was long enough for him to come charging across the room at full-speed to grab them. Only I was faster and snatched them up. And, as you can see by the picture, I didn't do so safely. I stabbed myself in the hand - and it was a bloody one. Little Guy's eyes were like saucers when he saw what had happened. I think that he truly did not believe me all of those times I told him that scissors are dangerous. He probably thought I was just saying it to keep him from having all of the cutting-up-paper-fun. Ever since this occurrence, though, he hasn't tried to get my scissors. And I'm on the look-out for a good pair of child safety scissors for him. It is fun to cut paper and why should I be the only one to enjoy it?


Day 19 (1/19/12)
My Very Cold Friend
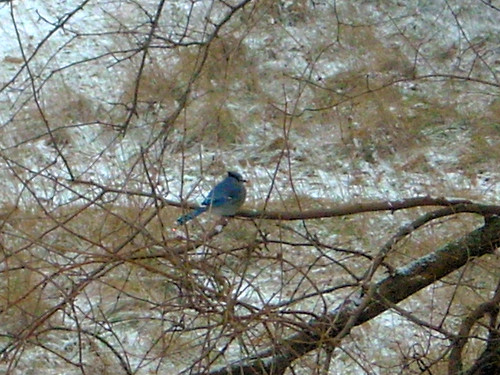
It was so cold! The wind was blowing like mad and the temperature, without taking windchill into account, was 9F. We have a pair of Blue Jays that have decided to winter in the woods behind our house and I couldn't help but see this bright blue guy all puffed up and trying to stay warm when I passed the window. I tossed a handful of seeds out for him and he quickly swooped down from his perch to fill his stomach.


Day 20 (1/20/12)
The Sick Blanket
Another chilly day. Rather than heading outside, Little Guy and I had an all-day indoor camping trip. This picture was taken early on in our day. We ended up making a campfire out of paper towel tubes and tissue paper. We made beds and Little Guy took a nap in his tent. We had snacks. We even went fishing, using sticks, yarn and paper clips for hooks. We didn't catch anything and concluded that fish do not like gummy worms, so we ate the worms for "dinner", instead!

See that striped, crocheted blanket? My great-grandmother made that before I was born (I think it may even be older than my mom.) It is known as "The Sick Blanket" because that is the blanket that we used whenever we were ill and laid on the couch in the living room all day, while our mom or dad nursed us back to health. It is used for the same purpose for my kids and, hopefully, one of them will become as attached as I have to it and their kids will get to know The Sick Blanket, as well. And when we were well, that blanket made the BEST tents... Still does!


Day 21 (1/21/12)
Wintertime
This is the picture of winter in my mind. Sled and squirrel tracks in the snow. Kids' footprints, big and small. The sunshine creating those cool blue shadows that you can only see in the wintertime across the snow...


So, what did your week look like? If you'd like to join me in this endeavor, just click on the Mamatography button at the top of this post to learn more. I'll be linking this post at Diary of a First Child's Week 3 Mamatography Linky when it's posted on Wednesday (1/25), so if you'd like to see more photos you should head over!

Thursday, January 12, 2012

Moss Terrariums {Crafty Science!}

I have been wanting to make a terrarium since I first saw them on Etsy, at the end of last summer. I vaguely planned to make them as Christmas gifts, then got caught up in back-to-school & Halloween. Suddenly the holidays were upon us and it was too late. I figured we'd do it as one of our spring projects. Until I was gazing out the window, checking out the squirrels and birds, when I saw this:
 See that lovely patch of green between the dying grass and the fence? It's moss! With the weather being so mild, and even warm on some days, the moss has been "living" it up. I kept my eye on it for a few days and then I just couldn't contain myself any longer. I dressed Little Guy for a nature walk and tossed a few plastic bags and spoons into a tote and we were off to collect things for our terrariums. In January. In Michigan. (Yes, I'm going to keep saying that. I am still amazed at the weather and will continue to be awed until there is 6" of snow on the ground and the temperatures have stayed below 30 F for at least a week!)
Once he finished running around like a nut, we got down to business. It was time to walk very slowly and see if we could spy any moss growing. Once we found a good patch, we collected some of it. Now, when you look for moss for this project, make sure of a few things:
1) Only take a little from each patch and leave the rest to regenerate.
2) Use a spoon or spatula to carefully lift it from the ground. It's pretty hardy stuff, but you want to make sure to lift the entire plant - including its root system.  
3) Don't forget to get some soil from the same area, preferably from directly under where the moss was growing. We found three different types of moss on our outing and each one had a very different type of soil beneath it: One had mostly rocky, sandy soil; one had a soil that was composed mostly of dead grass; a third had very rich soil that was mostly composed of what Little Guy refers to as "worm poops".
4) Take note of how moist the soil below the moss is. You are going to want to try to mimic that amount of moisture in your terrarium.  
5) Also be on the lookout for some nice-looking small pebbles and a few sticks or pieces of tree bark that have signs of moss or mushrooms (or, what Little Guy calls "fun guys") on them. We found a stick with some white "moldy" spots on it, a piece of bark from a tree stump with a mushroom, and bark from a dormant tree with green spots. We're excited to find out if anything sprouts from them!
Now, I want to tell you that you can use nearly anything to make your terrarium. I learned quite a bit from Storm The Castle. (This is THE coolest site for finding really neat things to do, by the way. Go bookmark it right now. I promise you'll use it. Repeatedly.) We used two different things for our terrariums: old honey jars and a plastic cake carrier that someone gave us a store-bought cake in for our terrarium containers. But, really, as long as it is see-through and has a lid or small opening, go for it: aquarium with a crack in it, glass vase, 2-liter pop bottle... Just remember that you're going to have to be able to get stuff into the container and arrange it! (Storm the Castle has a great tutorial on how to make really long tweezer-type thingies from a wire coat hanger so you can reach. I told you that site is great!)


Start by laying down the dirt you collected. Because the cake carrier is near-impossible to open without really jostling whatever is inside, I knew that we wouldn't be able to open it up to add water very often. So, I took a plastic lid that is about 1/4" deep and placed some cotton into it (the white rectangle on the left of Little Guy in the photo). I put this in the center of the cake "plate" before adding dirt. After we got the soil in place, I poked a small hole in the mound above the cotton-filled lid and poured some water into it, as well as all over the rest of the soil. My reasoning for the cotton was so it would hold a layer of moisture without saturating the soil. Don't know if it will matter in the end, or not. Just my theorizing!

(After I took the photo above, I noticed that pieces of dirt and rocks were falling into the area where the dome part of the cake carrier would fit into the bottom. So, I tore up a piece of paper towel into strips and poked them into that area to keep the debris out. You can see the paper towels in the photos below. Keep this in mind while you do the next part!)

So, where was I?! Oh, yeah: add your soil. Make sure to keep track of which soil is added where if you're using different mosses with different soil needs! Pile it up so you have a nice hill if your base is a flat piece like out cake dome has. If you're using a bottle-like container, try using a funnel to direct the different soils to different areas and attempt to get a mound going in there. This is important because, if you ever really look at the lay of the land that your moss is found on, you'll notice that it is usually on an inclined surface, even if it's only slight. Make sure to save some of the soil for later - you're going to need it to fill in spaces between the moss. Once you have your mound of soil, ever so slightly pack it down and moisten it. I just poured a little water onto the cake plate, I used a spray bottle of water for the honey jars.

Now it's time to add the moss! The pieces we had were rather large chunks, so I showed Little Guy how to gently pull them apart into small pieces. I had him decide where to place it. He loved being in charge of this part of the operation! It took forever for him to decide. He kept putting a piece down, turning it a little... moving it to the left, to the right... Sometimes he completely abandoned a piece in favor of a different one. It was really cool to watch him!

Once the moss was in place, I carefully added the reserved soils in between the pieces of moss. Then it was time for Little Guy to add the embellishments we collected. Now, I considered grabbing some tiny "guys" toys and a couple of tiny cars to include in the terrarium, but though better of it. Just before I went digging through the toys, I had a very disturbing vision: Little Guy attempting to recover his toys. Dirt everywhere. Terrarium ruined. Now, if your kids are cool with using toys inside, go for it. I think it would be pretty cool to create a scene with them. Just make sure that whatever you add to your terrarium will be able to withstand the high levels of moisture that it will encounter. Also consider whether it might give off any toxic fumes when wet or warm. The cute little plastic bunnies you add could end up killing all of the living things in there.

I think that I probably added too much moisture to our cake dome terrarium. Since opening and closing it just isn't an option, I have a back-up plan. If I notice that the dome is constantly coated in water droplets or the mosses or fungi start dying, I am going to poke small holes in the top of the plastic dome. This can be done very easily without marring the view: Just take a small nail or even a thick sewing needle and hold it with a pair of pliers over fire (a lighter or the burner of a gas stove.) Um... make sure your pliers are insulated or you're wearing an oven mitt! It doesn't have to get red hot, just hot enough to melt the plastic. Then, poke small holes through the dome, toward the top. This should allow enough moisture to escape without completely drying it out.

Our Finished Products:


This was such a fun and easy project to do. While we worked on it, we had some great conversations about ecosystems, habitats, what plants need to grow, what kind of rocks we were using, the water cycle... We also pondered the possibility of small insects, seeds, and spores being mixed into the soil we used. I'm anxious to see if any surprises grow in our terrariums.

I have another plastic domed container that has been sitting on top of my refrigerator since last spring. I've known it would be great for some use, but was waiting until I was inspired with an idea to use it. This thing is 18" in diameter! I want to do a similar project with that one. I'm not telling you what it is just yet, so watch for a post. It's going to be a little while, though. I need to have the space for the thing to have a home near a window, so I really need to do some purging of "stuff". One of these days, my husband and oldest will be gone all day. That's the day I call Salvation Army for a pick-up, get out the boxes, and get rid of all of this crap we don't really need! That day is coming soon and I can't wait for it. :)

One more thing: If you like this idea, but don't have the time or desire to make your own terrarium (or if you just don't have a moss supply available to you), you can get there ready-made. One Etsy shop I know of that sells these is 8Days Of Treasures. (You can check out the review I wrote of her shop for the Made in Michigan Blog Hop in October HERE.) Stephanie lives in Michigan and creates some pretty awesome terrariums! She also sells some unique glass containers that you could make your terrarium in, such as vinegar decanters, salt ans pepper shakers, and covered candy dishes.

If you make a terrarium and write about it, 
please leave me a link in the comments. 

If you have an idea of what could be added to a terrarium 
for a cool scene, share it! 

If you have pictures of your terrariums, 
I'd love for you to post them to my Facebook wall!

This post has been linked at:
Preschool Teacher Chestnut Grove Academy Classified: Mom Photobucket

Wednesday, January 11, 2012

(Trying to Be) Creative with the Camera {Wordless Wednesday}

Rainbow Sunset

Shadows in the Stairwell

Pointillism?

OK - not "camera-creative", but creative just the same. We made these bookmarks with THIS PIN as inspiration.

River of Sticks - These must have been left over from the flooding we had a few months back. The dark area is made up of a 4-inch-thick bed of twigs, dead grass, and seed pods. All of the grass & sticks were pointing in the same direction. Well, either the flooding or miniature aliens...

Friday, December 9, 2011

Looking For a Fun & Educational Book for the Kids? {@CowsCantJump}

I've always been interested in how children learn. With my oldest, I was amazed to find he could suddenly do things that he didn't know how to do the day before. He taught himself to read seemingly overnight just after he turned four. Well, really he didn't - I just wasn't paying close enough attention to notice all of the little signs of reading that he had been showing. With Little Guy, I've been much more keen on every little thing he learns. Witnessing his speech go from babbles and coos to actual words was amazing! And I loved finding out that, although he didn't have the physical ability to say certain words, he knew what they meant when I said them to him. One particular thing I noticed in his speech and vocabulary development was that nouns came first. I "tested" my theory that this is the same for most toddlers while watching and listening to them talking to each other at the library. Their speech was mostly made up of nouns, with a few verbs and adverbs thrown in (usually due to a phrase that they often used, such as "Go bye-bye.")

Now that he's speaking very well, using full sentences and a wide array of words to express himself, I wanted to introduce him to new words. Since I believe heavily in unschooling, I didn't want to sit down and "teach" him these words. I wanted him to learn them in a way that was natural and fun. Boy, did I jump for joy when I received an offer to review two children's books that contain a ton of new words. Cows Can't Jump and Cows Can't Quack, written by Dave Reisman and illustrated by Jason A. Maas, are the perfect fit!


Cows Can't Jump starts with, "Cows can't jump... but they can swim." It goes through many different animals, starting with what the animal can't do, then showing what it can. The book moves from familiar verbs, such as swing, to those that children don't often hear very often, such as wallow. Cows Can't Quack is similar, except it uses animal sounds. I loved showing little guy what each of these new words meant. We wallowed in the blankets on the bed. We grunted loudly. We laughed quite a bit!

After asking me to read the two books about a zillion times withing a couple of hours of receiving them, Little Guy decided to read them to me. Then to his stuffed animals. And, when my oldest came home, he just had to read the books to him! Later that evening, as he was playing with his cars, I listened in on Little Guy's narration (he is always talking!) His BMW was "pouncing" on the Cadillac. The tow truck was talking to the bus with a series of clicks, just like dolphins. I was watching my little one practice his new words!

Another thing I observed him doing was building up his cars' self-esteem. (Yeah, I know it sounds weird!) But, at one point, he was using a piece of cardboard with a block under it as a ramp. One car would speed down, but the other one kept crashing half-way down. After a few times, my empathetic kid picked up the crashing car and said, "You can't race fast, but you can so stunts!" I'll be willing to bet that he made that car feel much better! He's also used this way of dealing with shortcomings on the cat and even me. And, just last night, after he tried to keep up with my oldest while playing a football video game that he kept losing, he was feeling pretty low. My oldest, being the big brother, kept saying things like, "Ha, ha! I win!" to him. (Yeah, I thought that sibling rivalries would be non-existent with 10 1/2 years between the two.) Little Guy was getting frustrated and feeling sad and I was just waiting for him to lose his composure. He came close, then he thought of something. "I can't win, but I can make pizza!" My oldest lost his interest in cooking early, an Little Guy knows he doesn't know how to cook much more than Ramen or a bowl of cereal. He made himself feel better AND stood up for himself in one sentence - and my oldest was dumbfounded! LOL

I highly recommend these two books to anyone with infants through preschoolers - even up to kids in elementary school who are learning to read. The illustrations are hilarious. You can check out some preview pages of Cows Can't Jump and Cows Can't Quack by clicking on the links. The books are are easy to read and interesting - something you often don't find in easy-readers. And, as I started off saying, they're educational without being "teachy", if you know what I mean. I am especially impressed with how, just by reading these books, Little Guy has managed to figure out how to deal with blows to his self-esteem (and his cars', too!)

Cows Can't Jump comes in paperback or board book, and Cows Can't Quack is available in paperback.You can order these books at Jumping Cow Press HERE. Shipping is only $1.99 for ANY quantity order in the U.S.! You can also find these books online at Barnes & Noble and Amazon.com. You can also find Jumping Cow Press on Twitter and Facebook.

I'd like to thank Dave Reisman for sending me a copy of each book to review. My little guy absolutely loves them both and so do I! I can't help but wonder if there is anything else cows can't do...

Disclaimer: I received paperback copies of Cows Can't Jump and Cows Can't Quack, and a board book copy of Cows Can't Jump (all signed! YAY!) from Jumping Cow Press for the purpose of this review. I did not receive any other form of compensation. All opinions are my own.

Sunday, November 13, 2011

Quick Update...

Where am I? 

Well, I had a lot of writing lined up for the last two days, but something amazing happened: The weather was nice! Yesterday and today, the temperatures hit the mid-60's. I was certain that the weather was just going to get colder, wetter, and windier for the rest of the month, so I had plans to hunker down inside, writing and baking, and doing some fun Thanksgiving projects with the kids. Instead, we've been hanging out outside.
Yesterday was spent exploring the river shore. Since many of the wildflowers and weeds dies off from the frosts we've had, we can now walk around near the river without being hampered by all of the flora. Little Guy was amazed with all of the different ways that plants regenerate. We found milkweed "floaties", burrs of all shapes and sizes, and "beans" with seeds inside. Since he is very good at plant-identification, he was able to understand which plant each type of seed comes from. For instance, the Queen Anne's Lace has little seeds that hang onto your pants for a ride to their new home. While we were checking out the seeds, we made sure to bring some home to make seed bombs for Christmas gifts to give to those who live locally (you don't want to go sending them across the country and introducing a new species to an area - it may become one of those things that takes over native species and kills them off!)

We also explored the woods behind our home. Just like nearly every other kid, Little Guy loved finding himself knee-deep in leaves! We created a very big pile of leaves and he got to play "hide & seek" in the pile. He just loves hiding and having us scratch our heads and ask each other where he went. My oldest even got in on the fun and taught Little Guy how to throw the leaves into the air and watch them float down all around him.

Today, we already headed for a nice walk to the store. It's very windy, moist, and warm out. Later, we'll be heading out to the garden to get it ready for winter and collect some herb seeds. I also need to cut all of my herbs back. I've already lost all of my basil thanks to procrastination. I need to get to the parsley (I use it for everything!), oregano, thyme, sage, and lavender before a hard frost settles in. Looks like today's the day! I also need to cut down the marigolds and grab the seeds for gifts and next year's garden. Then we need to collect leaves and cover the mint and strawberries. Last year, I took the time to add a 2"-3" layer of leaves under a few inches of soil throughout the garden. I don't know if it helped, or not, but it did attract a huge number of earthworms. If there's time, I'll do that again today.

I made pumpkin seeds and cooked my pumpkin last night. Today, I need to puree and freeze the pumpkin. I'm going to probably spend the evening baking some kind of sweet yummy thing using some of the pumpkin. There are so many amazing recipes out there - I just don't know which to pick... Maybe I'll take a poll of the family and see what they'd like.

Well, that's it! Hopefully, I'll be able to write my Topic 2 post for the Mindful Parenting Collaboration tonight. It's all in my head - I just need to get it straight and type it all out! I've also got a couple of other posts that I need to write before the ideas leave my head and I lose my motivation. Oh, and there will be a few more giveaways posting this week, too!

Oh, and last, but certainly not least, PLEASE take a minute to enter my current giveaways. They are all sponsored by Etsy shops and I'd love for you to show these wonderful artists some love.  All of these giveaways are open to the US and entries are easy to complete with Rafflecopter:


Wednesday, November 9, 2011

Typical Tuesday {Wordless Wednesday}

Morning dew on the Blue Spruce outside my window.

This is new - he's never done the filigree-looking thing before. He was calling this "Tree" - I LOVE IT!

Bedtime after a long day.

Thursday, October 27, 2011

Amore Vivo - PREview and Extra (Easy) Entry {#MadeInMichigan}


This is a review for one of my sponsors of the Made in Michigan Blog Giveaway Hop, which will take place from October 28 – November 2. I will be offering my readers the chance to win a (Hand)Made in Michigan prize package worth nearly $200! Please take a moment to read about this wonderful Etsy shop and then fill out the Rafflecopter form below for a very easy extra entry into the giveaway.


Amore Vivo is an Etsy shop that specializes in beautiful floral arrangements, wreaths, wine art (a little more on that later!), and upcycled cork art. In Italian, "Amore Vivo" means "Love Life" and it is the perfect name for this shop! Many of the items you will find at Amore Vivo are full of life - live and silk Floral Arrangements, beautiful Peacock Feather Wreaths, and Unique Handmade Wine Bottle Toppers are at the heart of this shop. The shop's owner, Michele, is from South Lyon and has been a floral designer and crafter for over 25 years. Her love of local wines and penchant for floral design kind of coalesced into a passion.
 Now, my "review" is actually going to be a PRE-view. Rather than sending me one of her Fresh Christmas Centerpieces now, Michele has agreed to wait to send it until the perfect time for me & my family - between November 20 and December 18 - so we can enjoy it during the holidays. Because this is an arrangement made with Fresh Michigan Evergreens (balsam fir, blue spruce, juniper, cedar, pine...), it will last 2-3 weeks and I'd really prefer to enjoy it during the holiday season. I can almost smell it now and almost don't want to wait!

Isn't that just beautiful?! I wish I had a scratch-n-sniff monitor! And, just so you know, Michele will work with customers to get the look they want. It is completely customizable in color, size, style... the possibilities are endless. Each arrangement comes in a foam "oasis" container to keep the fresh pieces looking great and help them last. Michele also includes care instructions and a nice information sheet about Michigan Evergreens. Hey - sounds like a great learning opportunity as an added bonus!

This is what the information sheet says:
"This centerpiece is handmade with wonderful evergreens from our vast Winter Wonderland state of Michigan!  I hand cut these greens just before arranging my Christmas Centerpieces to keep them long lasting and naturally fragrant!  Most of them come from my home in Southeastern Michigan with accents from areas of Traverse City, Tawas by Lake Huron and the Tri City area.  In these times when so many of us have artificial trees, my special fresh evergreen centerpieces still give the home the fresh tree aroma."

Since I cannot write a review because I haven't received the item yet, I'm going to share some of the feedback that Amore Vivo has received on Etsy and via email. The first is from a client who was so happy with her order that she actually got out paper and pen and wrote an actual letter (anyone who takes the time to do this has got to be a happy customer!):
"Michele
Hope you remember, me. I ordered 5 of your Made In Michigan centerpieces for Christmas to be shipped to different states. Wow, what a great response of thanks I received! I now live in Michigan and every year search of special gifts for my family Made In Michigan. Yours was perfect, along with the evergreen information you attached. Thank you so much, I will be back next year!
Nicole"
Her Etsy feedback is just wonderful - 100% positive. I keep seeing two things that people have written over and over: her shipping is very fast and her items are beautiful. Both of these are important to me, as a buyer. No one wants to purchase something and then wait weeks for it to arrive, especially on sites like Etsy where you really don't know the person you're dealing with. If it takes more than a week and a half for me to receive an order or a tracking number... something from the seller, I start getting nervous. Did I just send money to someone who isn't going to send me my item??? Then there's the disappointment you sometimes have when an item that looked absolutely gorgeous on the computer screen ends up being something I could have made with Little Guy and had it turn out better. You just never know and there's a level of trust that you must put into the shop owner. From the looks of the feedback, Amore Vivo has surprised clients in the opposite direction! Just check out some of these feedback excerpts:
"Even prettier in person!"
"Fantastic job!"
"So awesome! Even better looking in person!"
"BEAUTIFUL!"
"Wonderful person to deal with. My mother loved the arrangement, and it's so nice to know the evergreens were fresh. I'll never buy from [popular fresh florist] again!"

In addition to Amore Vivo, you can find Michele's work at her other Etsy shop, Amore Bride. I cannot believe the amazing pieces that she's created - from Peacock Feather Bouquets to Hairpieces to Cake Toppers - that are both beautiful and will last. They're all artificial arrangements, although Michele says that the most frequently asked question she receives is: "Are the florals real or fresh?" They look that good!


Disclosure: I will receive one Christmas Centerpiece, as pictures above, for this review. No other form of compensation will be exchanged. All opinions are my own.

8daysOfTreasures - Review and Extra (Easy) Entry {#MadeInMichigan}


This is a review for one of my sponsors of the Made in Michigan Blog Giveaway Hop, which will take place from October 28 – November 2. I will be offering my readers the chance to win a (Hand)Made in Michigan prize package worth nearly $200! Please take a moment to read about this wonderful Etsy shop and then fill out the Rafflecopter form below for a very easy extra entry into the giveaway.


 This Etsy shop is very aptly named. 8daysOfTreasures is filled with a variety of amazing items! What first caught my eye in this shop, based in Mount Pleasant, were the Moss Terrariums. If you know me, you know my inclination toward anything that has to do with nature. But these aren't just any old terrariums. Their containers are beautiful and come in just about every shape and size imaginable. The shop's owner, Stephanie, up-cycles jars, pitchers, and even salt and pepper shakers into little ecosystems that you can watch grow and flourish. The moss is collected from her own yard, then layered in the containers with carbon, small pebbles, and soil. The carbon works to keep everything clean. All you have to do is mist with water once or twice a week and enjoy your own little bit of Michigan!

But that's not all you'll find at 8daysOfTreasures. You'll discover some beautiful handmade jewelry and scarves, too! I especially love the eclectic mixture of glass, bone, shell, and wood beads used to make the bracelets. Each one is unique and the mixture of different textures and colors all come together to create a one-of-a-kind work of art. 

 
And I cannot forget to mention the huge assortment of Vintage and Antique items that Stephanie has collected for your shop-at-home pleasure! You'll find everything from glass candy dishes to antique books, vintage jars to candy dishes. I swear, this portion of 8daysOfTreasures reminds me of my grandmother's house! I used to drink "coffee" (hot cocoa with a few drops of decaf  sprinkled on top) in a cup just like the one on the right!


And I've saved the very best for last: Stephanie is a very talented photographer. She's managed to capture some wondrous bits of Michigan that I could look at for hours. She has beautiful photos of forests, trees, and amazing autumn leaves. Then there are those shots of wildlife that I could wait a lifetime for the opportunity to come across (then somehow manage to blur into obscurity!) I mean, you have got to check out this Frog - the colors almost make him (?) appear to be metallic! And don't even get me started on her abstract photos - simply breathtaking! And here's the great part - you can order her work in just about any size/form imaginable. From a basic 4" x 6" photo to a large 20" x 24" canvas print to a jigsaw puzzle! You can see the many other options at the shop policies page. Check out the beautiful photos that I had the pleasure to receive for this review:


 "8daysOfTreasures", as I said before, really describes Stephanie's Etsy shop better than any other name I could think of. I mean, really, you could probably get the majority of your holiday shopping done all at once. And her prices are so low... PLUS, she's currently holding a sale - you can get a whopping 20% off your entire order simply by entering the code: AUTUMNSALE11 at checkout until November 30! And, to stay informed of new items and sales (plus to get ahead on the Made in Michigan entries), you can find 8daysOfTreasures on Facebook!

  I received a set of 4"X6" photographs for the purpose of writing this review, which will become part of the giveaway prize. I received no other form of compensation. All opinions are my own.