Saturday, December 31, 2011

I Don't Do New Year's Resolutions

This time of year, I see tons of posts, news articles, and commercials that all revolve around New Year's Resolutions. I don't play into that one. For me, creating a list of things that I resolve to do to change myself is just a set-up for failure. Yes, there are ways to make it easier, such as creating large goals and then listing small goals that work as stepping stones toward the main thing you want to change. But, with me, if I miss out on a deadline for one of those goals - large or small - I tend to give up.

That doesn't mean that I let January 1st go by just like every other day on the calendar. Instead, I like to think of the new year as a clean slate. Right now, I am working hard to get my home in order. The place is a mess. If you've been reading this blog for a while, you'll know that my husband likes finding stuff that people throw out that is still usable. Now, I have absolutely no problem using others' trash. BUT, when he keeps bringing home stuff that we really have no use for, it's not OK. Every inch of storage space we have is filled with things like extra sheets, sets of flatware, brand new & still wrapped VHS tapes (we don't even have a VCR!), small bookshelves... he even has a crib mattress in a closet - we co-sleep!

He's not the only one with a problem. I save jars, cardboard boxes, plastic containers, etc. These are things that I just know will be useful for crafting, gift-giving, or just plain reusing. But do I really need 10 empty spaghetti sauce jars? Or a stack of the fronts of pasts boxes (they have those little windows and I plan , someday, create picture frames from them)? I managed to clean out about 1/3 of these items over the holiday as packaging for gifts, but that barely touched on what needs to be done.

I want to mark the new year with a little more space in our home. I don't want to have to look for a place to put things that won't cause an avalanche of junk to cascade onto the floor. I also want to be able to clean more effectively. I haven't cleaned the entire kitchen floor in one session since I went into nesting mode when I was pregnant with little guy. I can't right now - I have to move boxes of books and paperwork from point A to point B to clean under them, wait for it to dry, then move them back. By that time, something else needs to be done, like make dinner or put Little Guy down for a nap. So, the next few days are all about purging and scrubbing.

I'm also trying to spend more time with Little Guy. He's been a real nightmare to be around lately. I'm really hoping that some serious one-on-one time in which we work together to complete a project will help get us back in tune with one another. He's also been trying to teach himself how to read, so we need to spend more time reading books with simple words together. I'm not waiting until January 1st to turn over a new parenting leaf, though. Spending quality time with my kid shouldn't be something that I need to have a goal set to motivate me into doing. I do, however, want to start that new calendar with new priorities, especially one that is as important as spending time with my kids.

So, in a year's time, I won't be posting about all of the resolutions that I've failed to keep. I do hope to be posting about the latest adventure that I had with my kids or the most recent piece of uselessness that I managed to donate to charity.


Do you do resolutions? Why or why not?


Friday, December 30, 2011

MY Post About Having a Three-Year-Old

Now, I keep reading posts by moms of three-year-olds that say their kids have suddenly morphed from sweet little toddlers into bratty little princes & princesses who are moody and demanding. Yep. I have to concur with these moms - Little Guy is the same. I've really been questioning whether I'm raising a brat or just a strong-willed and independent little boy. The kid seems to create his own tantrum situations.
"I not listen to YOU!"
 Yesterday, he woke up and demanded cake for breakfast. Now, first of all, I'm not giving him cake first thing in the morning and he knows it. Sugary goodness turns him into a bitter devil. Second, we didn't even have cake - haven't had any since October, in fact. I pointed out that we don't have cake (because the "no, you have to eat something healthy" was just asking for a tantrum), in hopes that he'd see how his request would be impossible to fulfill. Tantrum ensued anyway. And his tantrums are no longer just a toddler kicking and screaming for a few minutes before he's ready for a hug. Uh-uh. Now, they entail long periods of crying about unfairness and how I don't like him anymore. They also have toy-throwing, wall-punching, and all kinds of other lovely behavior. I end up putting him onto the bed and blocking his way off because I just won't put up with that shit. Sometimes he'll go on for an HOUR about something like I got him milk to drink rather than the juice that he telepathically told me he changed his mind about while I was pouring the milk he requested.

I don't know what to do anymore. I have read and read on how others deal with this kind of behavior (Aha! Parenting has some great articles) , but the ideas just repeatedly backfire. He's a smart little one and, while a new approach will work the first time, he sees through it the second time. I'm finally getting him to say his feelings ("I'm very, very ANGRY!!!") so I can mimic them back to show him I understand. But it's not helping - instead of yelling and screaming about the problem, he just yells and screams about his emotions.

My husband isn't helping, either. Due to some physical and mental problems, he's not spending enough time with Little Guy to even be able to understand his speech. When he is around, he gives in to the demands just to avoid the tantrums. This means that Little Guy is "the boss of Daddy" and he sure throws his weight around! When my husband just cannot give in, such as a situation like the cake one or something that is dangerous, he goes from weak-willed Daddy to the guy who's threatening to spank. Especially when Little Guy is hitting (yeah - THAT makes sense!) Then Dad leaves because "I can't deal with this anymore." UGH!

The only thing I can think of doing differently is spending more one-on-one time with him. I thought that we already did a lot of it. But, now that I stand back and evaluate our time together, we don't. We might be in the same room, but we are both doing different things. He'll be playing with his cars while I hit up Facebook for the latest news. Not really quality time.

I have a ton of projects that I want to do with him (check out my Pinterest Kids' Crafts and Recipes boards!) but I really need to get my house in order first. So, I've been working on getting our house cleaned out and organized. I've been asking him to help me, which he eagerly agrees to do. Unfortunately, he will help for only a few minutes - then he's into things he knows he should not be playing with, running into the bathroom and tossing anything he can get his hands on into the toilet, or running into my oldest's room and messing with his stuff (our doors don't close correctly, thanks to shoddy carpentry.) After five or ten minutes of cleaning, we end up throwing in the towel for a little while. It just feels like an uphill battle right now and I'm becoming disheartened and frustrated. I'm going to keep up with this, though, because I'm pretty sure that the novelty of it will wear off and he'll (eventually) be able to focus on our "Important Jobs" that I need his expert help to complete.

This kid is busy. He's smart and can see through plans and, I swear, tries to foil them just for the heck of it. He really wants to be helpful and spend quality time together - it's just that he's still at that self-centered age and wants the best for himself first. And, thanks to Daddy, he thinks that flipping out and throwing a huge tantrum is the way to get those things. I suspect that he leans toward the ADD side due to his inability to do anything for more than a few minutes - even the things he LOVES to do. He's got a great sense of self and takes pride in anything he does - especially when he doesn't need help to do it.

Does anyone have any suggestions for me? I don't do rewards for a good job - I want him to learn to do good things because he will feel good inside, not so he can get a sticker or piece of candy. He is often congratulated when he obviously struggles with something and overcomes it, whether it is getting his pants on by himself or helping me do the dishes without getting down off the chair and running around the kitchen getting into everything. He knows the rules that are unchanging (mainly safety ones) and the rules that can be bent (the "harmony ones" that help us all live together.)  

Wednesday, December 28, 2011

Here's to New Traditions! {Wordless Wednesday}

From my Facebook Page:
Monroe County Courthouse

Went to tell hubby we were leaving and snapped this. I had the camera on the wrong setting and this is what happened - kinda cool!

Me: "Get back here! It's dark and I can't see you!" I snapped the pic just so I could use the flash to locate him.

Our town's Christmas tree. :/ They lopped the top off a couple of years ago... I don't know why.

"Stick 'em up!"

Kids playing in the stage at Loranger Square. I love the metalwork of the lotus leaves & flower on this!
I stopped taking pictures after this. When we left on our little expedition, I had visions of photos with: faces in awe of the decorated homes, my guys all holding hands and enjoying the walk, the kids screwing around with each other. Nope.

The cookies and hot cocoa afterward were a hit, so at least we had that as a happy note to end on! 
I'm really hoping that we'll have more fun next year...

Monday, December 26, 2011

Tuesday's Giveaway Linkup! {12/27}

Tuesday's Giveaway Linkup
Welcome to Tuesday's Giveaway Link Up with your hosts Aimee @ Classified: Mom & Karen @ Tots and Me & Alicia @ McCrenshaw's Newest Thoughts!

This link up will be posted Monday at 7 PM est. and run all week long! Make sure you stop in as often as you can to list your latest giveaways.

Here is how to use the Giveaway Link Up

1. Post your reviews and/or giveaways, as many as you have, be sure to add the end date (family friendly please)

2. Help spread the word about the giveaway link up by grabbing our button, Tweeting or posting on Facebook. (Not mandatory- but it helps get more exposure to your giveaways as well!)

3. Take a moment to enter any giveaway that strikes an interest to you!

If you would  like to follow the three hostesses, we will gladly follow you back! Simply leave us a message to do so.


Thank you for linking up with  Aimee @ Classified: Mom & Karen @ Tots and Me & Alicia @  McCrenshaw's Newest Thoughts! 

Thursday, December 22, 2011

Two-Ingredient Thin Mint Cookies {Last-Minute Homemade Gifts}

O... M... G...
These cookies are AMAZING!!! And, yes, there are only two ingredients. You can literally make a few dozen of these in less than 15 minutes and people will be raving about them! I wouldn't venture so far as to say that these are just like the ones that you can buy in March from little girls dressed in green and brown, but they are close enough (and WAY more affordable!) The flavor is there, but the texture is more delicate.

Now, I don't have a photo of them because, as it turns out, my husband and oldest found my stash and pigged out. No worries, though, you can see a photo HERE, on Vanessa of The Crafty Nest's Pinterest board, where I found this idea. I cannot find her original post on her blog, so I cannot link you directly.

So, here's what you're going to need:
  • A bag of Andes Mints (the original ones)
  • A box of Ritz crackers
That's it.

Now, you can find Andes Mint pieces in some stores. They cost a little more, but you don't have to unwrap a zillion of the mints and they melt faster since they're already broken into small bits. I bought one bag of each kind because I couldn't resist having some of the mint foils on hand for projects. (Hey, free green foil paper! I'm thinking St. Patrick's Day and springtime craft projects!) Also, I didn't try using an inexpensive store-brand cracker. I wanted these to taste just right and wasn't willing to risk it. I'm sure a cheaper box of crackers would work out just fine, though.

Here's what you do:

Over a double-boiler, melt the mints. I made sure to get them good and warm so the excess chocolate would run off easily. Just be careful that you don't over-do it and burn the chocolate - ick! You could probably use the microwave, but I don't care to melt large amounts of chocolate that way. It heats from the inside out and can sometimes get overheated and burn without even changing shape!

Make sure you pull out any broken and flaking crackers from the package (I crumble mine up and keep them in a jar for a quick topping for mac and cheese or other casseroles). Simply drop one cracker at a time into the melted mints, flip it over, then fish it out with a fork. With the coated cracker laying bottom side down, very gently tap the fork to let the excess chocolate drip off. Set the coated cracker on a baking sheet lined with waxed paper or parchment (I use parchment this time of year - less chance of sticking and you can reuse it many times for the same thing.)

You can leave the cookies as they are, or make them look pretty. Since I have my assistant chef helping me all of the time, it was decided that our cookies would be pretty. I gave him several small bowls with different cookie toppings in them: nonpareils, sprinkles (some of you call them jimmies?!), colored sugar, candy cane pieces, etc. As soon as I set a freshly-dipped cracker onto the baking sheet, his job was to decorate it with "just one little pinch" of whichever topping he chose, and sometimes a few of them!

When I finished with a tray, I put it into the refrigerator for about 5 minutes to let the chocolate set up. After I let them return to room temperature, I put 3 to 4 of the cookies, depending on how big Little Guy's pinches were, into a cupcake liner. We put three cupcake liners worth of cookies into a sandwich bag and tied it securely for giving to friends and family. You want to make sure that these are sealed pretty well or the minty flavor will sink into your other baked goods - not very yummy!

Now, I have to go melt some more mints. There are two guys in the doghouse right now who are going to be replacing the cookies they ate last night. See? These are so easy to make that I can actually have them do it on their own!

Wednesday, December 21, 2011

Fizzy Bath Bombs {Last-Minute Homemade Gift}

I originally found the recipe for these on About.com - the place to find articles about anything by anyone! This recipe for the Bath Bombs is based on the one posted by David Fisher, so I'd like to thank him for showing me just how easy these are to make. Really, I've been wanting to try them out for a while now, but they always seemed so complicated and as if they needed a ton of ingredients that were expensive and hard to find. Not true on either! 

Now, I scented my bath bombs with lavender essential oil and dried rosemary from my garden, but you can use any number of scent combinations. Check out this tutorial on mixing essential oils to get the right scent on Easy Aromatherapy Recipes. Just remember: If you use herbs instead of the oils, you'll need to use more. Also, remember that once the herbs rehydrate in the tub, their scent will be stronger! I chose Rosemary and Lavender because I just love how the two blend. Also, I had to buy the essential oil for this and I wanted something that I'd use often. And, once again, don't go all out and buy some expensive and fancy rosemary - get the cheap bulk stuff.

There is one ingredient on the list that I was worried about finding: Citric Acid powder. I took a shot in the dark and visited our local health food store, Health Matters in Monroe, MI, and found that Maurine had it AND it wasn't expensive. I only got a 4 oz. bottle, so I had to halve the recipe on About.com and, of course, I changed it up a little. Here's what I ended up with:

Rosemary-Lavender Bath Bombs

Ingredients
  • 1/2 c. Corn starch 
  • 1/2 c. Citric Acid (4 oz.)
  • 1 c. Baking Soda
  • 1/2 c. Epsom Salt
  • 1 tsp. Water
  • 1/2 tsp. Borax
  • 1/2 to 1 tsp Lavender Essential Oil 
  • 1 Tb. Dried Rosemary leaves, broken up into 1/4" or less pieces (I just pinched them in my hand to break them)
  • 1 Tb. olive oil
  • Colorant, if you want to use it (I used gel food coloring. If you have soap colorant you can use that, too)
Now, according to David Fisher, the most important part of the entire recipe is making sure that there is a 2:1 ratio of baking soda to citric acid. This is what makes the fizzies. All of the rest can be played with. The corn starch is there to make the bath water feel silky and it also helps hold the bombs together when they dry, but you can leave it out if you prefer. The Epsom salt can be exchanged in full or in part with sea salt. The oil is also up to you. I used olive oil because it's what I has on hand and I like it. Try grape seed, jojoba, anything you like!


Equipment
*Make sure that you either use all glass or metal equipment, or use plastics that you don't need for cooking. The essential oil will permeate the plastic and no amount of washing will help you!... Trust me - I found out the hard way!
  • Large glass or metal mixing bowl
  • Metal whisk
  • Measuring spoons and cups
  • Small squirt bottle (I picked up some ketchup and mustard bottles from the housewares section at the end of summer for $0.25. You could use anything that is small, squeezable, and has a top that allows you to control how much comes out.)
  • Spoons
  • Baking sheet lined with wax paper, foil, or paper towels
  • A mold for your bombs. I used the rounded half of a plastic Easter egg. Look around the house - lids, scoops, measuring cups, even a sturdy cardboard tube from the tin foil will work! You just want to make sure the mold is sturdy enough to withstand the pressure you're going to be putting on it by packing the mixture into it and that it is shaped to release the bombs easily.
How I Did It

I'm so sorry I didn't take pictures. Though, it would have been hard to do with my hands covered in bath bomb stuff! I made these on my own, without Little Guy's help, because I ended up making them at 2am. There are portions of this that he could have helped with, but it was rather powdery and I think I'm glad to have kept him out of this project - I wouldn't have wanted him, at his close level to the counter, to have breathed in all of that dust!

Make sure that you have all of your equipment at hand. This isn't a project where timing is everything, but it keeps things cleaner. I ended up trailing some of the mixture from one end of the kitchen to the other, collecting the things I needed as I went along.

  1. Mix the dry ingredients (*except the Borax) together with the whisk, or use a sifter: Cornstarch, Citric acid, Baking soda, Salt, and dried herbs. This is where I made the dusty powder bomb in my kitchen. Make sure you have food and clean dishes put away!
  2. In the squirt bottle, mix the wet ingredients and Borax: Water, essential oil, olive oil. Just put them all in and shake it up! This is where I added my food coloring, too. Remember to not over-do the coloring! The bombs will darken as they dry.
  3. Put your whisk in one hand and the squirt bottle in the other and get ready - this is where you have to make sure you went potty, the kids are going to be quiet for at least five minutes, and the answering machine is on. Just FIVE MINUTES! Squirt a tiny drop of the oil concoction into the middle of the dry stuff and wait a couple of seconds. See how it fizzes up? You don't want that to happen as you're mixing the wet and dry ingredients together, so make sure you keep stirring with that whisk. I don't know the scientific explanation as to why the stirring prevents the fizzing, it just does. So, as you drizzle the wet ingredients into the bowl, whisk like crazy. You may want to stop drizzling once in a while to make sure that it's all mixed in before adding more. 
  4. You want to check every once in a while to see if you have enough wet mixed in - depending on your ingredients, you may need less wet than you mixed up. Grab a small handful of the mixture and squeeze it hard. Open your hand and gently poke the mass. If it flakes up any, crumble it back into the bowl and keep adding the wet ingredients. If it doesn't - stop and go on to step 6. If you run out of wet stuff, go to step 5. (Check the picture that David Fisher was so kind to include in his instructions here.)
  5. If you need more wet, just put 1 TB of water into your squirt bottle. I added a little more food coloring here, too, because I wanted a darker color. Shake it up really well to get some of the leftover oils mixed in and keep squirting, mixing, and checking to see if you have enough wet in there. DO NOT USE TOO MUCH WET! I have no idea how to fix this!
  6. Now you're ready to mold your bath bombs! Get your mold and fill it up with the mixture. Press it in there as tightly as you possible can. This took everything I had to do - I have arthritis in my wrists and fingers. It's important to get it packed well, or they'll end up falling apart as they dry (if they do, just crumble them up, put it in a jar with a nice bow on top and call it Fizzy Bath Salts!) 
  7. If you're using a tube to mold them, set it directly on top of the lined baking sheet. Put some of the mixture into the tube, then use something to batter it down. I used a spice jar lid that fit perfectly inside the tube. kind of like a piston, and then used a long wooden spoon handle to pound it down. It worked great, but I didn't care for the giant pill-shaped bombs, so I scraped them and used the 1/2 egg mold. Once you have it packed well, just slowly lift the tube straight up. If it sticks, you can tap the sides of the tube and use the lid/spoon to press it out as you lift.
  8. Unmolding can be tough. You must have patience because you can't just plop them out unless your mold will allow it.I just repeatedly tapped and shook the mold against my hand until the bomb came out. There were times when I'd nearly given up - it was getting really late! - but then the bomb would pop into my hand. 
  9. Set the bombs on the baking sheet into your oven or other safe place to dry. Mine were dry in 12 hours, but I let them sit for about a day and a half just to make sure they were dry all the way through. When they were dry, they were rock hard and not at all fragile! 
  10.  I packed three bombs into each bag, added a sprig or two of dried lavender for pretties, and was done!
Now, after I made these, I thought of a few possibilities that I could have tried, had I had the time:
  • Split the dry mixture into two separate bowls, mix the wet ingredients into two separate bottles, and add different colors. When molding, create stripes or swirls of the two colors.
  • Wrap each bomb in plastic wrap and tie with a ribbon.
  • Put the bombs into wide-mouthed Mason jars with a pretty ribbon tied around the top.
  • Pack the bombs into a "spa gift basket" with herbal tea, raw honey, a pretty mug, handmade soap, a scrubby or pretty washcloth...  
I'm planning on making these more often! I tried one out (had to make sure they worked!) and I loved it. Do you have any scent combos that you think would be good? For me, for my husband and oldest, for little guy, for gifts?

Cousins! {Wordless Wednesday}

 On Sunday, we spent the day at my dad's. Once a year, mt brother, sister, and I are able to all get together at the same time. Little Guy has been so excited to play with his cousins and had me show him pictures of them every day for a week leading up to the party. Now, he hasn't seen my nephew (5 months younger than Little Guy) since last Christmas, so I was a little worried that they might not really know what to do with each other. I was wrong!
With no car, my dad had to pick us up early. My guys watched a movie while waiting for everyone else to arrive.

Two minutes after his cousin got there! You just HAVE to jump on a bed like this.

I can't believe he actually sat long enough to play a game of Go Fish with my niece!
And check this one out! Awww...

LEGO!

My niece added to the party atmosphere with a little music - and Little Guy "helped"
But he's a much better dancer than he is a keyboard player!

100% Satisfied!

Tuesday, December 20, 2011

Orange Spice Potpourri {Last-Minute Homemade Gift}

 I got the original idea from a post on Keeper of the Home. You should really check out this blog - she recently posted about different home remedies for winter ailments. I get tons of great ideas from her!

I cannot believe how great this stuff ended up smelling. I just added a few ingredients to it. It is so easy to make - Little Guy pretty much did it all himself! Just make sure that you have the whole family save their orange peels!

Orange Spice Potpourri

  • Cinnamon Sticks
  • Whole Allspice
  • Whole Cloves
  • Peels from Oranges
  • Bay Leaves
  • Pine cones or Wood shavings (from untreated wood!),
  • Orange or Citrus Essential Oil
Now, looking at the list of ingredients, I know what you're thinking: "Doesn't she have any idea how expensive those spices are???" Yes, I do. That's why I bought the dollar store out of them! As I mentioned in my Spiced Dough Ornaments post, if you're not eating it, it doesn't matter how good these things are. You want them for their scent only, so go the cheapest possible. You may even consider buying some of those Cinnamon-Scented Pine Cones to use - just pull them apart!

Next, I used Clementines. Little Guy can peel them by himself and the peels are very thin, they dry very quickly. I kept a bowl near the trash can and told everyone to put their peels into it. Little Guy's job, before bed, was to tear the peels into small pieces (about 1/2" X 1/2"). Then, we spread them onto a wax paper-lined cookie sheet and popped them into the oven. We have a pilot light that is on all of the time, so the little bit of heat generated by it helped dry the peels overnight. If you don't have a pilot light, try setting the sheet near a heating vent or anywhere that the air circulates.

You don't have to go collecting pine cones and wood shavings like we did. I just wanted to be able to bulk up my batch of potpourri so I could give out more and use less spices (they might have been bought at the dollar store, but the cost does add up, anyway!) We had a friend save his shavings for us. Since we had a lot of time before having to give the gifts, We mixed up a little food coloring into warm water and added the shavings. I let them sit for a couple of hours, then drained and spread onto a cookie sheet. I was worried about the orange scent being overpowered by the spices, so I shook a little bit of the essential oil onto the still wet shavings then put them into the oven to dry. They took about 24 hours, and I used my hand to turn them over a few times so they'd dry all over.It added a little extra color and extra scent to the mix.

Now, I didn't give any measurements because there really aren't any. I used about 8 cinnamon sticks. I had to get out a hammer and gently hit them so I could break them into 1/2" to 1" pieces. I used one jar of cloves (0.62 oz, I think), and the same amount of allspice. I think we had the peels from a dozen clementines (they shrink a ton when they dry!) and around 1 1/2 c. of wood shavings. I dumped it all into a bowl and Little Guy used a wooden spoon, then his hands, to mix it all together.

We wanted to have enough potpourri to give to ten people, so we put about 1/2 cup (eyeballed it) into a sandwich bag, then tied closed with a pretty ribbon. The potpourri smell good enough to just set in a bowl. When it stops being "smelly", just put a tablespoon or two into a mug filled about halfway with water and microwave for 45 to 60 seconds. Mmmm!

I linked this post at:
Classified: Mom

Pin It

Monday, December 19, 2011

Tuesday's Giveaway Linkup! {12/20}

Tuesday's Giveaway Linkup
Welcome to Tuesday's Giveaway Link Up with your hosts Aimee @ Classified: Mom & Karen @ Tots and Me & Alicia @ McCrenshaw's Newest Thoughts!

This link up will be posted Monday at 7 PM est. and run all week long! Make sure you stop in as often as you can to list your latest giveaways.

Here is how to use the Giveaway Link Up

1. Post your reviews and/or giveaways, as many as you have, be sure to add the end date (family friendly please)

2. Help spread the word about the giveaway link up by grabbing our button, Tweeting or posting on Facebook. (Not mandatory- but it helps get more exposure to your giveaways as well!)

3. Take a moment to enter any giveaway that strikes an interest to you!

If you would  like to follow the three hostesses, we will gladly follow you back! Simply leave us a message to do so.


Thank you for linking up with  Aimee @ Classified: Mom & Karen @ Tots and Me & Alicia @  McCrenshaw's Newest Thoughts! 


Saturday, December 17, 2011

Shhh! LOOK Who was Checking Out Our Tree! {Quick Giveaway - Ends 12/21 Open WW}

Last year, I was lucky enough to have won a custom iCaughtSanta.com photo. What is this? It is a very cool way to surprise your kids with a photo of Santa in their very own home. I simply took a photo of out living room (I choose where Little Guy stashes his toys since that's a very familiar area to him) and then uploaded it to the site. Once it was uploaded, I was able to choose from a ton of different Santa poses to find the right one for my photo. What I really love about this is that you can change the size of Santa, you can change the hue of his clothes and lighting to match your photo. It really looks as if he's there:

In my last post, I told you how Santa replied to Little Guy's letter with a wonderful box of goodies. We hung the "hangable" stuff on our "Tree Wall" and it looks great:
When I learned that I'd have the opportunity to review iCaughtSanta.com this year, I was so excited! I uploaded the above photo and added the PERFECT Santa pose:
Santa in OUR LIVING ROOM, checking out Little Guy's Santa's Nice List Certificate!
Once I finished creating the photo, I was able to print it out, share it on my social networks, and even email it to friends and family. I also downloaded my photo so I always have it (just like I did with last year's.) Wouldn't it be cool to have a photo every year to add to our collection? I'm imagining eventually making a garland with each photo on it to hang along with out other decorations!

So, on Christmas Eve, I'll have Little Guy help me set up our digital camera to see if we can try to get a picture of Santa when he stops by!

Would You Like A Chance To Win One?
iCaughtSanta.com has offered to give away FIVE CODES to my readers! You can make your very own Santa photo. They also have other characters to chose from, such as the Easter bunny and the tooth fairy that you could use it on. AND, if we can get 30 different entrants, they're going to double the giveaway and I'll have TEN WINNERS! So, take a minute and enter in the Rafflecopter form, below! This giveaway is a quickie so the winners will have time to make their photos. And, if you don't win, you can still use the code: SAVE25 to receive 25% off your order! Just think of the wide-eyed look on the kids' faces when they wake up Christmas morning to see a photo of SANTA in their own living room!  

Santa ALWAYS Sends Candy Canes

I know that, in the social networking circles I travel in, Santa is pretty controversial. Some parents don't do Santa because they don't want to lie to their kids, be found out later, and have their children feel betrayed by the lie. Others prefer to keep Santa out of a religious holiday. And some parents just want to focus on the family time and spirit of giving - Santa is really all about receiving when you think of it. Although I can see all the points of these parents, and agree with some of them to some degree, we do Santa.

My biggest concern of all of the above reasons for eliminating him from the holiday season is the first - I do not lie to my children. That is, I don't lie to them, with this one exception! Santa is magical, he's a giving person who wants to spread joy. Why wouldn't I want my children to feel that magic once a year? "But what about when they find out it was all a lie?", you ask? Here's how it worked for me, and how I went about this with my oldest: When I started doubting the whole Santa thing, my dad took me aside and explained that he was really Jolly Old St. Nick. A slight shock, but I was OK. Then, he enlisted my help. Now that I was grown up enough to know the secret that little kids didn't know, I was an elf (when I had kids of my own, I got to climb the ladder to "Santa" status.) So, from then on, I got to join in on helping my brother and sister write letters to Santa, I got to help choose the gifts for them from Santa, I got to stay up late and help my dad arrange the gifts under the tree on Christmas Eve. My oldest loves having these special privileges, too.

So, do you remember the photo I posted a couple of days ago, asking if you could figure out why Little Guy was so amazed and my teen was giving me an actual smile... for the camera?

Here's the wonderful Holiday story:
Little Guy and I wrote a letter to Santa as our Dec. 1st activity from our Christmas Countdown/Advent calendar. He dictated a short letter to me, then we cut out pictures of toys he liked from the Black Friday ads we'd been saving. Being three, he wanted everything. So, we spent a good hour cutting things out. Then, we weeded it down to 1 page's worth of toy pictures and we glued them all onto the letter. As I folded up his letter, he said, "No, Mama! Don't close it all up! I need to make a picture!!!" Whenever we send his grandmas anything, we always include a freshly-drawn picture, so why not one for Santa, too? I traced his hand with a marker, then he colored it in and added a couple of stickers. I added it to the envelope, sealed it up... and didn't know what to write for the addressee.

Google was no help. I man, there were nearly 2 million hits for "Santa's address", but I was hoping to find one where we might be able to get some kind of response - even a form letter. I went from site to site for nearly an hour and finally gave up. I did the next thing I always do when I need to find something online and just can't:
How COOL is this???
Now, Bernie is one of my friends that my husband calls my "Imaginary Friends Inside the Computer". I've never met her. I've never even spoken with her on the phone. We know each other via comments on each other's blogs. (If you've never read One Mixed Bag, you have to go check it out. Bernie usually posts every morning before I even roll out of bed. Her posts are the very first thing I read in the morning while I gulp down sip my first cup of coffee.) ANYWAY, later that afternoon, Little Guy and I headed for the big blue mailbox near the grocery store with an envelope addressed to Santa... at his vacation home in Montana.

Before she even received the letter, Bernie asked if she could include a small gift for him and what might be appropriate. I suggested some stickers or, if she meant a package, she could probably find a die cast car for a buck. Then, STILL before she got the letter, she (or maybe her husband, Roy) came up with the idea to send him a stamp with his name on it. He LOVES stamps! And, what about one for my oldest, too? Um... OK! THEN, she emailed and asked if the kids could have candy canes. She said that Roy insisted that Santa always sends candy canes, but she wanted to make sure I was cool with the candy part. Well, Santa and candy canes go together like milk and cookies, right? Of course he sends candy canes!

 This is what arrived from Santa on Wednesday! Now, the mail gets delivered early here, so it had to sit here ALL DAY, waiting for my oldest to get home from school before we could open it. I really, really, really wanted to see what was inside. Try as I might, I just couldn't figure out how I might just peel back a corner to have a peek inside!


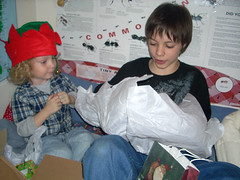
Finally, my oldest got home! Little Guy was just bursting the second he heard the front door open, "Brubber! Hurry up! We got a box from SANTA!!! Hurry!" Then, the poor kid had to wait for Mommy to take a picture.


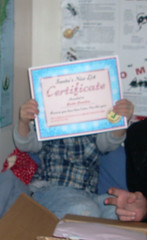
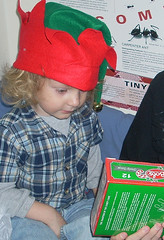
The very first thing in the box was a "Santa's Nice List Certificate" with Little Guy's name on it. He was so happy to know that he was on that list! He'd been watching the Dora the Explorer Christmas special where Swiper gets put on Santa's naughty list and has been wondering about himself. (He's not been easy to live with lately!) I haven't used the old, "Santa's elves are watching you!" threat, but I sure have been tempted!
 Next, he was just thrilled to pull out Artie the Elf's very own, real live ELF HAT! My oldest told him to make a face like one of Santa's elves for the picture and this is his interpretation:

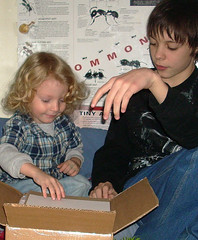
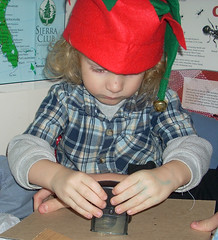
Then, they got into the gifts! Little Guy had no idea what his stamp was until we told him to push it down onto the cardboard. I couldn't believe it - I had to change my batteries right after the photo on the right. I completely missed the surprised look on his face when he moved the stamp. He can recognize his first name in print, so he knew exactly what it said. I love that Bernie & Roy included his last name, too. It was good thinking because we don't really write it much and he really should learn to recognize that in writing, too! Now, aside from learning to recognize (and eventually write) his own name, this stamp is going to be very helpful when it comes time to put his name on his drawings and art projects. You see, Little Guy just HAS to do everything by himself. He gets so frustrated when I write his name on the back of a drawing or project before we mail it off to a grandparent. Having his own stamp to put his name on all by himself is a great way to give him that independence he wants.


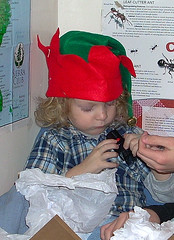
Although I missed the photo after he realized that the little box he was holding was a stamp, I did manage to catch the face he made in the photo on the left. I couldn't help but laugh when he proclaimed with much authority, "Brubber! I know what that is! It's a stamp with YOUR name on it!!!"

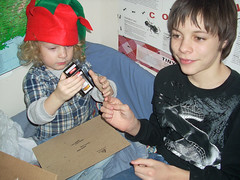
Now, on the right, you'll see a very genuine teenager smile! That smile is hard to find on an apathetic-acting teen's face - even harder to catch on film (or a digital memory card... whatever they call it nowadays.) He absolutely loves his stamp. It's not just his name, though! Nope - it's his signature with his name printed below it. He loves drawing - he's constantly working on creating his own brand of Yugioh-like cards, a manga comic book, or just doodling. He signs his work, then has to go back and print his name. He's proud of his work and wants people to know it was his work - his siggy is just a bunch of squiggles. So, Bernie and Roy created a signature stamp for him, with his full name printed below it. (You should have witnessed the weird looks he gave me for a couple of days after I asked him to show me his signature. I think he was under the impression that I was going to forge his name for who knows what reasons! LOL)
Bernie & Roy even thought to add an extra bottle of ink for the boys!
And, here are those candy canes. Little Guy is enamored with candy - especially candy canes. He hasn't had much candy until recently, and he sure has a sweet tooth! See the look on his face over there? That's one of complete and total awe. I took the picture right after my oldest explained that there were TWELVE candy canes in there and, if everyone in the family split them up, we'd each gt four whole candy canes. Now, being three years old, three is a big number to him. Whenever he is asked how many of something he'd like, he answers three. He knows that four is a larger number than three, so to learn that four of those candy canes were all his was nearly too much for him!


And check this out:
A real, framed AND autographed photo of Santa!!! I could have knocked him down with a feather when he saw this. Every morning, now, he wakes up and goes to his Santa picture and says hello. I'm wondering if Santa's picture will be spending his off-time in a box with all of our other Christmas decorations, or hanging on our living room wall year-round. (Actually, I think I know the answer. I'll be seeing Santa in July!)

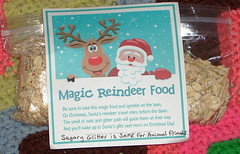
I think that Santa is expecting his reindeer to need a little pick-me-up by the time they fly to our house, He sent along some Magic Reindeer Food for us to sprinkle on our lawn on Christmas Eve! If you don't get any in the mail from Santa, you can make your own from some oatmeal and sparkly colored sugar.
What a great letter - I love how all of the crafting we've been doing is mentioned!
Oh, and, although we had to show Little Guy how to use the stamp at first, he figured out how it worked pretty quickly! At least I know that, if he gets lost in a store, they'll at least know his name so they can call me over the P.A. system. (Bernie, it takes a little more than a baby wipe to get this stuff off if you wait a while to clean it off. The back of his hand still has his name all over it! LOL) But just look at how much fun he is having! The ink will wash off (eventually), but I know he'll remember having a fun time for quite a while.


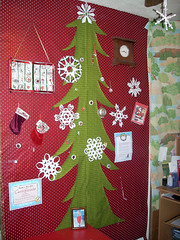
We added Little Guy's certificate and letter to our "Tree Wall" and his Santa photo is sitting right on his little red table. (Psst... check out my next post later on today to see what we did with this photo... There's a giveaway involved!)
 I really want to thank Bernie and Roy 
for helping to make Little Guy's first 
"real" Christmas all the more magical. 
Never, in my wildest dreams, would I have imagined
such a wonderful reply from Santa. 

We'd all like to send you our gratitude and wishes for a very wonderful holiday and very happy new year to both of you!


*I like to think that I'm pretty creative when it comes to cool things for kids. But I'd NEVER have thought of a simple personalized stamp as being one of them. I'm doubly amazed that both my 3 y.o. and my 13 y.o. are equally thrilled to have their very own stamps. If you're thinking that a stamp like the ones that Bernie & Roy sent my kids, check out their online store: Rubber Stamp Shop. Hey - there's even have a secret section on the site with jokes! Ok, it's not secret, but it did take me a while to come across it.

Thursday, December 15, 2011

Great Prizes and An Awesome Discount When You Like Melissa and Doug on Facebook

Melissa and Doug are very close to having 100,000 Facebook fans. For a while now, they've been giving away a Trunki to one fan every time they gain 1,000 new fans. When they reach 100,000 fans, they'll be giving away some VERY awesome prizes. They also promise a "Special Offer" to all of their Facebook fans when they reach their goal. I don't know what this offer will be, but this is a pretty generous company, so I can only imagine that it will be great! So, if you don't already "like" them on Facebook, head on over and do it now to get in on the fun!

*I'm not getting anything for this post. I just thought that you might be interested in learning about this offer!

In Up to My Eyeballs in Melted Chocolate and Candle Wax...

I had planned on writing two posts tonight before going to bed. Not gonna happen!

Since we don't have a car, it can be kind of hard to get things done in the winter time. Well, Michigan has some of the most contrary weather I've ever witnessed. Tomorrow (Thursday) is going to be 51 degrees and partly sunny. This will be the perfect opportunity for us to walk to the post office and get our three packages of gifts mailed out. Oh, and I have got to buy stamps for our cards! I MUST remember to buy the darn stamps! Our cards have been done for a week - the first time that I've ever gotten them done when I planned - and they're just sitting here... waiting for a 3 year old with a marker to get a hold of them!

Now, I had planned to mail out our packages next Monday, but I just can't let a beautiful day in the middle of December go by without taking full advantage! Little Guy needs to get out and run (his snow pants make him waddle - it's cute, but not that great for getting around quickly), I need to go to the grocery store, I have a few more items to pick up at the thrift store for projects that I am giving on Sunday, AND I just found out that I can get free range eggs at the health food store - so I have got to stop there, too. Anyway, the date change means that I need to have all of the gifts I plan on mailing made, wrapped, packed, and addressed... TONIGHT!

I planned on making one food item per night this week. Each afternoon all week, I was to work on the homemade gifts I plan to give. They're not terribly complicated, but they do take time. Well, since those gifts and food items are all supposed to go into the packages I want to mail out, I need to get it all done tonight. I know I won't... it's too much stress and these things need to be done right. I don't want to be giving crappy gifts just because I went too fast. I also don't want to hate making this stuff. I live for the holidays. I love making things to give. Regardless, I still want to try to get as much done as possible.

Please check back tomorrow evening, though. I have a wonderful story to tell you! Plus, I have a quick giveaway to post.
Here's a preview of the story I want to tell you. 
Can you guess what's got Little Guy so excited and 
allowed me to get a photo of my teen with a genuine smile on his face?

Wednesday, December 14, 2011

Old Pics! {Wordless Wednesday}

I have a couple of old Christmas pics that I'd love to share. These were probably taken in 1978 or 1979???  I'll never forget that Holly Hobby dress - it was one of my favorites! I had long hair up until a month or so before - when I found my mom's scissors. I was one of those super-curious kids and was into everything all of the time. Just like Little Guy. Karma in its most perfect form, in my parents' opinions!
We spent countless hours playing with my brother's Fisher Price garage. I don't remember playing with the Easy Bake Oven too much. Must have been one of those things that my parents saw the danger in about 30 seconds after setting me loose on it!
See my upper lip? That's the result of me waking up at my aunt's house at 3am and deciding to SHAVE, just like my uncle. At the time this photo was taken, I think it had a month or more to heal. I'm surprised that all I ended up with was a teeny-tiny scar that you can only see in just the right light.

Monday, December 12, 2011

Tuesday's Giveaway Linky 12/13

Tuesday's Giveaway Linkup
Welcome to Tuesday's Giveaway Link Up with your hosts Aimee @ Classified: Mom & Karen @ Tots and Me & Alicia @ McCrenshaw's Newest Thoughts!

This link up will be posted Monday at 7 PM est. and run all week long! Make sure you stop in as often as you can to list your latest giveaways.

Here is how to use the Giveaway Link Up

1. Post your reviews and/or giveaways, as many as you have, be sure to add the end date (family friendly please)

2. Help spread the word about the giveaway link up by grabbing our button, Tweeting or posting on Facebook. (Not mandatory- but it helps get more exposure to your giveaways as well!)

3. Take a moment to enter any giveaway that strikes an interest to you!

If you would  like to follow the three hostesses, we will gladly follow you back! Simply leave us a message to do so.


Thank you for linking up with  Aimee @ Classified: Mom & Karen @ Tots and Me & Alicia @  McCrenshaw's Newest Thoughts! 


Transform Your Bread Dough into Something Gooey! {Recipe... Kinda}

Yesterday, I made beef stew in the crock pot. Once the smell of the stew drifted into the front room and into my nostrils, I started daydreaming about eating it. In this daydream, I wasn't just eating that stew. It was accompanied by some very gooey cheesy bread and followed up with even gooier apple cinnamon bread. So, I tried to figure out how to move this vision from my mind to my plate. I could have made a pizza dough for the cheesy bread and a sweet dough for the cinnamon apple bread, but that means LOTS of measuring and even more dishes. So, I decided to make one of my rather bland bread recipes, split it in half, and sweeten up one part and add salt and herbs to the other.

Here's the base dough recipe that I used:
  • 3 Tb. Warm water
  • 2 1/4 Tb. Yeast (one packet)
  • 1 c. Milk
  • 5 Tb. Unsalted butter (cut into small pieces)
  • 3 Tb. Sugar
  • 1 tsp. Kosher salt (if you don't have it, use just 1/2 tsp. table salt)
  • 1 Lg. egg
  • 2 c. + 1 1/2 c. All-purpose flour
  1. Measure warm water (105 degrees F) into your mixing bowl. Sprinkle yeast onto the water and set aside.
  2. Mix milk, butter, sugar, and salt in a small saucepan. Heat on medium low, stirring, just until butter has nearly melted. Let cool to warm (105 degrees F.) I have a kitchen thermometer that I just pop into the pan. Every couple of minutes, I'll stir the milk to help it cool and then check the temperature. It's not necessary, though. Just poke your finger into the milk once in a while. It should just barely feel warm. Do not try to rush this - yeast dies at high temperatures. In fact, it's better if you use it too cool than too hot. If it's cold, it'll just take a little longer for the dough to rise - no harm done!
  3. Once it's cooled, lightly beat the egg into the milk mixture.
  4. Add the milk to the yeast and mix.
  5. Add the first 2 c. of lour to the yeast/milk mixture and stir well. Slowly, about 1/2 c. at a time, add the remaining 1 1/2 c. flour, stirring after every addition.
  6. When the dough comes together, don't mess up your counter! I knead the dough right in the mixing bowl for about 5 minutes. You can stop kneading it when it no longer sticks to everything and is stretchy.
  7. Oil a second bowl with vegetable oil (about 1 - 2 Tbsp.), you can use just about any oil, just remember that the flavor may transfer to the bread! Place dough into bowl and flip it around until it's coated in oil. Put a piece of wax paper or plastic wrap over the bowl, then cover with a kitchen towel.
  8. Find a warm place and set the bowl there. Let the dough rise until double, about 1 - 1 1/2 hours. *You can also put the dough into the fridge overnight. It'll still rise, it'll just take much longer. You'll need to pull it out of the refrigerator about 1/2 hour or so before making the breads.
*I find that the oven is a good, safe place to let my dough rise. If it's particularly cold in the kitchen, I'll turn the oven to 200 degrees F for a few minutes, then open the door to let it cool down some before putting the dough in to rise.

From here to the end of this post, I don't have any real measurements. I just guessed. I know that I should have added a little more salt to the cheesy bread and apples to the apple cinnamon bread.

Gooey Cheesy Bread
Split risen dough in half. Set one half of the dough onto a lightly floured surface. Sprinkle about 1 tsp. oregano, 1 1/2 tsp. basil, 1/2 tsp. Kosher salt, 1/2 tsp. rosemary, and 1/4 to 1/2 tsp. powdered garlic on the dough. Fold the dough over the herbs and start kneading. Knead for about 5 minutes, until all of the ingredients are mixed in pretty evenly.

Roll dough to about 1/2" thick. I actually just rolled it to roughly the size of my baking sheet! Place the rolled dough onto a lightly greased baking sheet (I admit it: I use Pam.) You can also skip greasing the sheet by sprinkling some corn meal onto the baking sheet. Put the dough somewhere warm for about 45 minutes to rise.

Heat the oven to 375 degrees. As the oven's heating, sprinkle cheese and any toppings you'd like over the dough. For this one, I used sharp cheddar, a little more garlic powder, and some cut-up pieces of salami that I found in the refrigerator drawer. Then, I cut a few chunks of mozzarella cheese and distributed them all over. Drizzle the whole thing lightly with olive oil or a little melted butter. Bake for about 15 minutes, checking after 10 minutes. You'll know it's done when the top is all bubbly and gooey-looking! Let cool for about 10 minutes before attempting to cut or the cheese will just melt back together. This is really good dipped in beef stew, ranch dressing, and leftover spaghetti sauce!

Cinnamon Apple Bread
As with the cheesy bread, place the dough on a lightly floured surface. Sprinkle the dough with 1 - 2 Tbsp. sugar and 1 tsp. cinnamon. Knead until the ingredients are distributed. Roll to about 1/2" thick and transfer to a greased baking sheet (you can use corn meal for this one, too, if you prefer.) Let rise for 45 minutes.

Brush the dough with melted butter. Peel and cut 2-3 apples, depending on the size, (tart ones like Granny Smith or Rome are best) into 1/8" thick slices. Distribute apples onto dough evenly. Sprinkle with 1 - 2 tsp. cinnamon and 1/2 tsp. ground cloves. You can add any other spices you like, such as nutmeg or allspice. Sprinkle about 1/2c. UN-packed brown sugar (light or dark) over the apples. Then, drizzle a little honey over that. Finally, melt 2 Tb. unsalted butter and drizzle that over the apples. Bake in  375 degree F oven for 15 - 20 minutes, until brown and bubbly.

While the bread is cooling, mix 2 Tb. melted butter, 1/2 c. powdered sugar, and 1 - 2 Tb. milk, half-and-half, or heavy cream in a small bowl. Drizzle over apples, then let cool for about 15 minutes before cutting.


Do you have any suggestions for toppings for these breads? 
It was so easy to do and my family loved them so much that I know I'll be doing it again... often. 
I'm thinking that a spinach/artichoke/Parmesan cheesy bread might be good. 
And I'm trying to figure out how I'd do a pumpkin version of the sweet bread.